How to Use WhatsApp Business Chatbot?
WhatsApp chatbot for SalesHiker is Automated tools along with manual send/receive message to WhatsApp contact from SalesHiker.
How to Setup a WhatsApp Chatbot?
To access WhatsApp Business bot click on Chatbot in the top navigation bar.

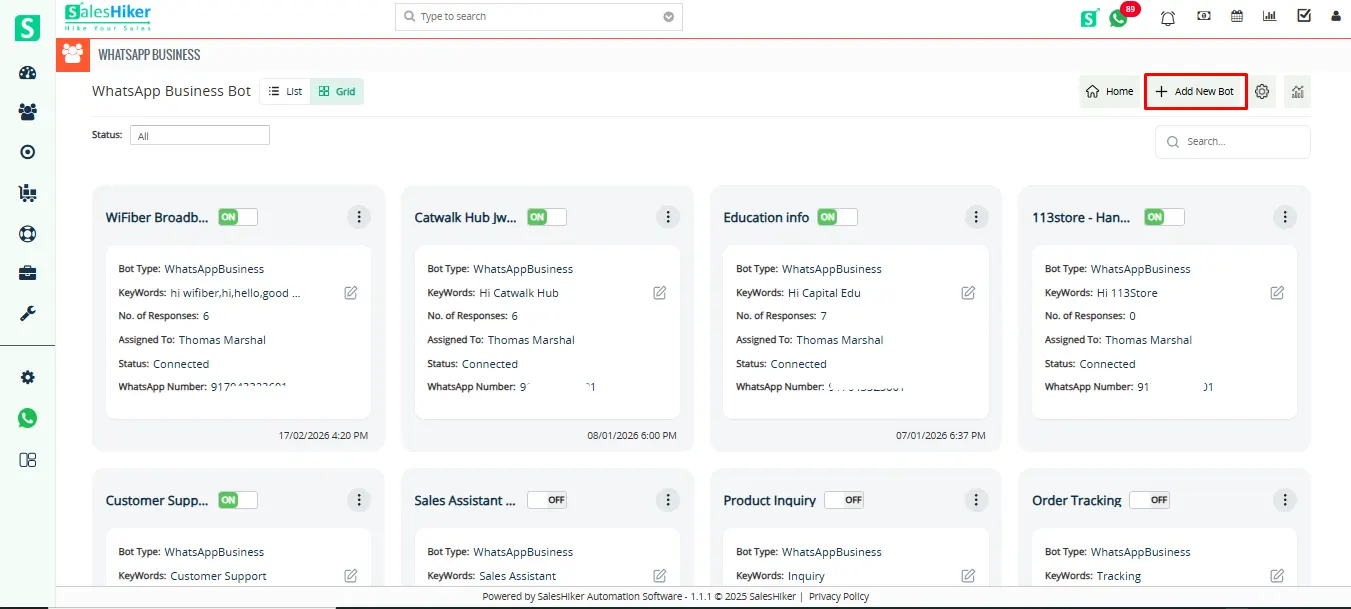
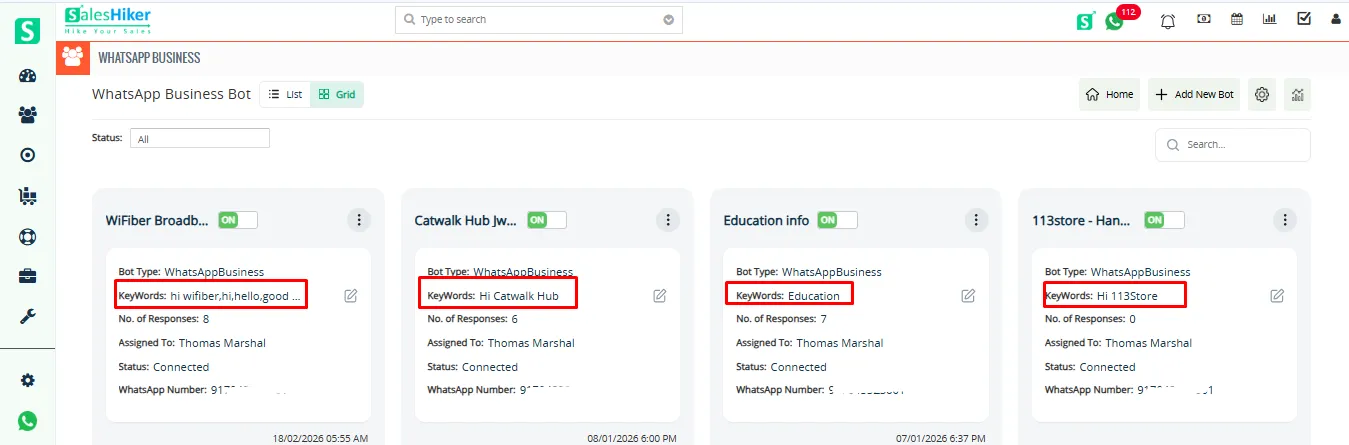
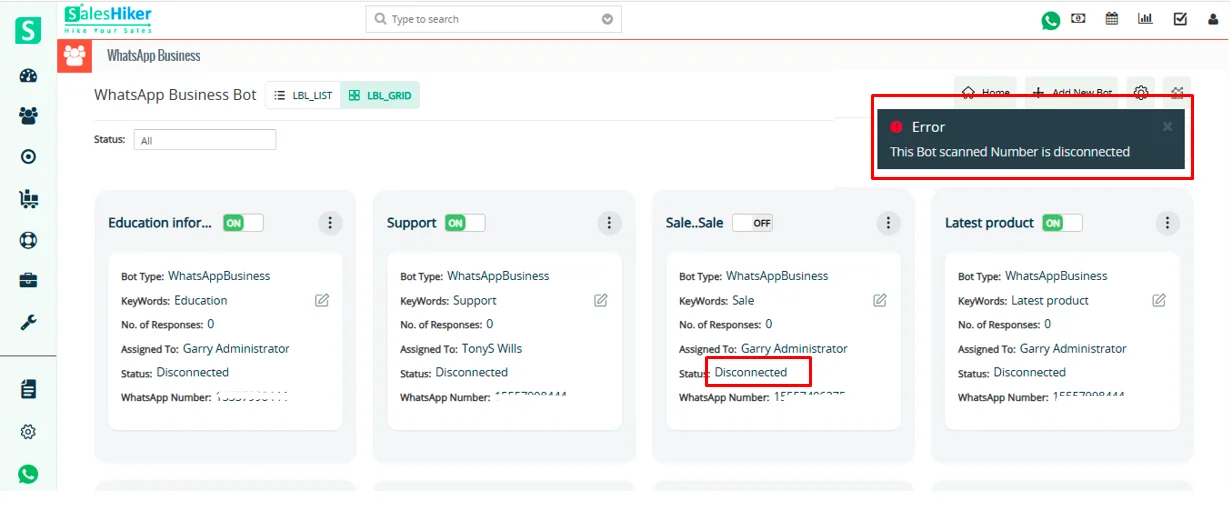
Clicking on Chatbot will open the screen below, which displays the list of configured WhatsApp Business Chatbots.

Creating a New Bot
To create a new bot, click on the Add New Bot button, As shown in the below Screenshot
Once the user clicks on Add New Bot, they will be redirected to the page shown below, where they can create a chatbot.
Users can create a bot by either:
Selecting a previously created bot template, or
Clicking on Create Bot from Scratch to configure a new chatbot from scratch.
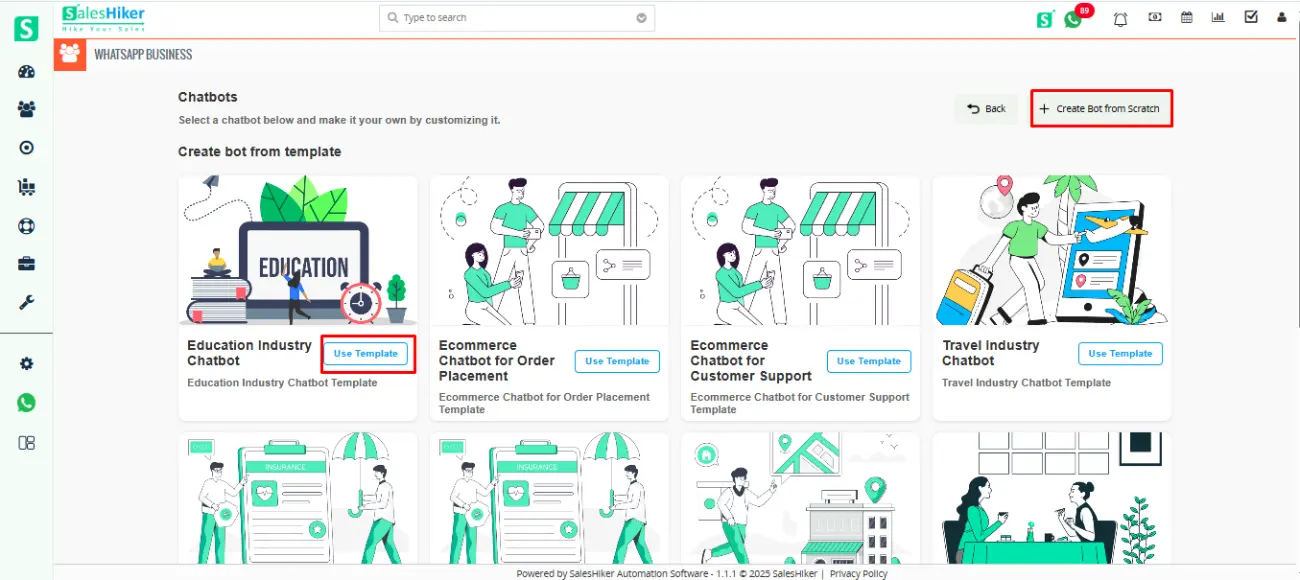
Select from Existing Bot Templates
A list of pre-designed bot templates will be displayed.
Browse through the available templates and select the one that best fits your requirements.
Once selected, proceed with customization and configuration as needed.
Create a Bot from Scratch
Click on the “Add New Bot” button.
Enter the required details, such as the bot name and purpose.
Configure the bot settings according to your business requirements.
After completing the setup, your bot will be created and ready for use.
Available Actions for Chatbot
Grid view
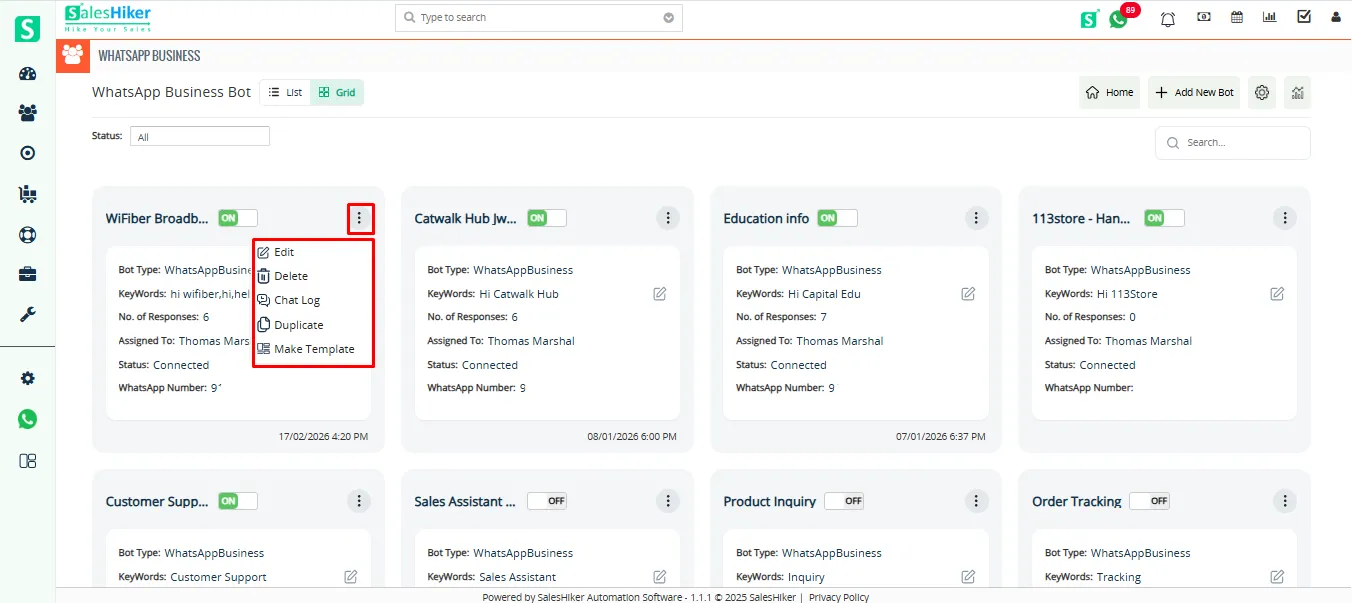
List view

Edit:
Allows you to modify the chatbot configuration, including message flow, triggers, keywords, responses, and other settings.Delete:
Permanently removes the selected WhatsApp Business chatbot from the system. This action cannot be undone.Chat Log:
Displays the conversation history handled by the selected chatbot, allowing you to review user interactions and bot responses.Duplicate:
Creates a copy of the selected chatbot, enabling you to reuse the existing flow and make modifications without affecting the original bot.Make Template:
Converts the configured chatbot into a reusable template, allowing you to use the same structure and flow when creating new chatbots.
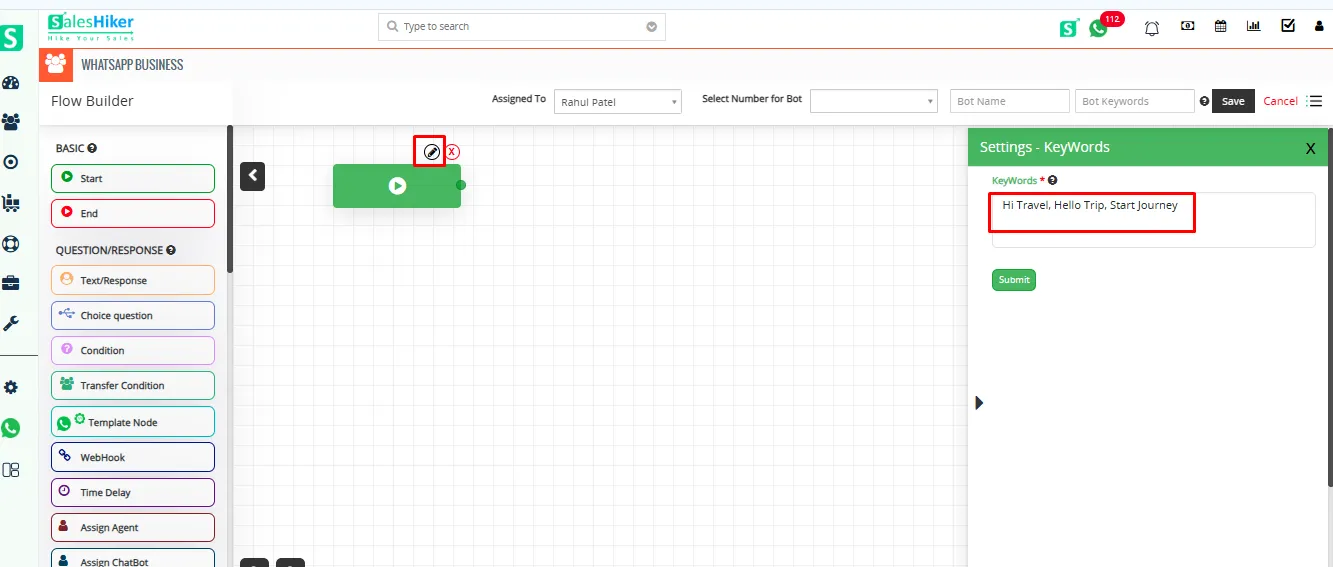
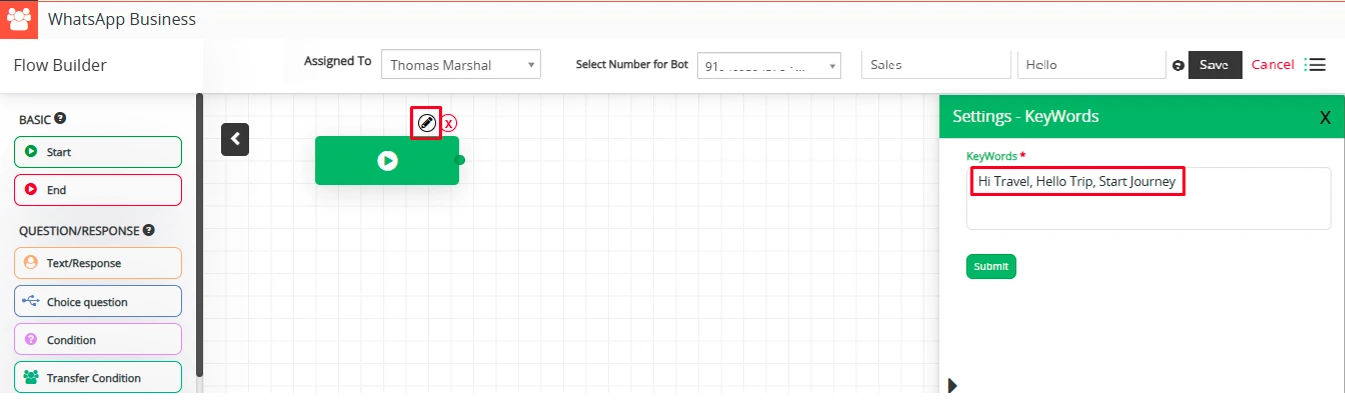
Keywords
To add keywords, the user must click on the Start Node Edit icon.
Keywords are used to initiate a bot automatically.
Users can run multiple bots simultaneously, each triggered by specific keywords.
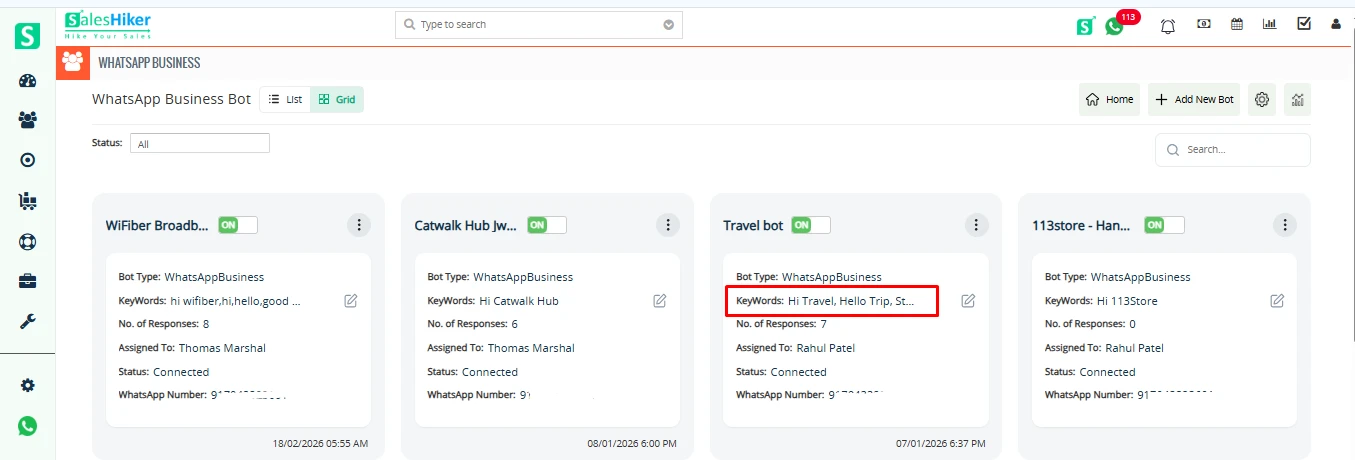
Multiple keywords can be added for a single bot by separating them with commas. for example: Hi Travel, Hello Trip, Start Journey
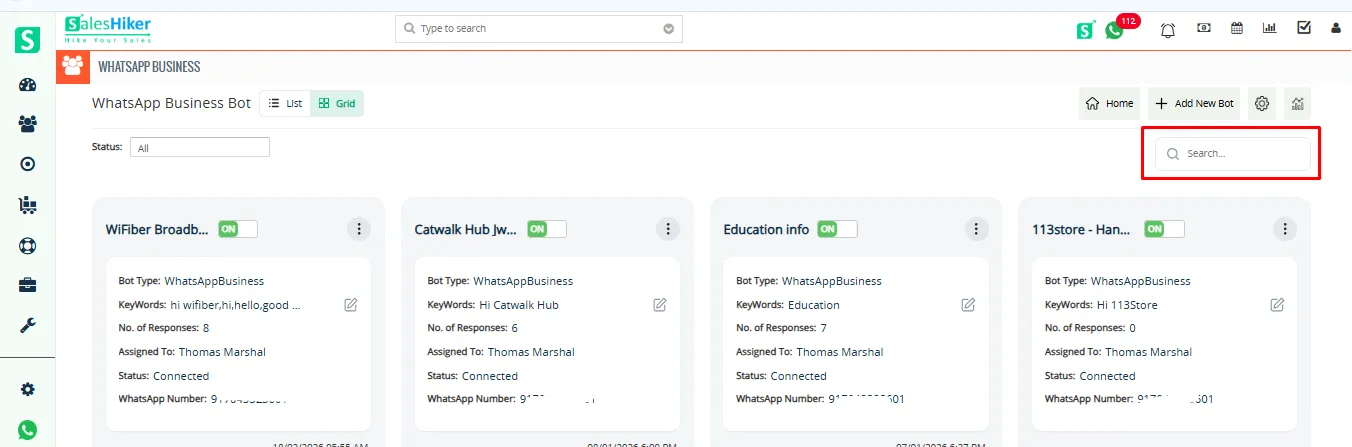
Search in WhatsApp Bot Listing
Users can easily locate a specific bot by entering relevant keywords in the search bar within the Bot List.

Search in Grid View
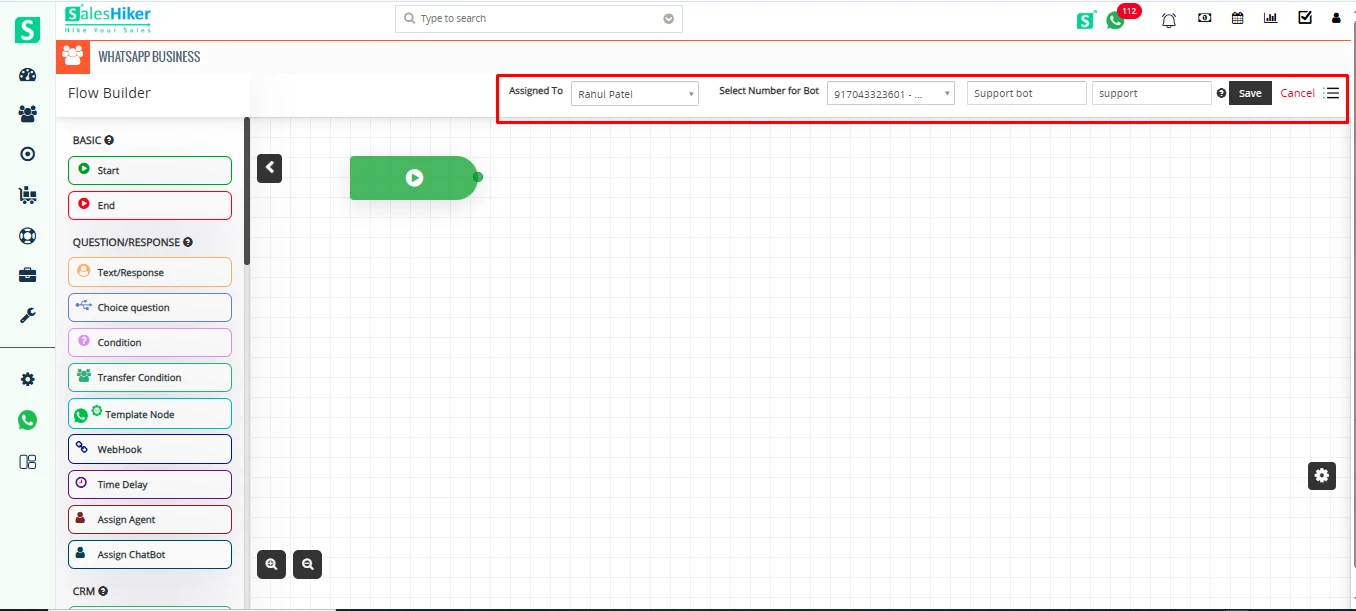
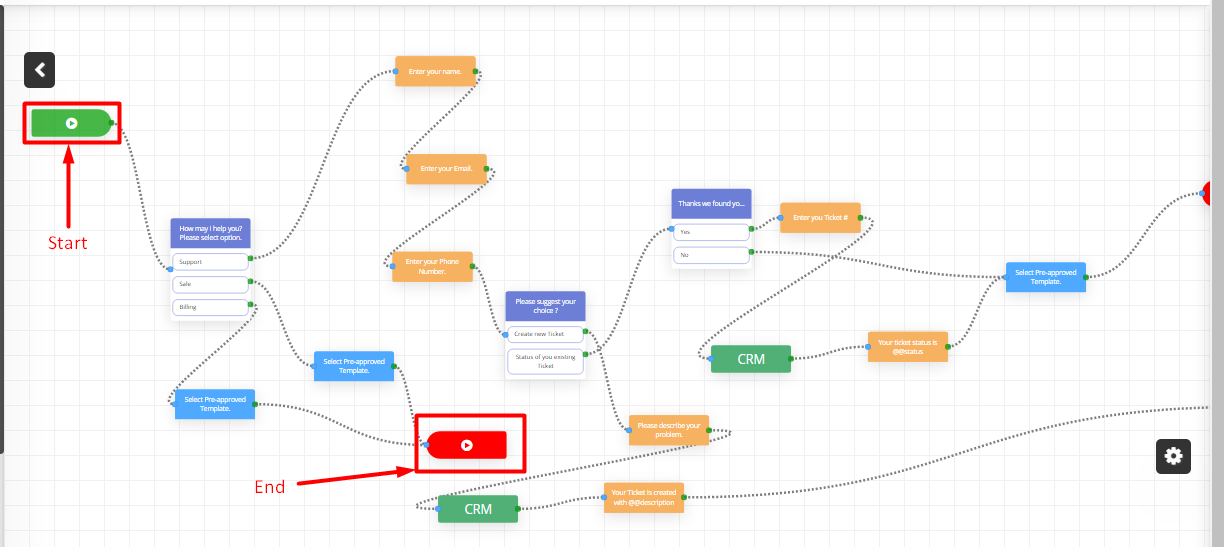
How to Build/Design Flow for WhatsApp Business Chatbot?
Users can set the flow according to the requirement for the Bot.

Assign Bot to User with Connected WhatsApp NumberThe “Assigned To” dropdown shows a list of users configured from the WhatsApp Business settings.
When a user is selected from the “Assigned To” dropdown, their connected WhatsApp number will appear in the “Select Number for Bot” dropdown.
Only users who have WhatsApp numbers configured in the WhatsApp Business settings will appear in the dropdown.
You can assign a bot to any user, even if you are logged in as another user.
This allows flexibility in assigning bots across users, as long as the target user and their number are already configured.
After selecting the user and their number, you can enter the bot name and click the “Save” button to complete the assignment.
Basic:
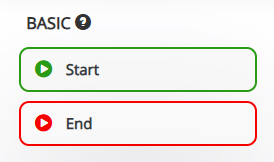
- Start: Use this node when you start designing the Bot flow.
- End: Use this node when you end designing the Bot flow.
Keyword: To add keywords, the user must click on the Start Node Edit icon.
Keywords are used to initiate a bot automatically.
Users can run multiple bots simultaneously, each triggered by specific keywords.
Multiple keywords can be added for a single bot by separating them with commas. for example: Hi Travel, Hello Trip, Start Journey
- When a customer sends the message “Hi Travel”, the Travel Bot will be initiated.
- When a customer sends “Hi Healthcare”, the Healthcare Bot will be triggered.
- This allows different bots to respond based on the message received, enabling topic-specific automation.
Question/Response:

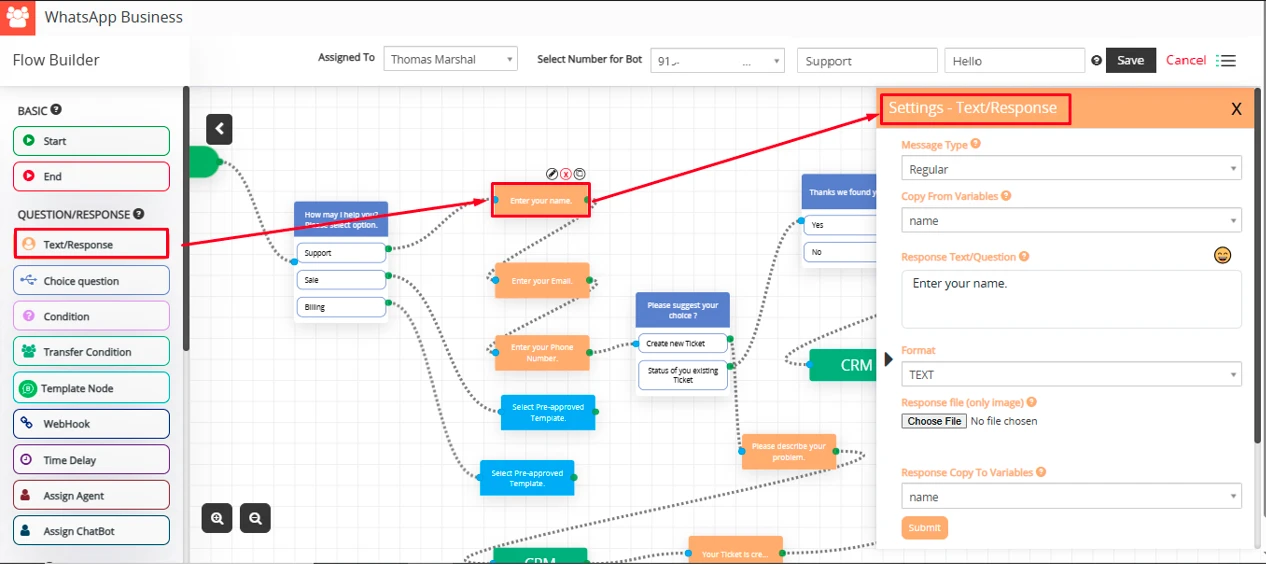
Text/Response:
With this feature, users can set various types of questions in flow to Ask customers.
Add Condition to check it against a response from a customer in Bot.
Question/Response Action Settings:
Message Type:
- Regular message – This is a regular message type format sent to customers from Bot.
- WhatsApp Business Response – This message type will display responses to customers in WhatsApp format.
- Copy from Variables: Select variable to add or copy to the message which converts to actual value when sent message to customer.
- Response Text/Question: Type a message as a response or ask a question to the customer.
- Format: Select any format like text, number, email and date for response.
- Response file: Send Image as response to the customer along with text.
- Response copy to variable: Copy customer answer of question from bot to variable which can be used to store in CRM or reply to customer on various stages of Bot flow.
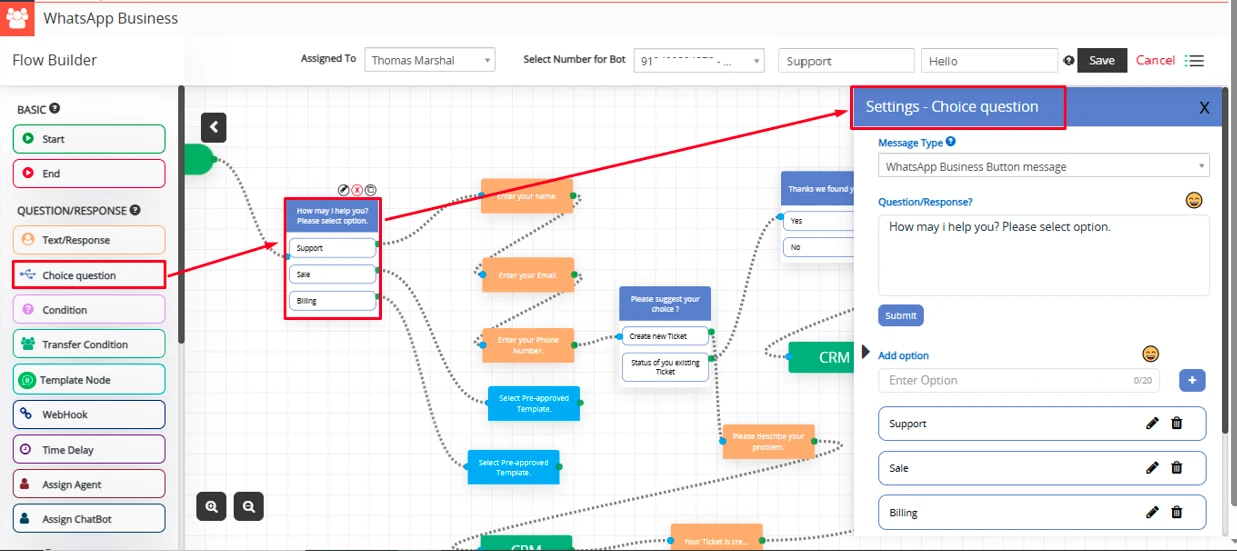
Choice Question
Choice question allows the user to choose from multiple predefined options during a conversation with the chatbot. This helps guide the user through different chatbot flows (e.g., Support, Sales, etc.), making the experience faster and more relevant.
Choice Question Settings:
Message Type
- Regular message – This message type will display responses to customers in WhatsApp Regular format.
- WhatsApp Business Button message – This message type adds interactive buttons (up to 3, with a text limit of 20 characters per button) to a message, offering pre-defined actions that make user interaction smoother.
- WhatsApp Business List Message: This message type presents a dropdown menu with up to 10 selectable options, organized under headers for better clarity. It’s perfect for scenarios where more than three options need to be displayed, allowing users to easily browse and select their choice from a clear and organized list. Simply tap the dropdown to view the options and make your selection.
Question/Response: Add a question for the flow according to your choice.
Add Option: Add an option for the question according to your choice.
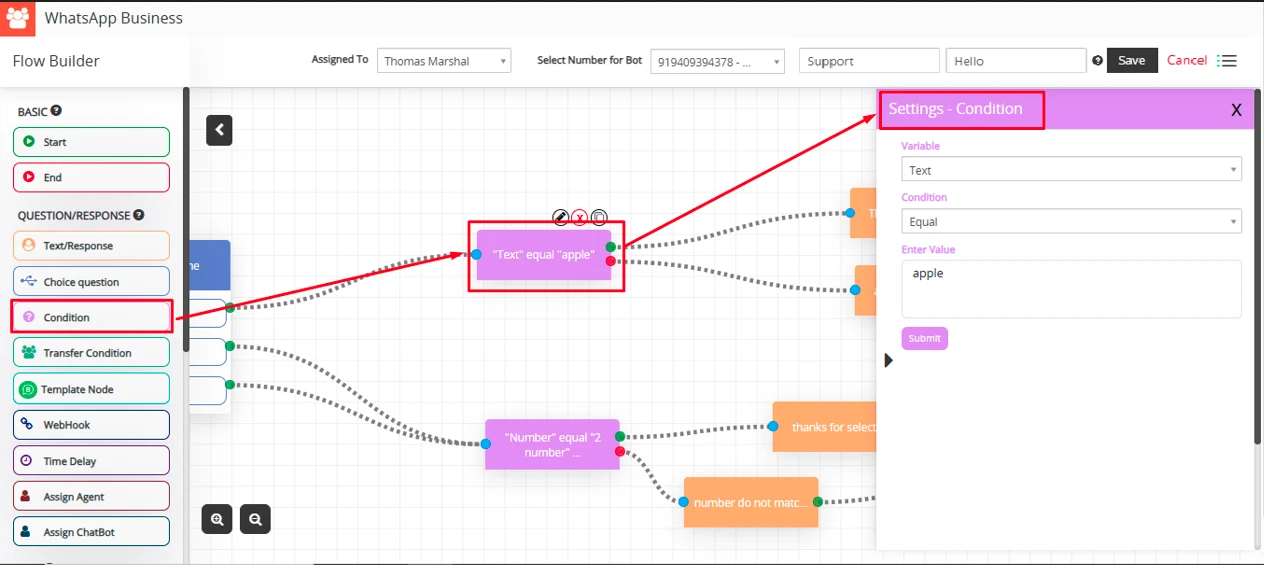
Condition
By selecting condition, User can add condition for the question if it’s true then it will fire the value which is set.
- Variable: Select a variable like number, email, date or description for the value.
- Condition: Select the condition for the question like a value equal to Apple etc.
- Enter Value: Value: Enter value according to variable type selected.
Users can also set conditions for both ‘AND’ and ‘OR’ in the chatbot, enabling more flexible logic to evaluate multiple conditions and trigger specific actions based on those criteria.
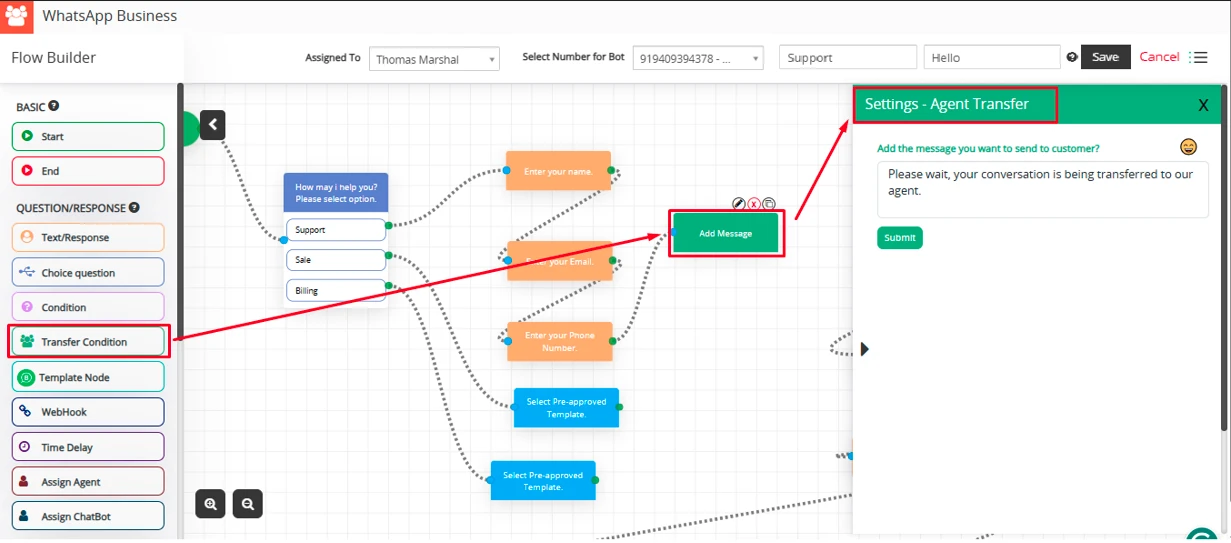
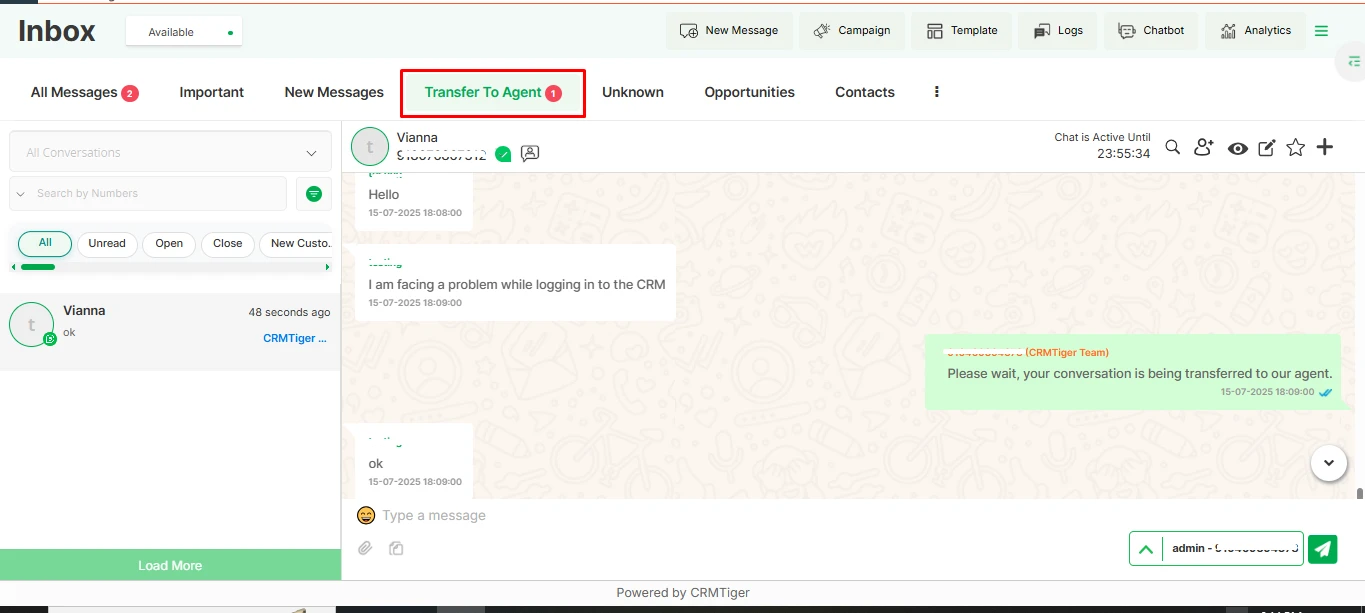
Transfer Condition
The Transfer Condition node is used in chatbot workflows to route conversations from the bot to a human agent based on certain conditions or intents.
Settings – Agent Transfer:
- Add the message you want to send to customer: You can enter the message that will be displayed to the customer while the bot transfers the conversation to a live agent. — For example: “Please wait, your conversation is being transferred to our agent.
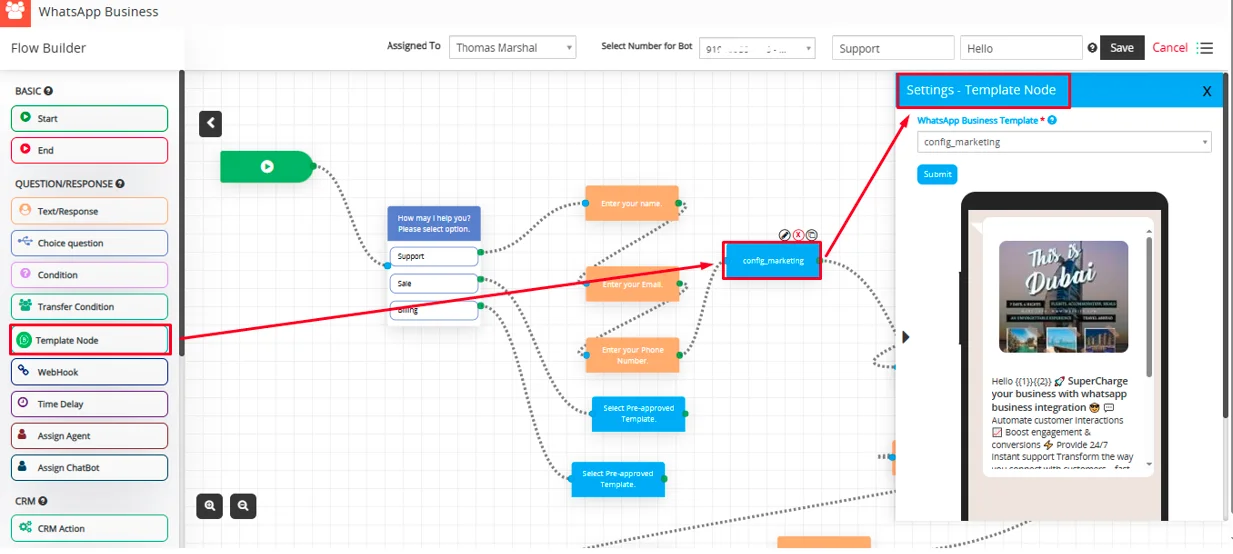
Template Node
The Template Node is used to send pre-approved WhatsApp Business Template Messages to users directly from the bot. These templates are typically used for notifications, reminders, confirmations, and other transactional messages
Select Pre-approved WhatsApp Business Template: You can select pre-approved WhatsApp Business Template from list.
Webhook
Connects the bot to an external system or API.
Sends data and fetches responses dynamically (e.g., from your CRM or backend).
Ideal for advanced workflows like checking order status or fetching user data.
Webhook URL:
This is the endpoint that your bot will call when this node is executed. It can be used to send or retrieve data from external systems.
How to use:
- Enter a valid URL such as https://yourdomain.com/api/webhook.
- Make sure the endpoint supports the selected API type (GET or POST)
- If you are using variables, you can set them below in the Set Variables section.
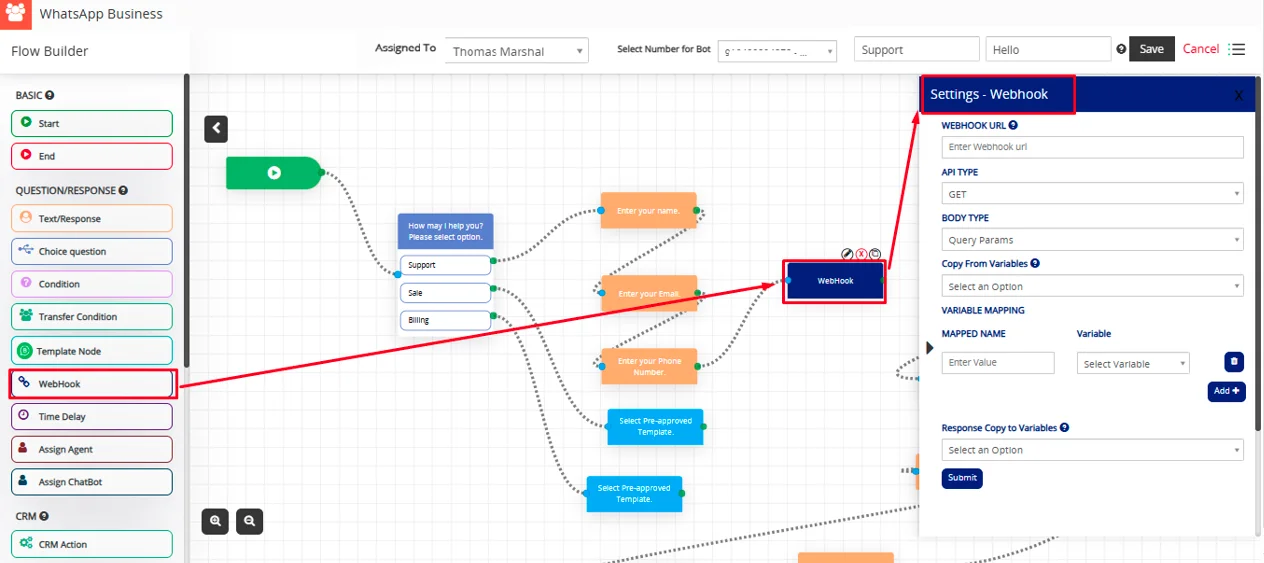
Note : Ensure your endpoint is accessible publicly or within the server’s network if it’s internal.
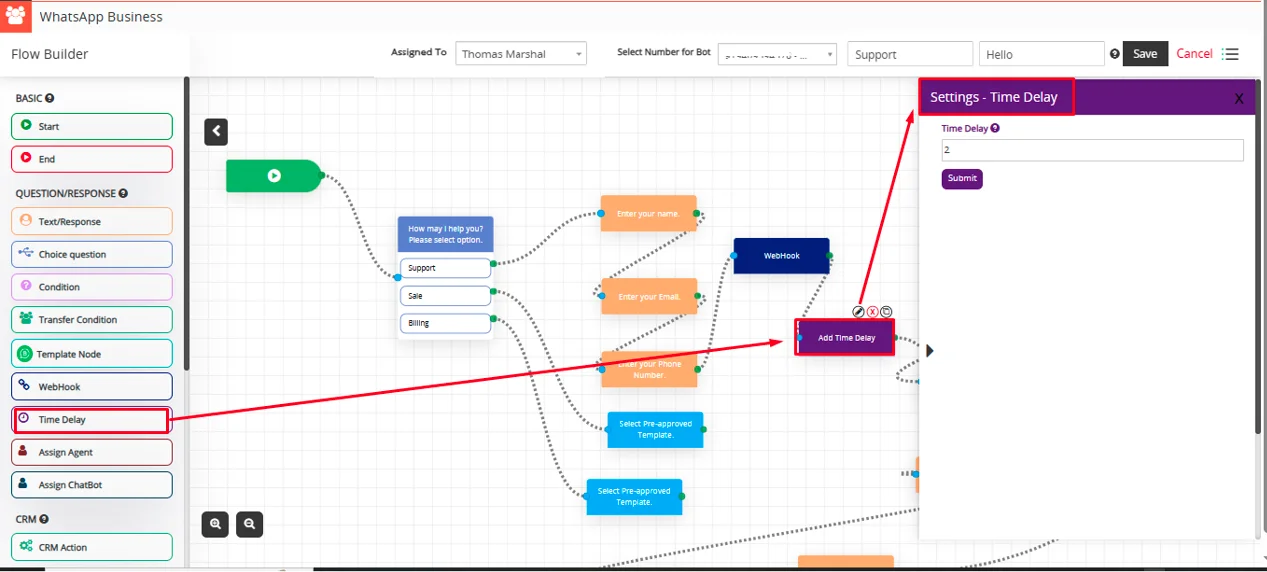
Time Delay
Adds a pause between messages.
Simulates human-like conversation or creates space between messages for better UX.
Example: Delay of 2 seconds before sending the next message.
Assign Agent
This feature allows the system to assign a specific agent to handle the conversation when the bot reaches this node.
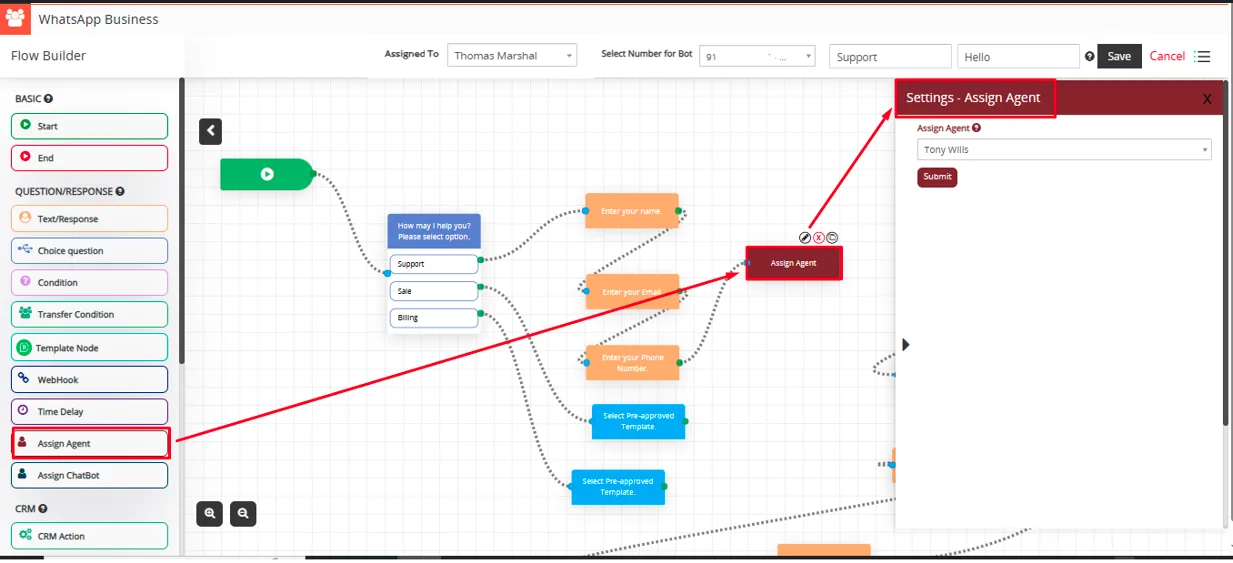
Note: Only agents assigned through your WhatsApp settings will be available for selection.
Assign Chatbot
Routes the conversation to another chatbot.
Useful for managing multiple bot flows across departments or topics.
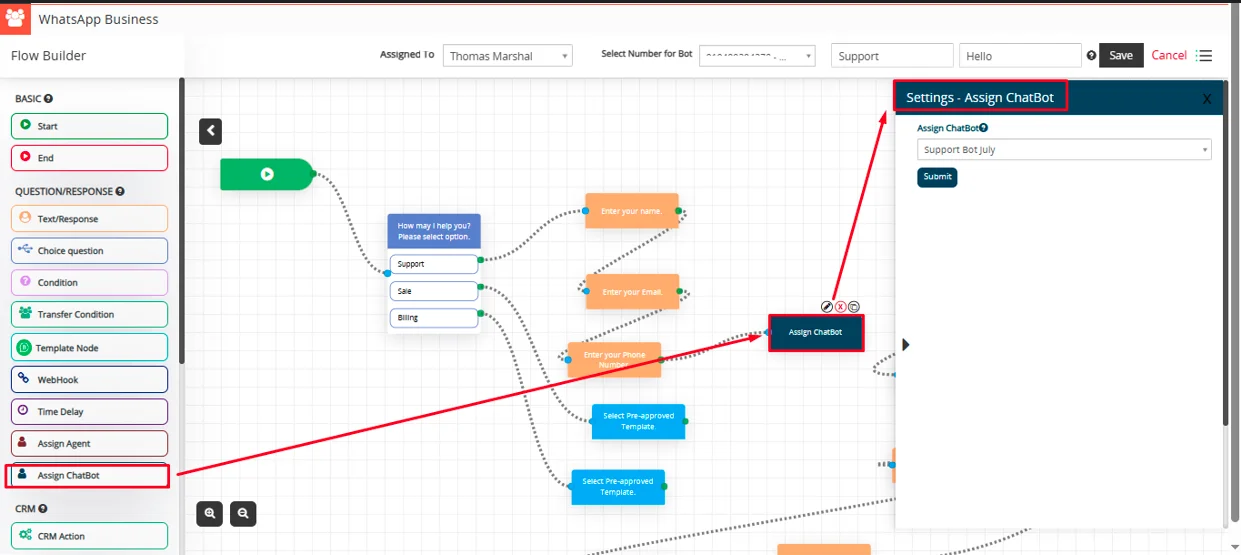
Note: Only active chatbots configured in the system will be available for selection.
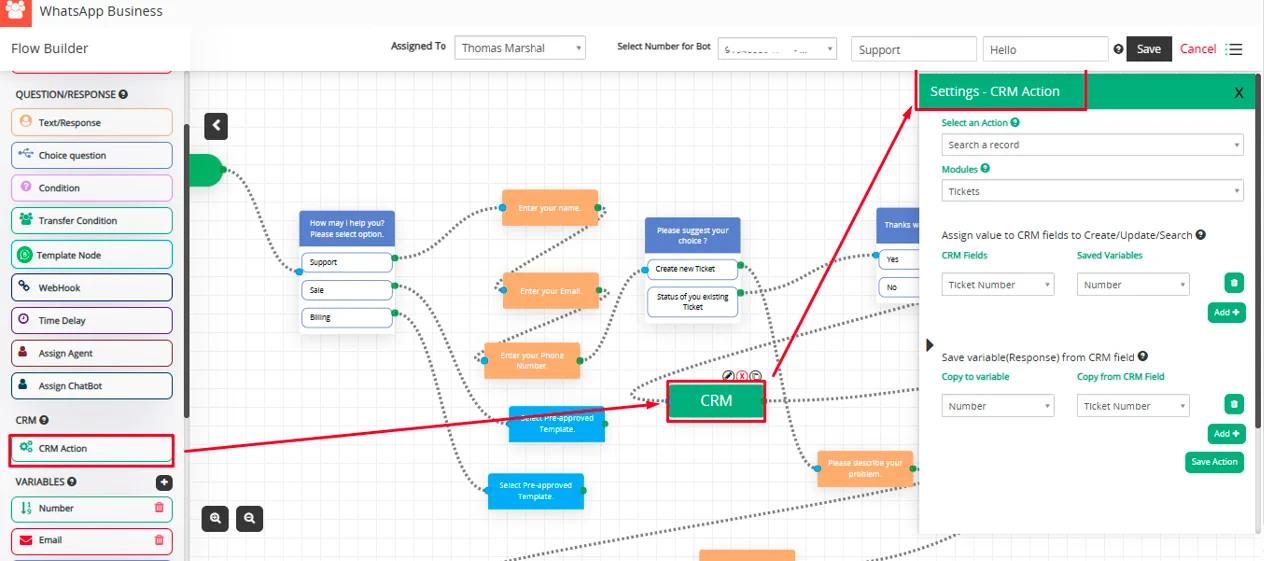
CRM Action
With CRM Action You can Insert/Search/Update record To or From CRM.
CRM Action Setting:
Select an Action: Select an Action should allow the user to select various operations on CRM.
- Create a Record – It allows you to Create records in CRM from responses from the customers.
- Search a Record – It allows you to search records from CRM from the value pass to CRM field.
- Update Record – It allows you to search and update records from CRM from the value pass to CRM field.
Modules: Select module to Create/Update/Search record to or from CRM.
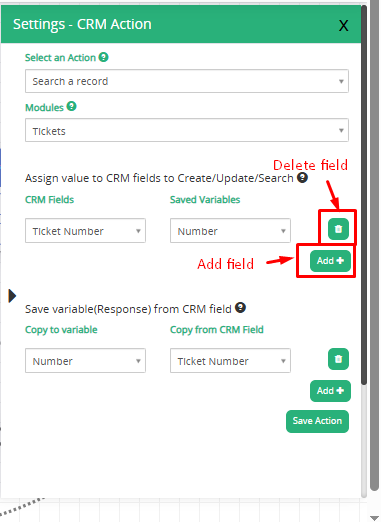
Assign value to CRM fields to Create/Update/Search:
- CRM field – Select CRM fields to copy value to CRM fields from available variables in create action
- Saved variables – Select available variables used to store customer’s input from chatbot’s questions.
Match and update record if exists:
- CRM field – Select CRM fields to copy value to CRM fields from available variables in update action.
- Saved variables – Select available variables used to store customer’s input from chatbot’s questions.
- Default Value: Users can add a default value to be stored in the CRM field if needed.
Save variable(Response) from CRM field: On create/search on CRM it will return selected field value to customer to be displayed in WhatsApp Business bot.
- Copy to variable – Select variable type as name, email, date or description for copy variable.
- Copy from vTiger Field – Select fields for copying variables from vTiger field.
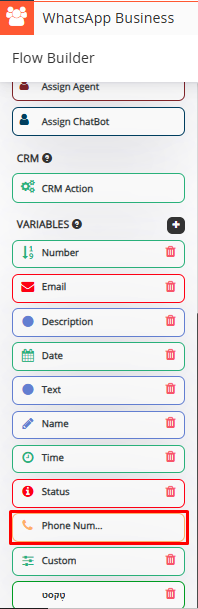
Variables
![]()
Variables used to copy answers from customers using bot like their name, email, phone etc. This will be used to map with respected CRM fields to Add/Search To or From CRM.
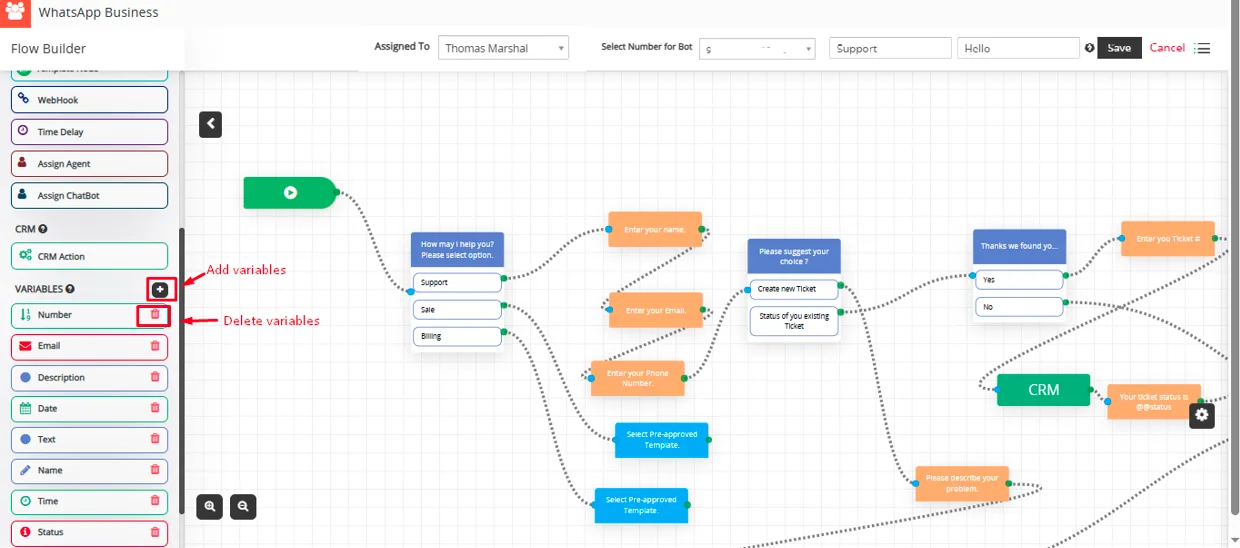
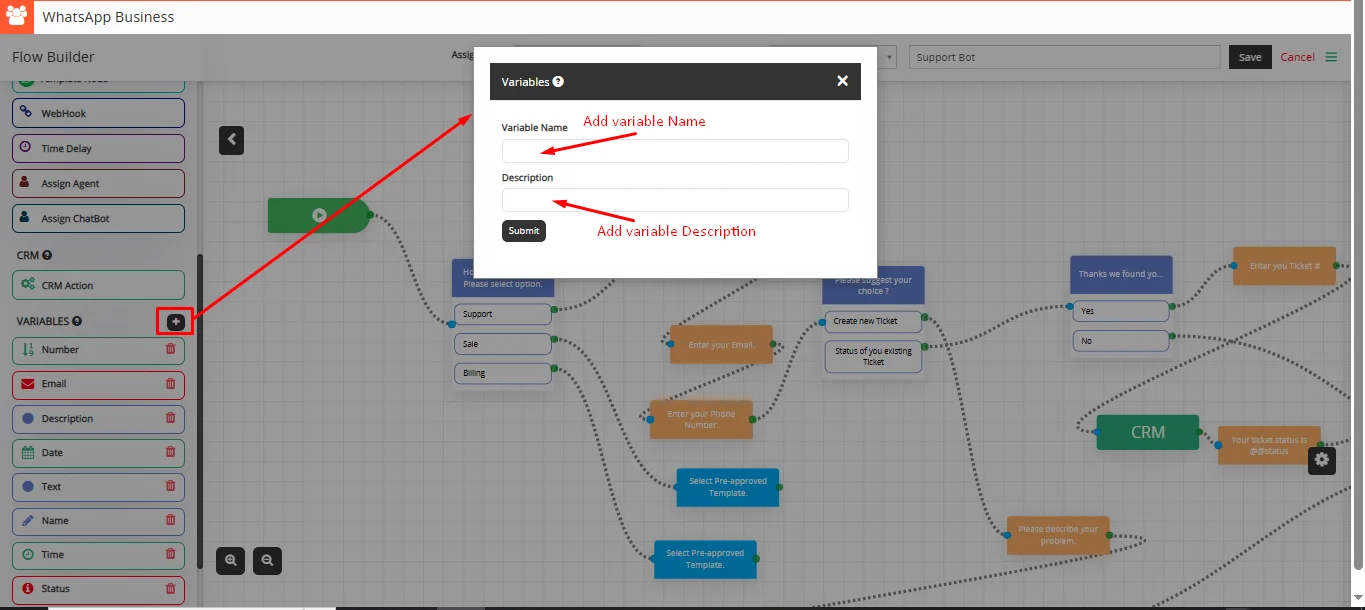
Add Variable Pop-up
- Variable Name: Enter name for Variable
- Description: Enter Description for Variable
The phone number variable is a default system variable that automatically captures the user’s number from the conversation. Users do not need to manually save the phone number to the CRM
Users can Clear all the added actions by clicking on the Clear option and also duplicate the created Bot from the Flow Builder.
Users can also zoom in and zoom out of the created chatbot flow.

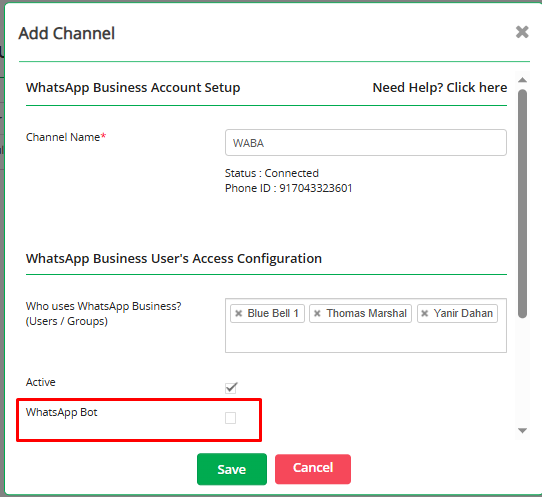
Note: WhatsApp Business Bot will only be enabled for those users who have been connected to the selected WhatsApp Business numbers from Settings > WhatsApp Business configuration > Edit Action> Enable WhatsApp bot
 by
by