How to configure and set up WhatsApp Business Integration for SalesHiker.
-
- Access “WhatsApp Business Configuration” from Settings > Other Settings > WhatsApp Business Configuration > Gear Icon

- This is the setting page to manage various activities of WhatsApp Business within SalesHiker.
-
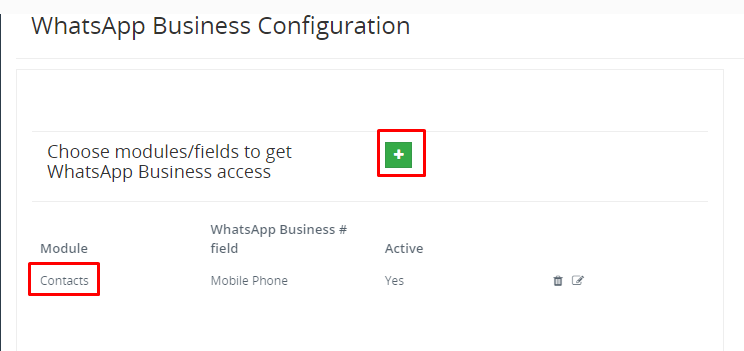
Add/Remove modules for WhatsApp Business Integration
- Add/Remove modules to be integrated with WhatsApp to Send/Receive messages against any phone number of the module.
- In “Access modules to WhatsApp” click on
 to add modules to provide access to display WhatsApp icons to send/receive WhatsApp Business messages.
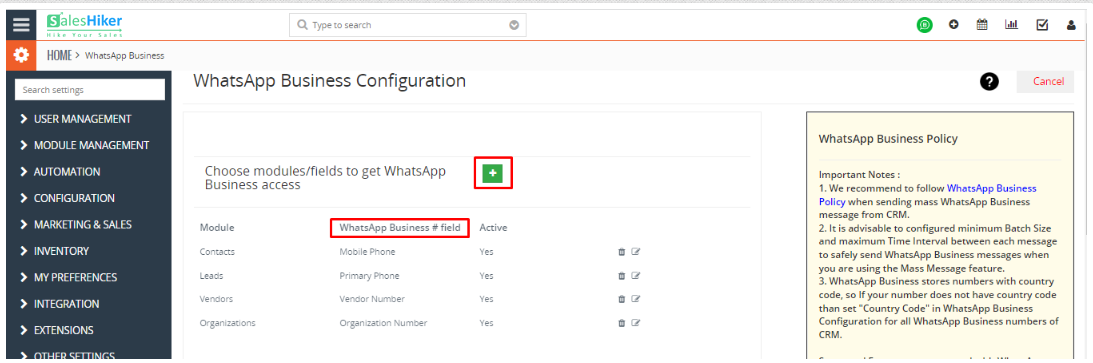
- Select “WhatsApp Business # field” from “Access modules to WhatsApp Business integration” to allow which fields in selected modules to be considered as WhatsApp Business fields.
-
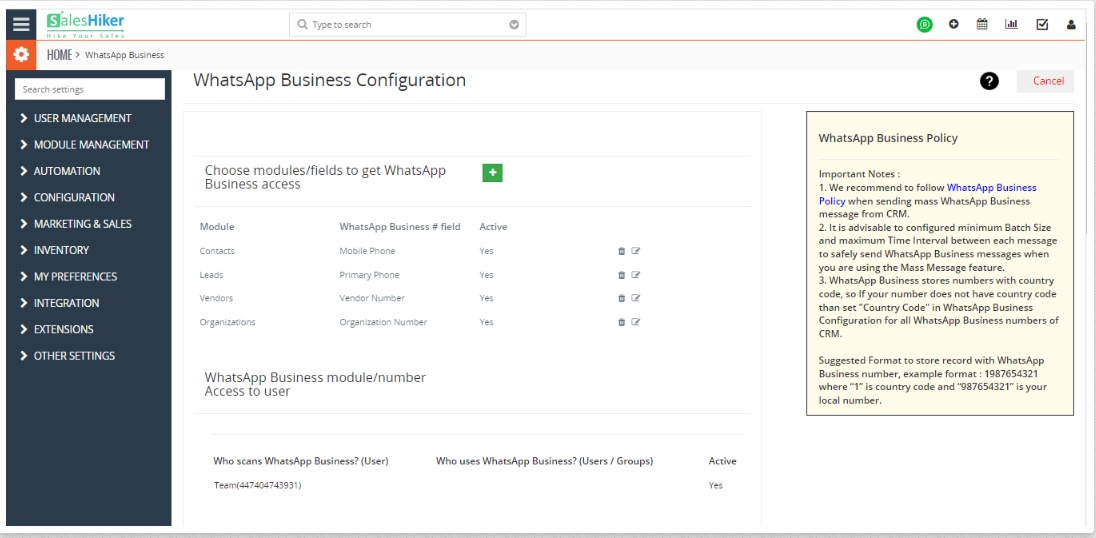
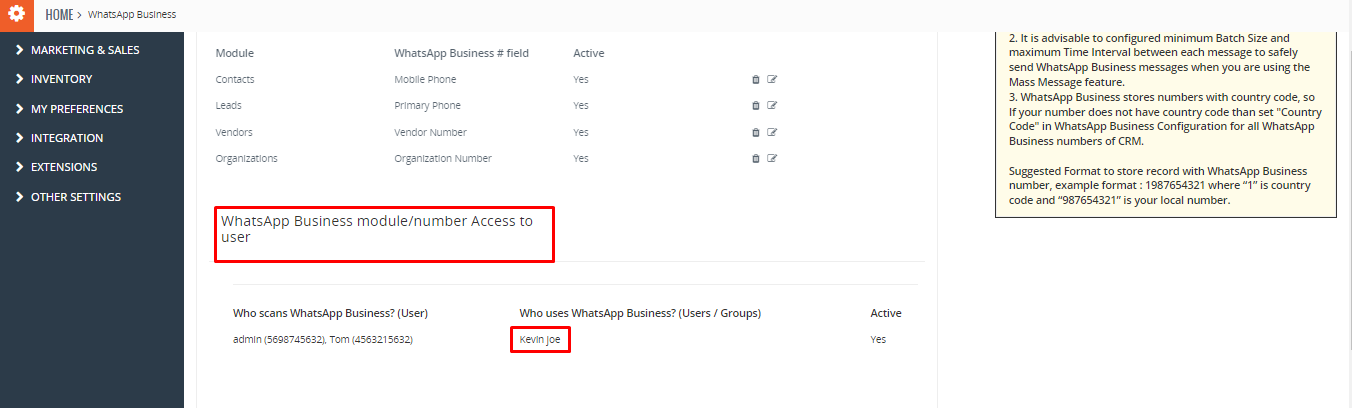
WhatsApp Business module/number Access to user
- Multiple WhatsApp # for each user
- SalesHiker’s WhatsApp business integration allows this option for those companies who rely on a Multiple WhatsApp number configuration for each user. As well as allocate a WhatsApp number to each single user.
- This option will display from Other Settings > WhatsApp Business configuration > Gear Icon > Find “WhatsApp Business module/number Access to user”, it will display the selected list of users to get WhatsApp Business # access
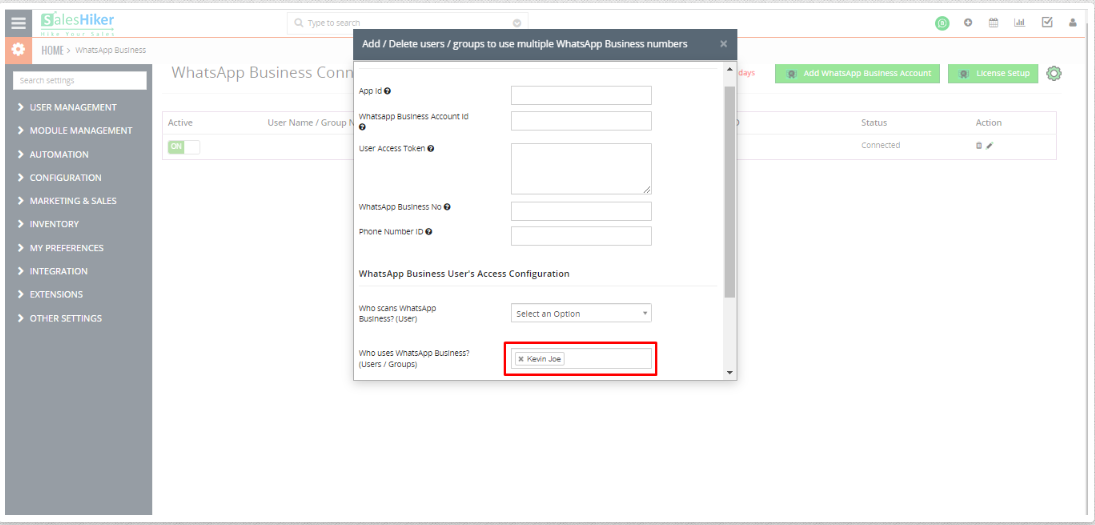
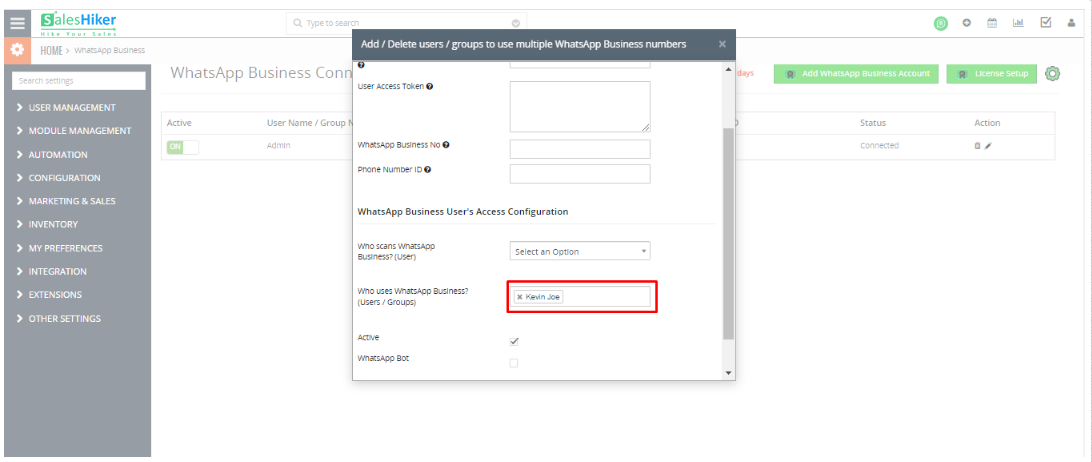
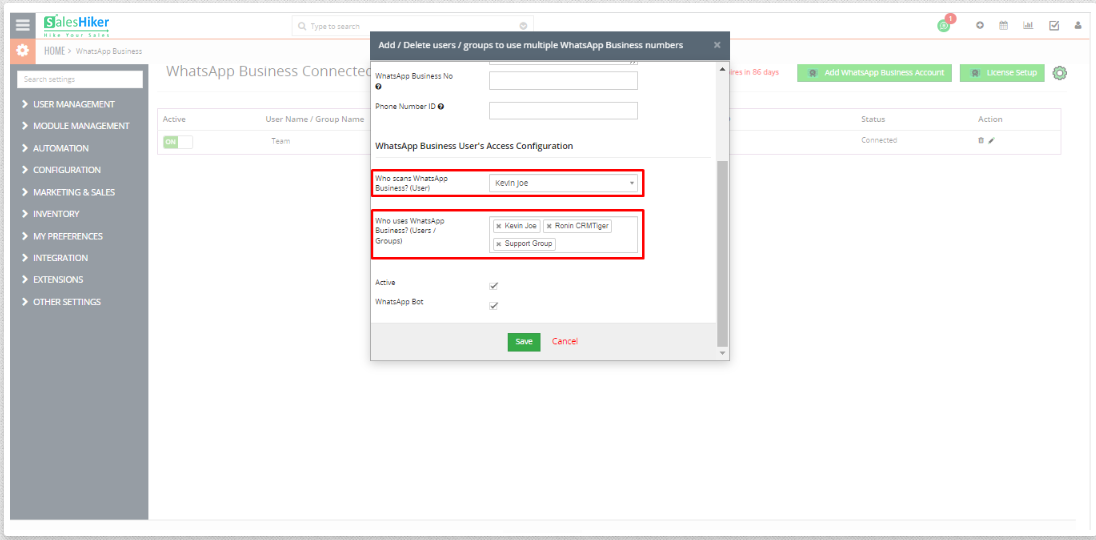
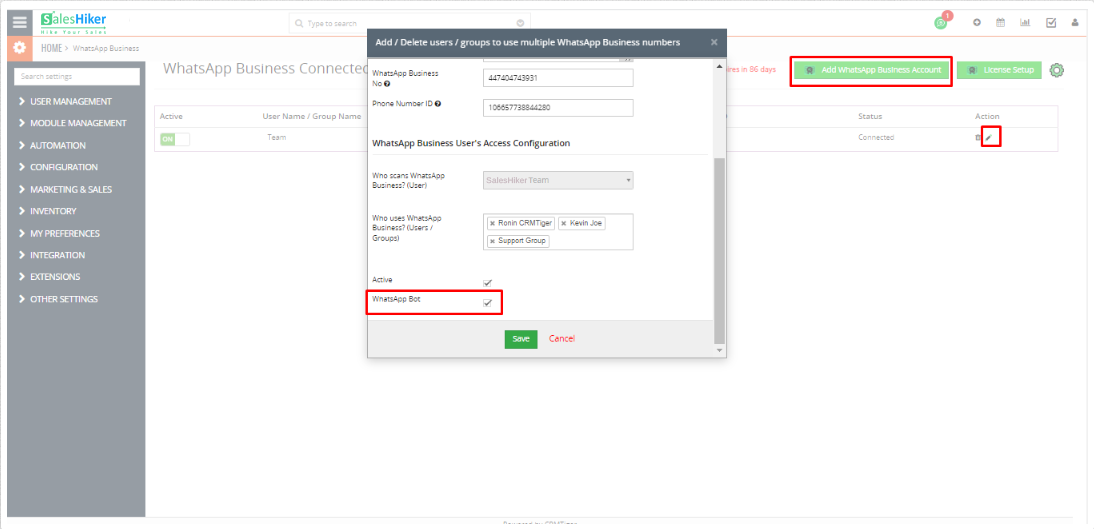
- Click on Other Settings > WhatsApp Business configuration > edit icon will open the Pop-up for Add User to use Multiple WhatsApp Business Number.
- Using Multiple WhatsApp # configuration any user who has rights given from Settings > WhatsApp Business configuration > Click on edit icon > Find “Who uses WhatsApp Business” and Select the user from the list to get WhatsApp Business module access.
- Users can not use WhatsApp Business Integration as admin remove the user from here
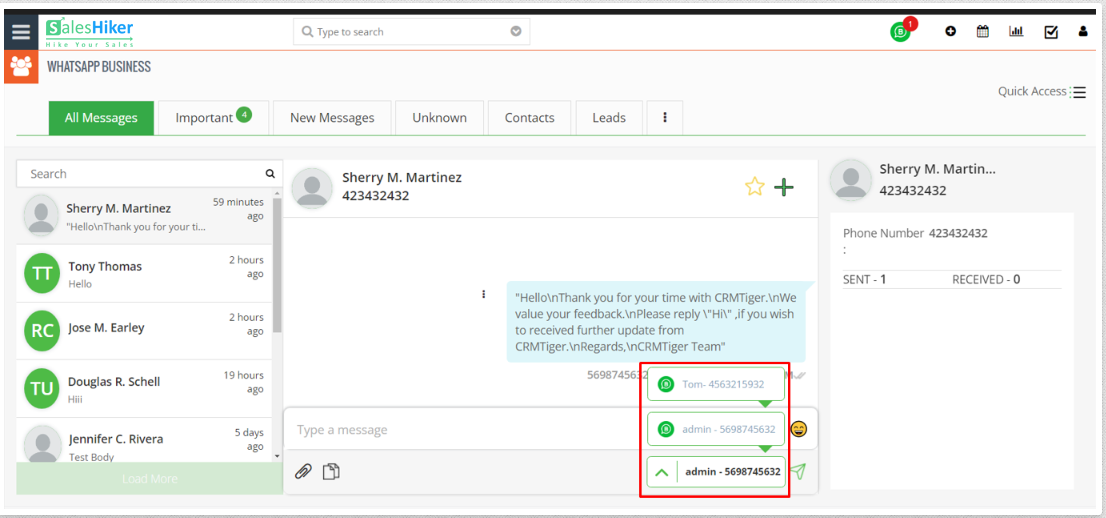
- As per below screenshot, kevin can send messages from both the WhatsApp Business number of Admin and Tom.
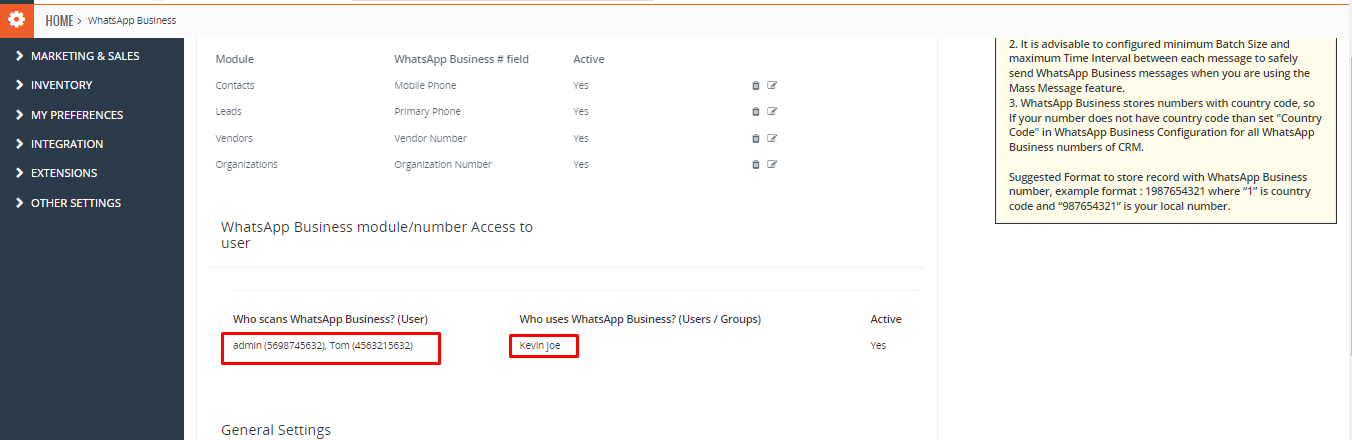
- Admin and Tom are the users who have connected numbers and they have given access to kevin to use their number. So Kevin is able to message from both the numbers.
- Multiple WhatsApp # for each user
- Access “WhatsApp Business Configuration” from Settings > Other Settings > WhatsApp Business Configuration > Gear Icon
- How to setup WhatsApp Business Account on the Facebook Business Meta App?
-
-
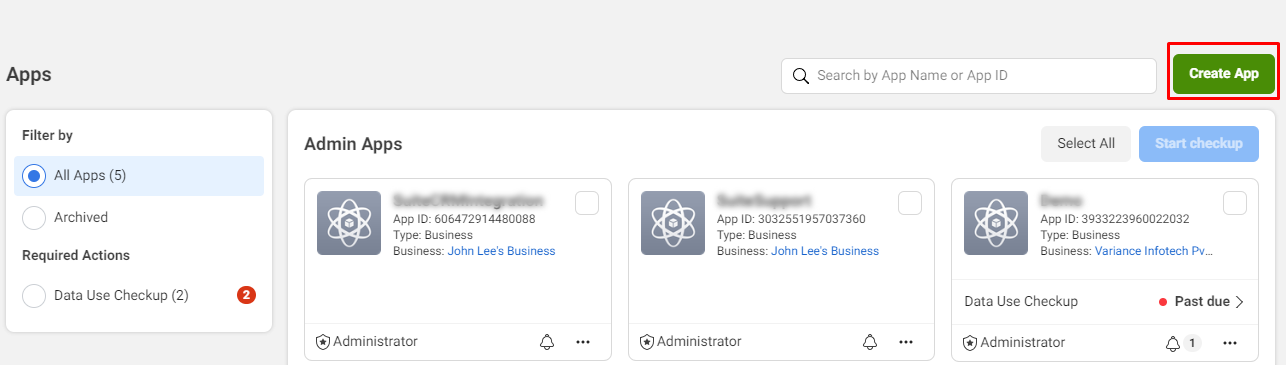
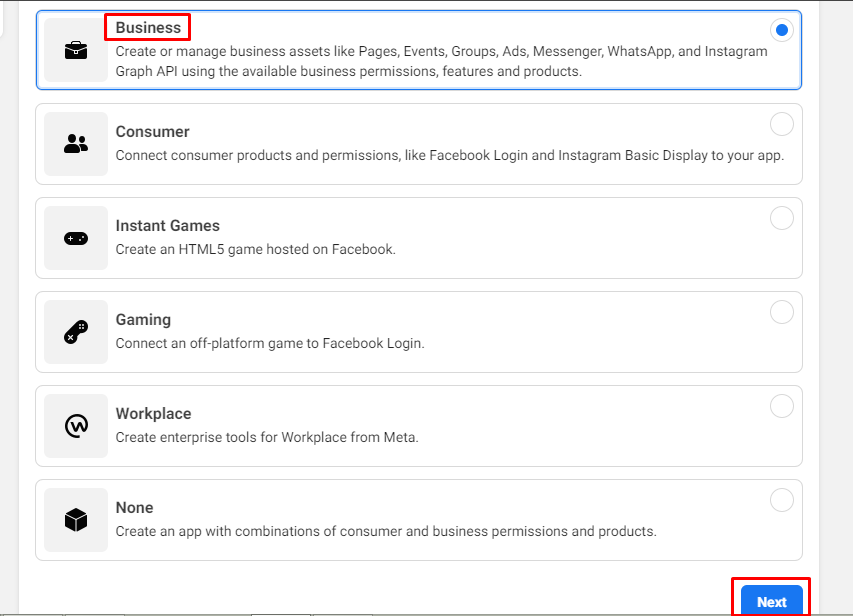
Go to developers.facebook.com > My Apps > Create App. Select the “Business” type and follow the prompts on your screen
-
Create Meta App
 Business Account is Optional but please select as well because to access certain permissions or features, apps need to be connected to a business account.
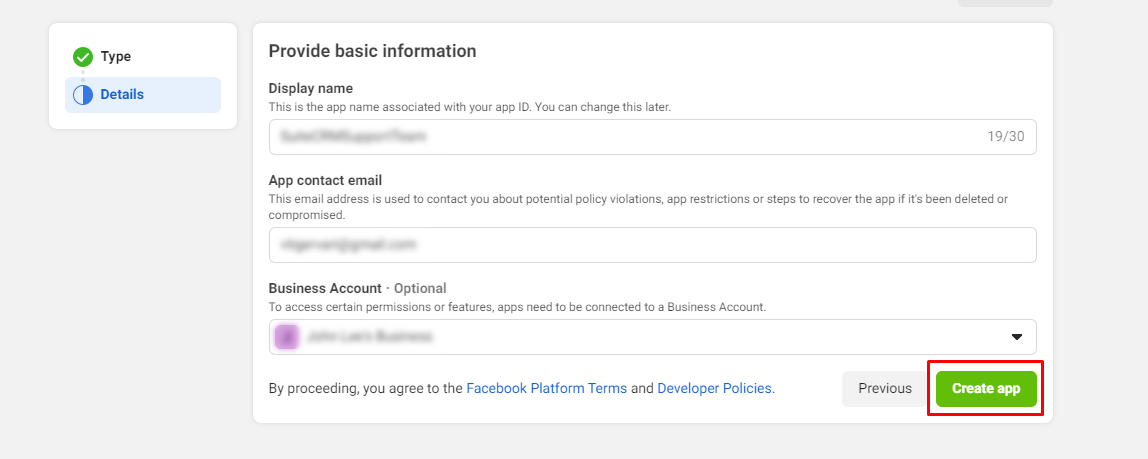 From the App Dashboard, click on the app you would like to connect to WhatsApp. Scroll down to find the “WhatsApp” product and click Set up.
-
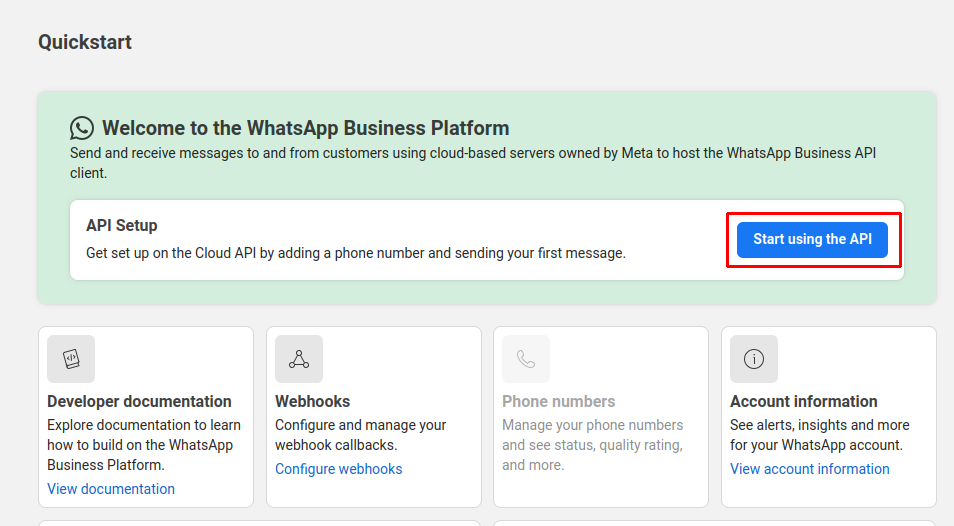
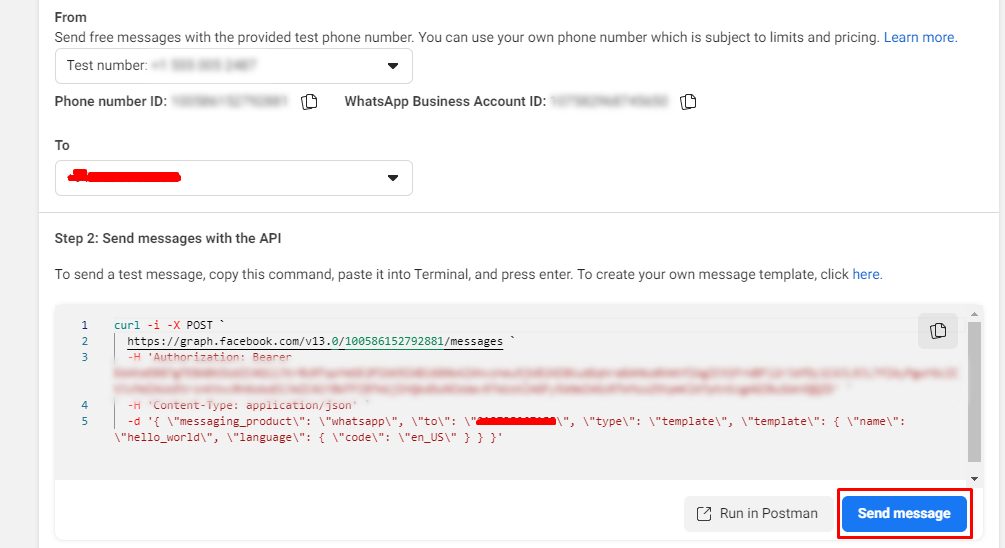
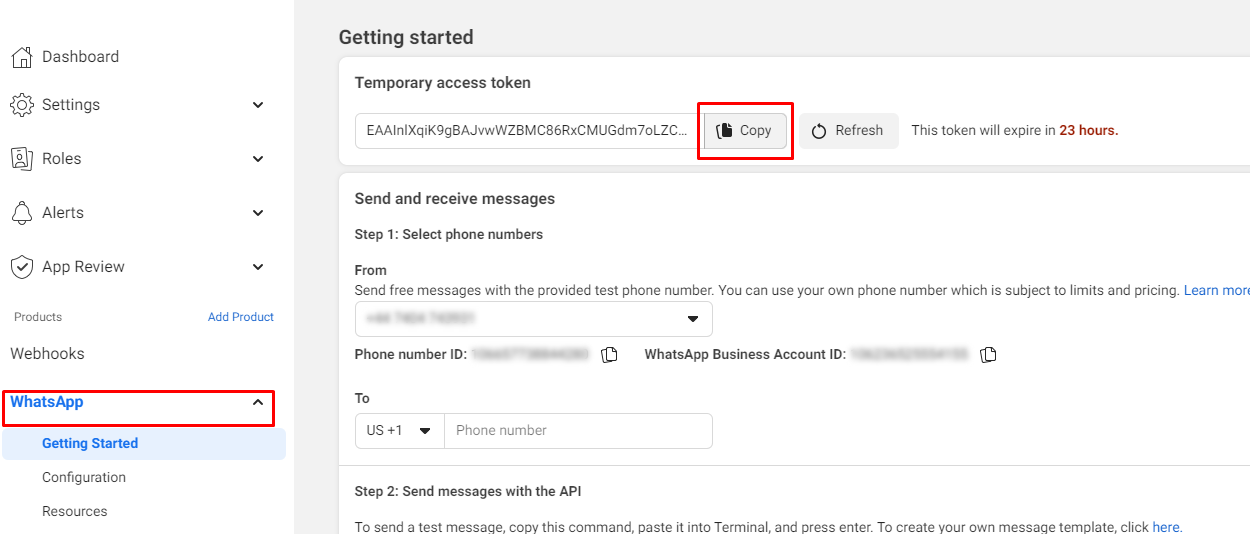
Send a Test Message
-
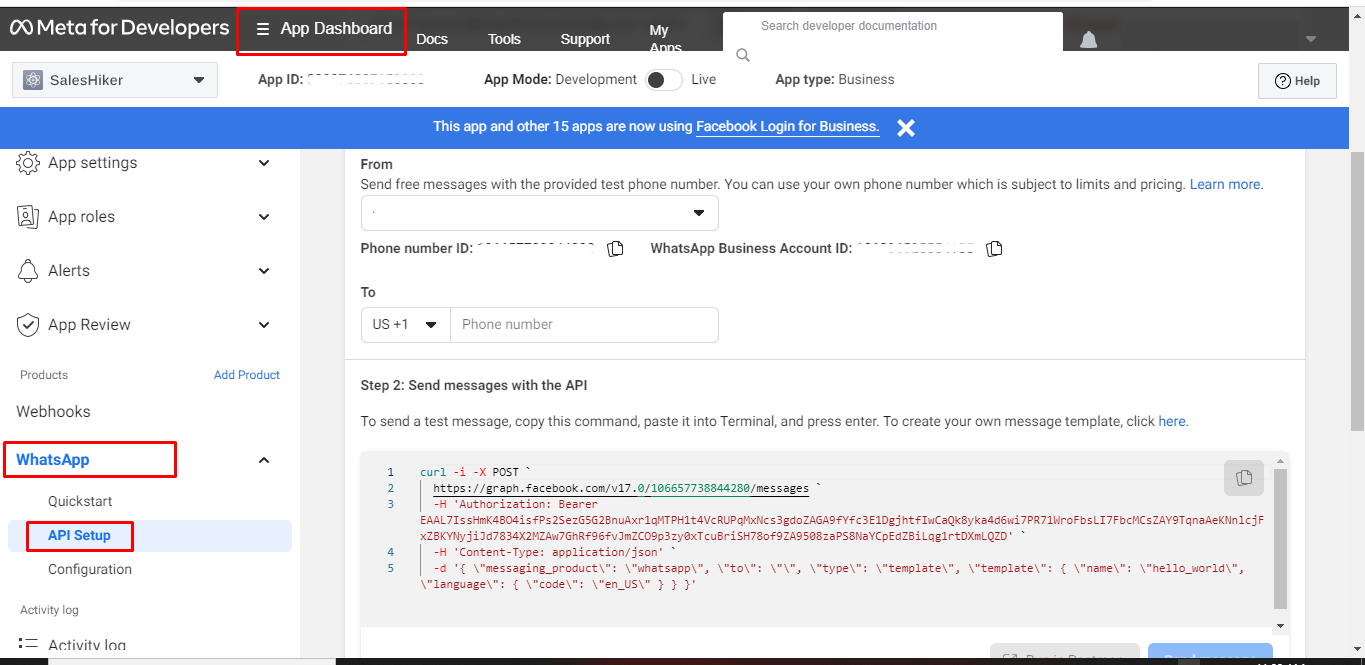
Select your test phone number in the From field. (Unless you have registered other phone numbers, this will be the only phone number in From.)
-
Enter the phone number you would like to message in the To field & click on Send Message as shown in the below screenshot.
-
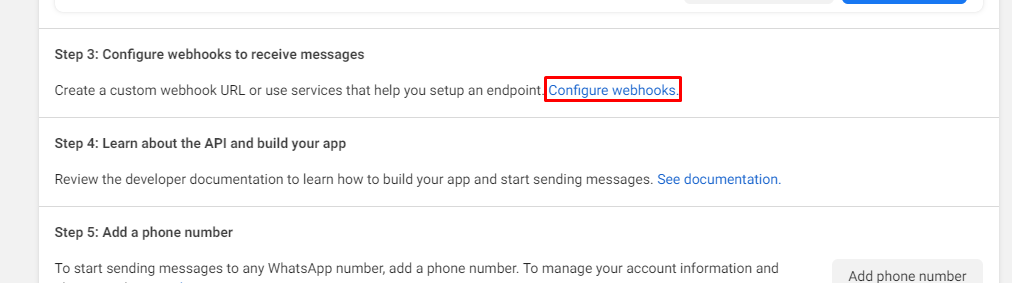
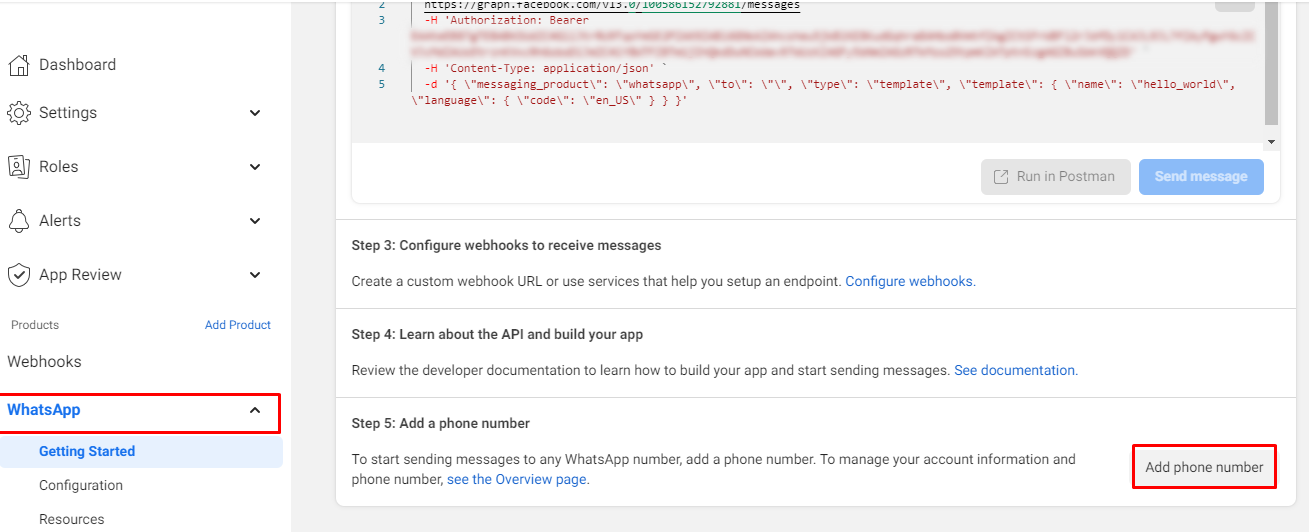
- Configure webhooks to receive messages
- Click on the Configure Webhooks link as shown in the below screenshot.
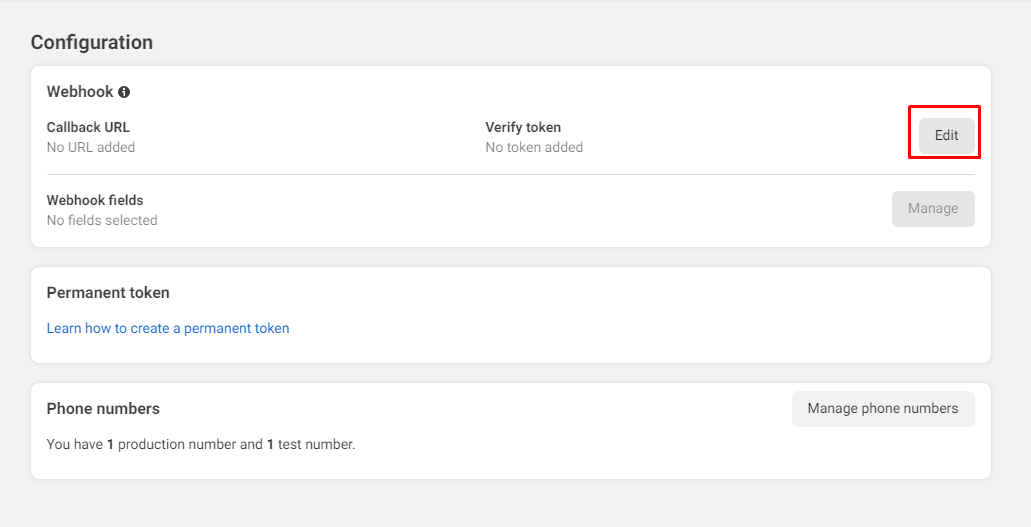
- Click on the Edit button as shown in the below screenshot.
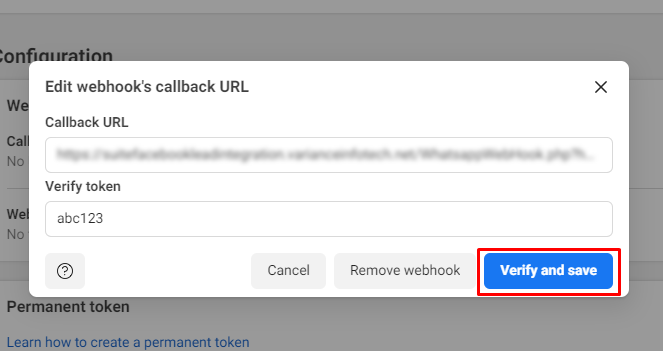
- Add the Callback URL & Verify Token and click on Verify & Save button as shown in the below screenshot.
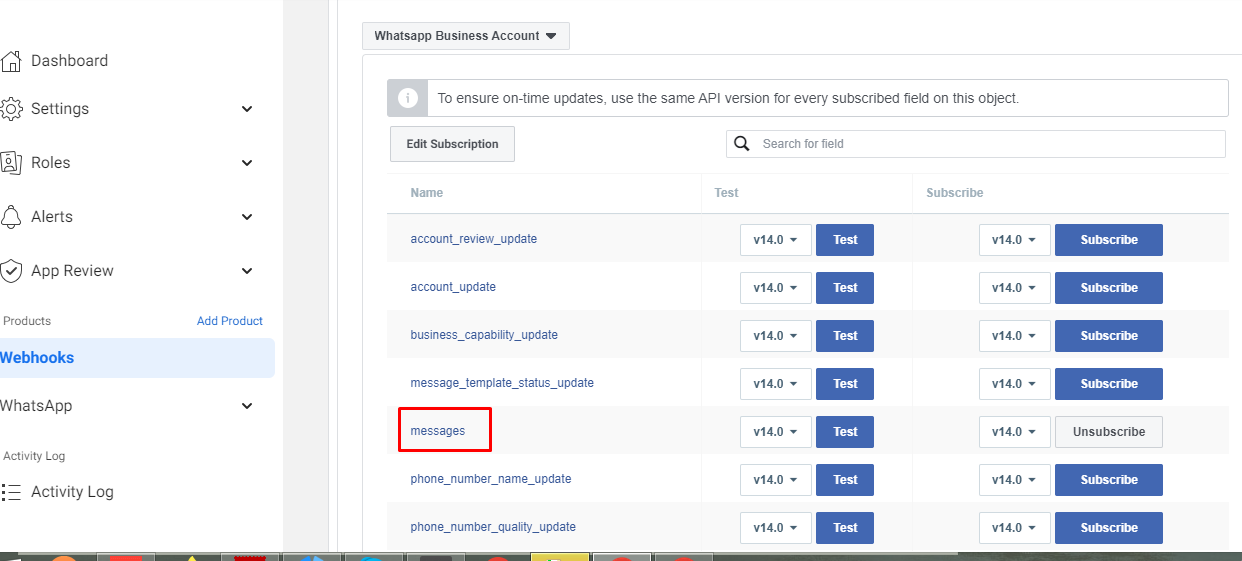
- Subscribe to the messages field as shown in the below screenshot.
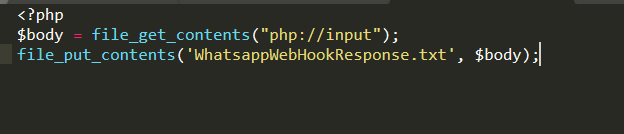
- In the Webhook file to check the webhook response add this type of code as shown in the below screenshot.
- Now that your Webhook is set up, send a message to the test number you have used. You should immediately get a Webhooks notification with the content of your message!

- Click on the Configure Webhooks link as shown in the below screenshot.
- Add Phone Number:
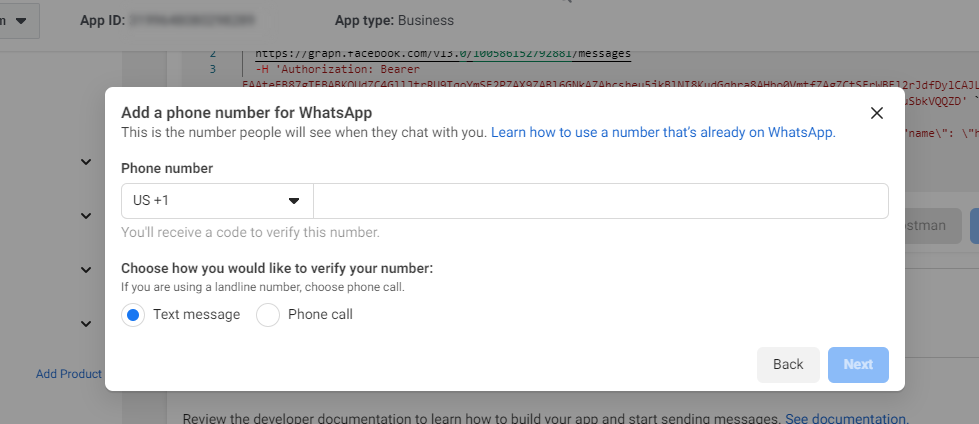
- To Add a Business Phone Number click on the “Add Phone Number” button as shown in the below screenshot.
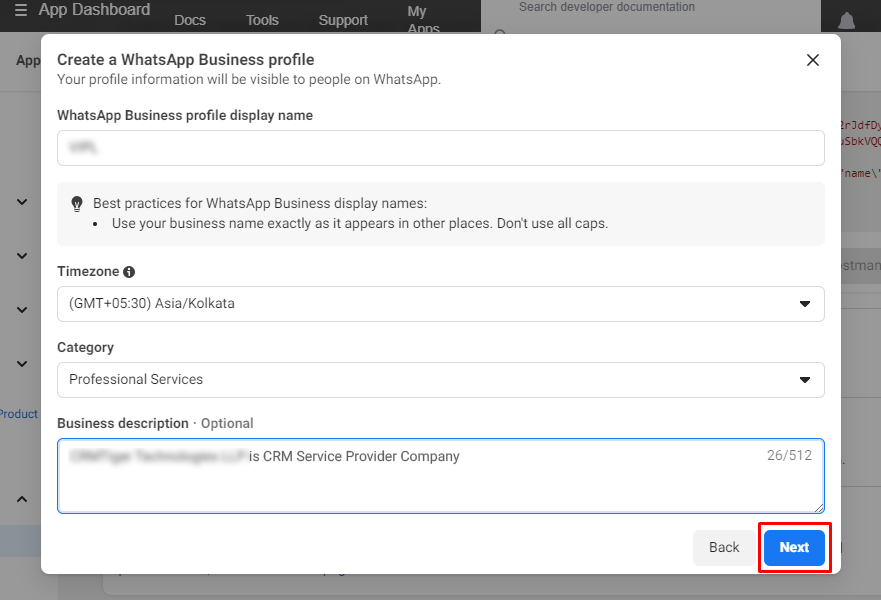
- Fill in all the information as shown in the below screenshot.
- Add the Phone number & choose the verify method as shown in the below screenshot.
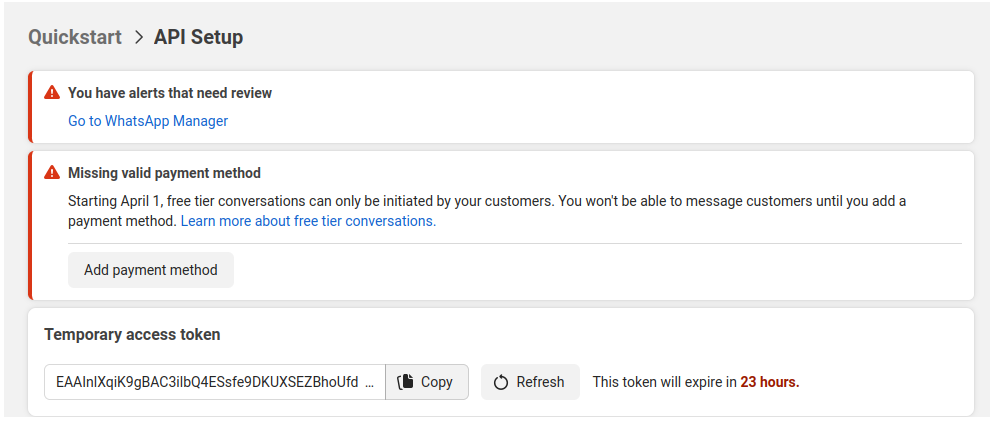
- The first 1,000 conversations each month are free. If you want to send more than 1,000 conversations, you need to add a credit card to your account. Click here for update pricing of WhatsApp Business Account Messages.
- To Add a Business Phone Number click on the “Add Phone Number” button as shown in the below screenshot.
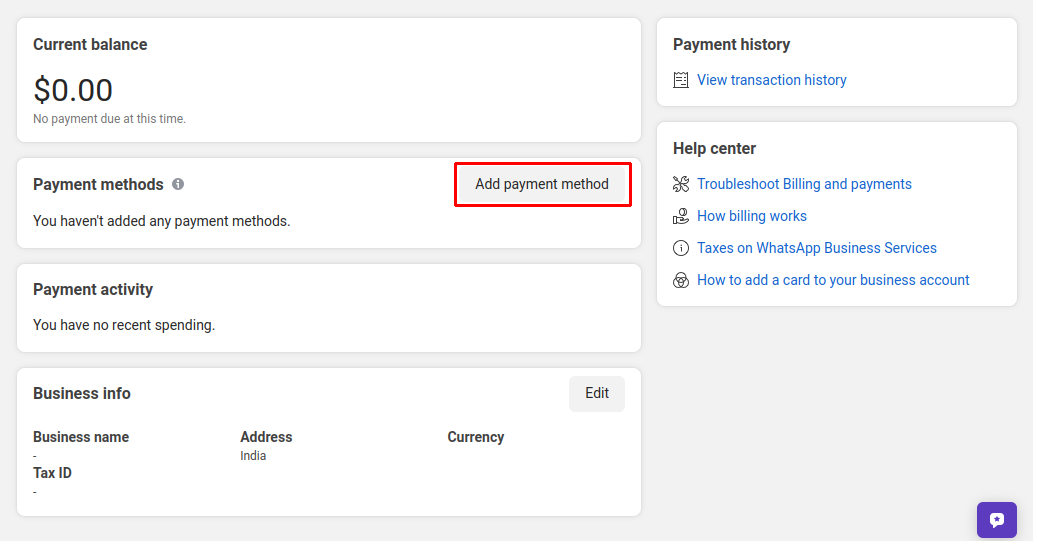
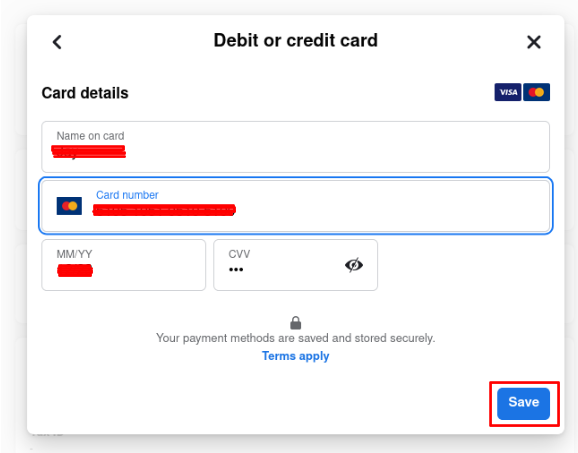
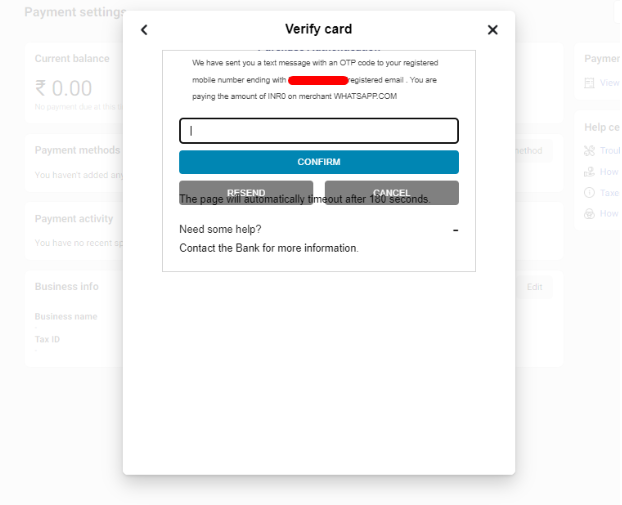
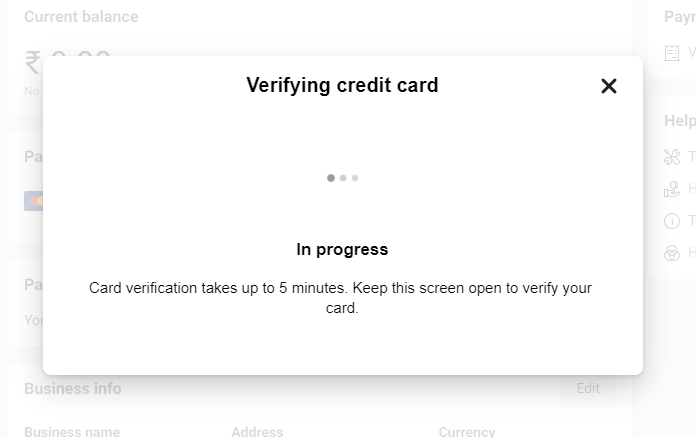
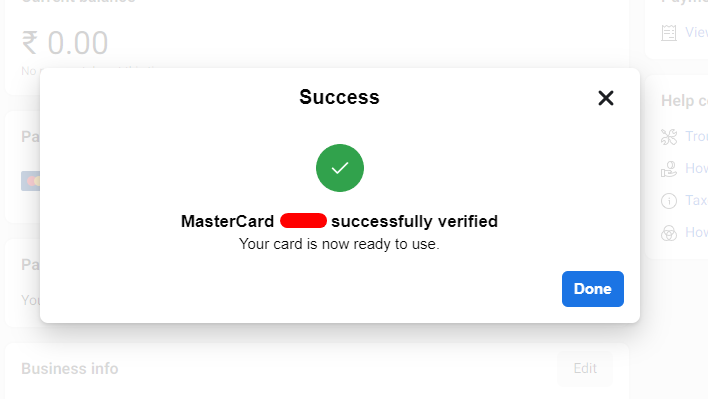
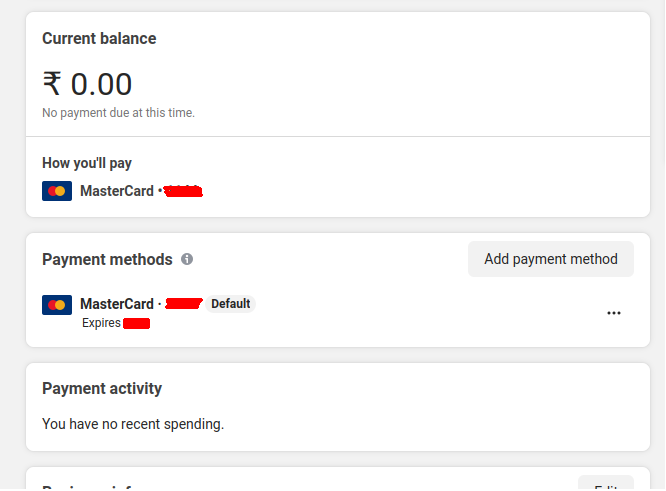
- Add Payment Method:
- You need to add Payment Methods to start conversations with your customer. Follow the below step to Add a Payment Method.
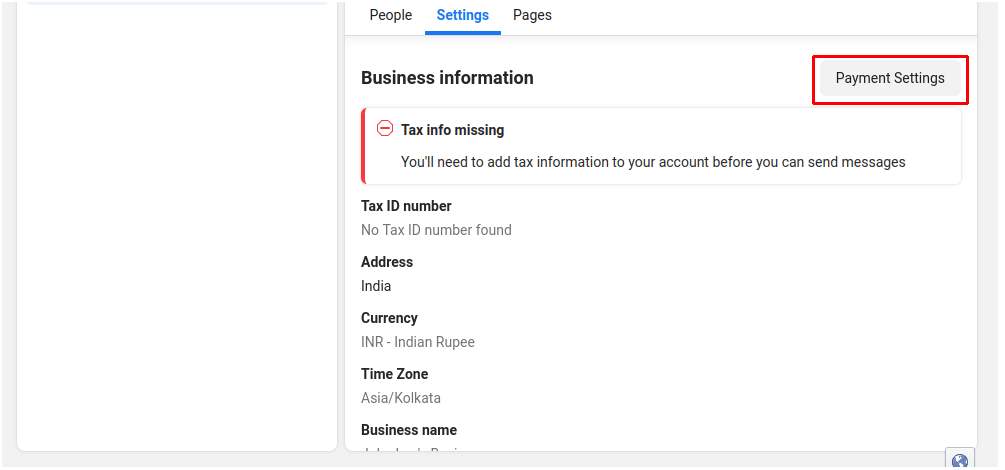
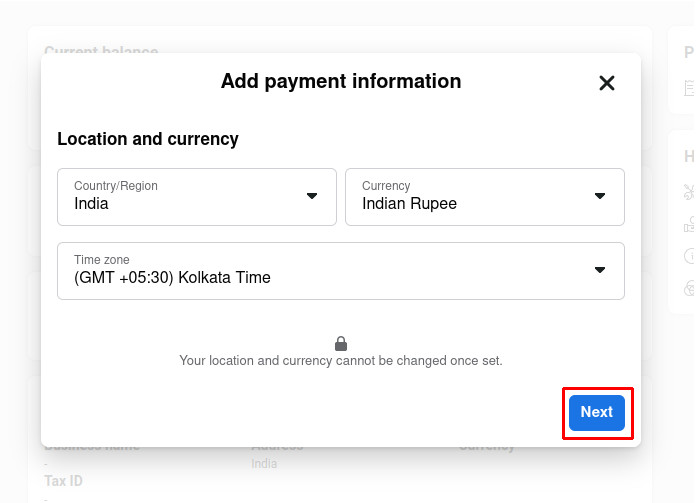
- For Verifying Card details Need to pay 1 Rs from the card which will be refunded back in 10 days.
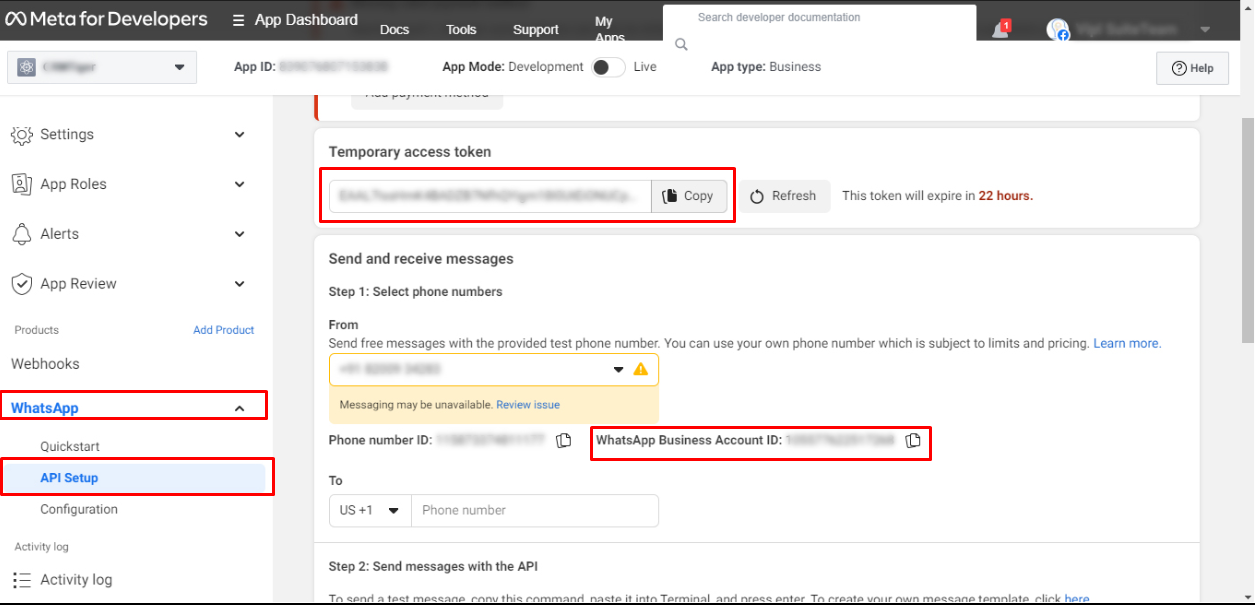
- Copy the Temporary Access Token as shown in the below screenshot.
- You can also create the Permanent Access Token.(https://www.facebook.com/business/help/503306463479099?id=2190812977867143)
- You need to add Payment Methods to start conversations with your customer. Follow the below step to Add a Payment Method.
- How to setup permanent token for WhatsApp ?
- Once the token has expired, you can update your token by following the steps shown in the page link:
https://www.facebook.com/business/help/503306463479099?id=2190812977867143
Before you beginYou must own a Facebook app that’s associated with your Business Manager to add system users. Learn how to add an app to your Business Manager.
- Once the token has expired, you can update your token by following the steps shown in the page link:
- Add system users to your Business Manager
- Steps to add a new system user:
-
-
-
-
-
-
- Go to Business settings.
- Below Users, click System users.
- Click Add new system user.
- Give a name to the system user and click Create system user.
- Assign assets such as your Pages, ad accounts and catalogues.
- Click Generate new token. Click here (https://support.cognigy.com/hc/en-us/articles/5326310754332-WhatsApp-Endpoint-Get-a-Permanent-Access-Token)
- Select your app and your permissions, then click Generate token.
- Copy and save your token.
-
-
-
-
How to add WhatsApp Business Account/Number/ App Id and token Access Id
- Click on Other Settings > WhatsApp Business Configuration > Add WhatsApp Business Account/Edit icon will open the Pop-up for Add new WhatsApp Business account or edit the old configured account to use Multiple WhatsApp Business Account.
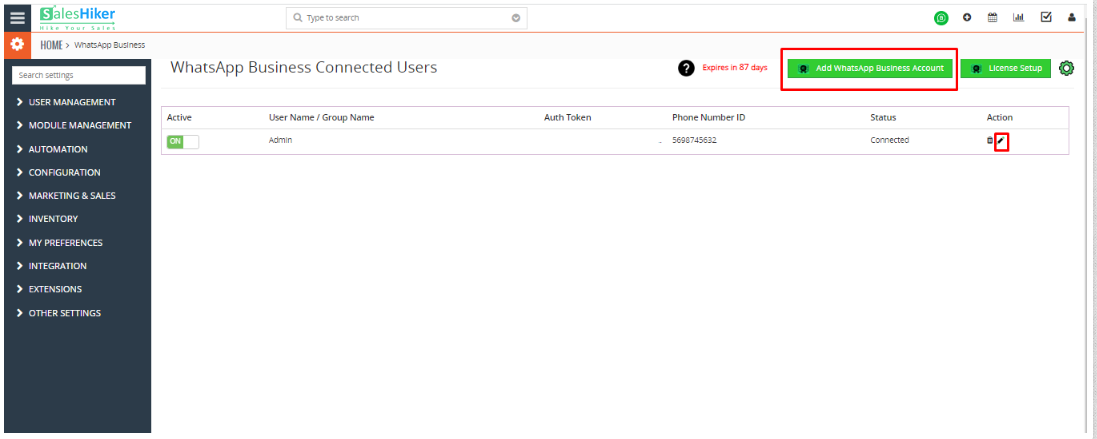
- Once click on Add WhatsApp Business Account/ Edit icon it shows the first option as ‘Who scans WhatsApp Business’ to add the new Business account.
- App Id: To find your App Id follow the below steps
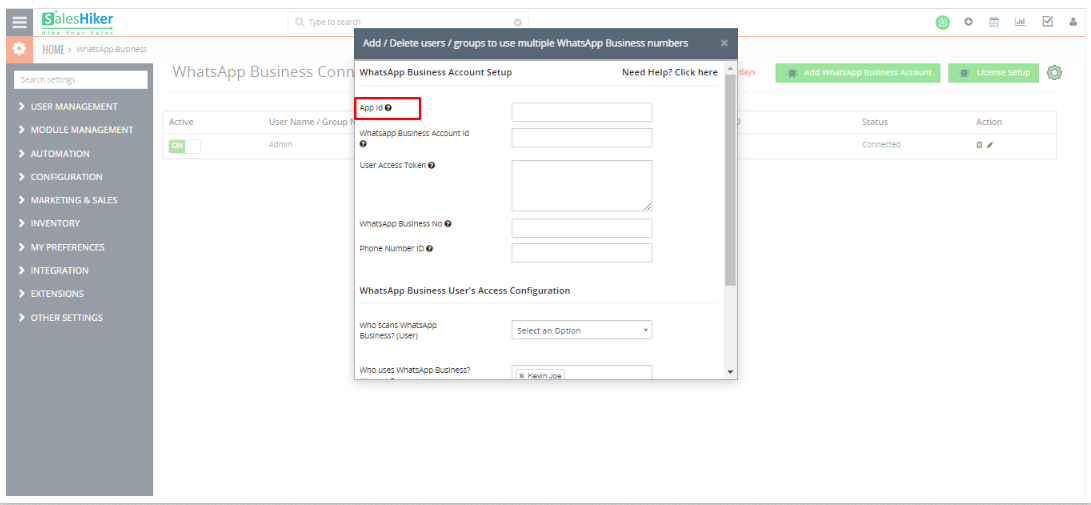
- You can add an App Id from the developer’s Facebook page.
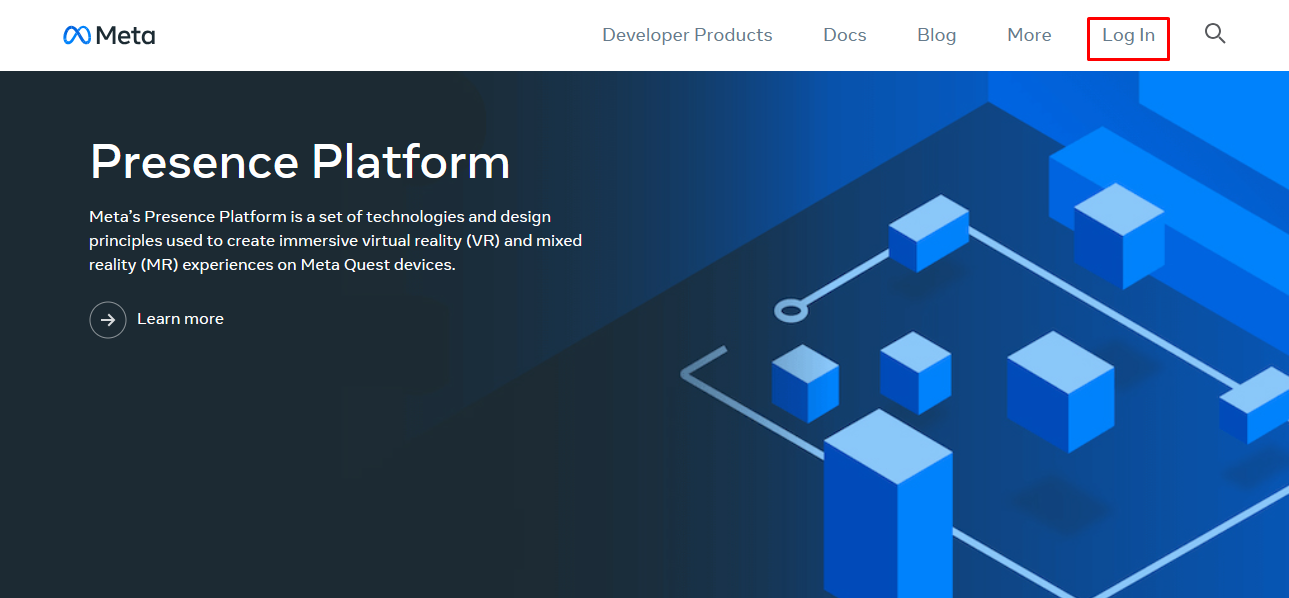
- Once you login the page click on My App
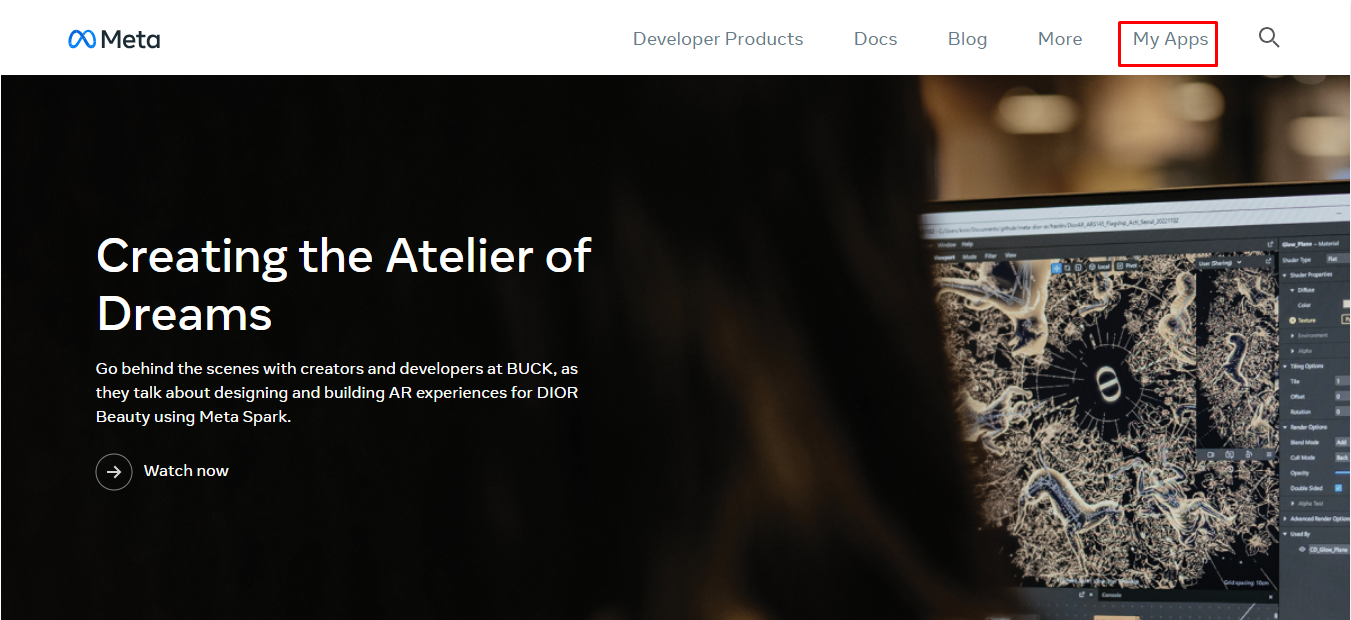
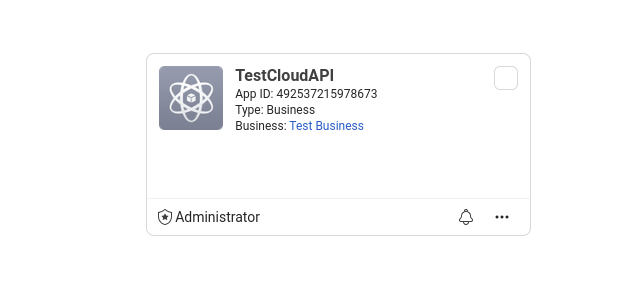
- Once you click on My App the page will look like below screenshot, Click on your SalesHiker App
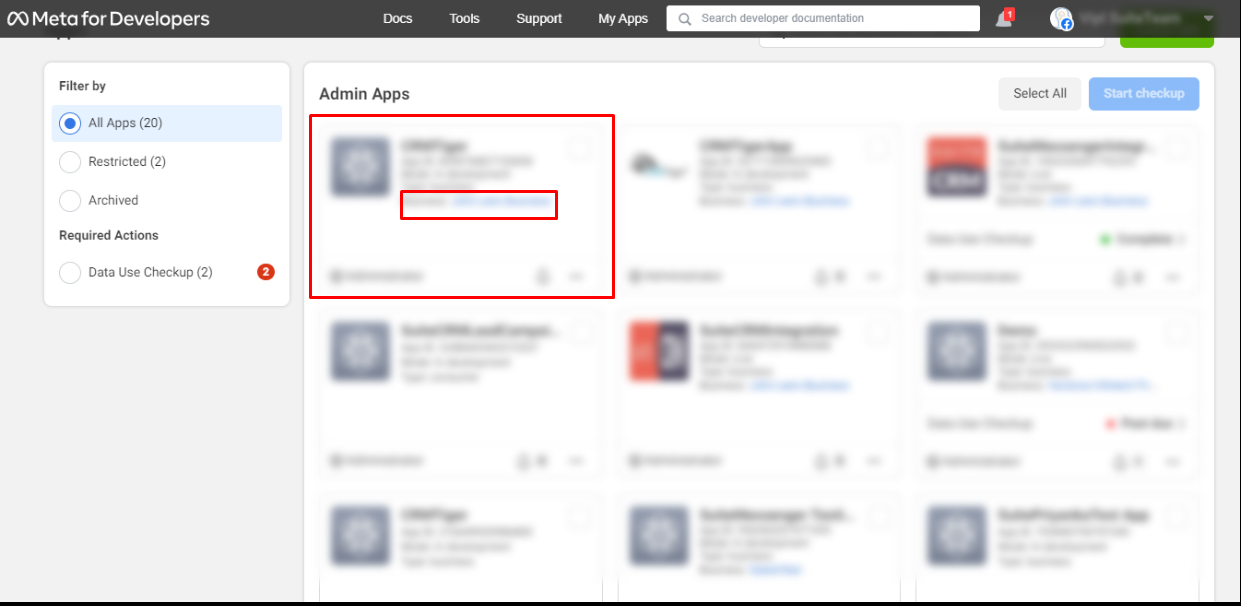
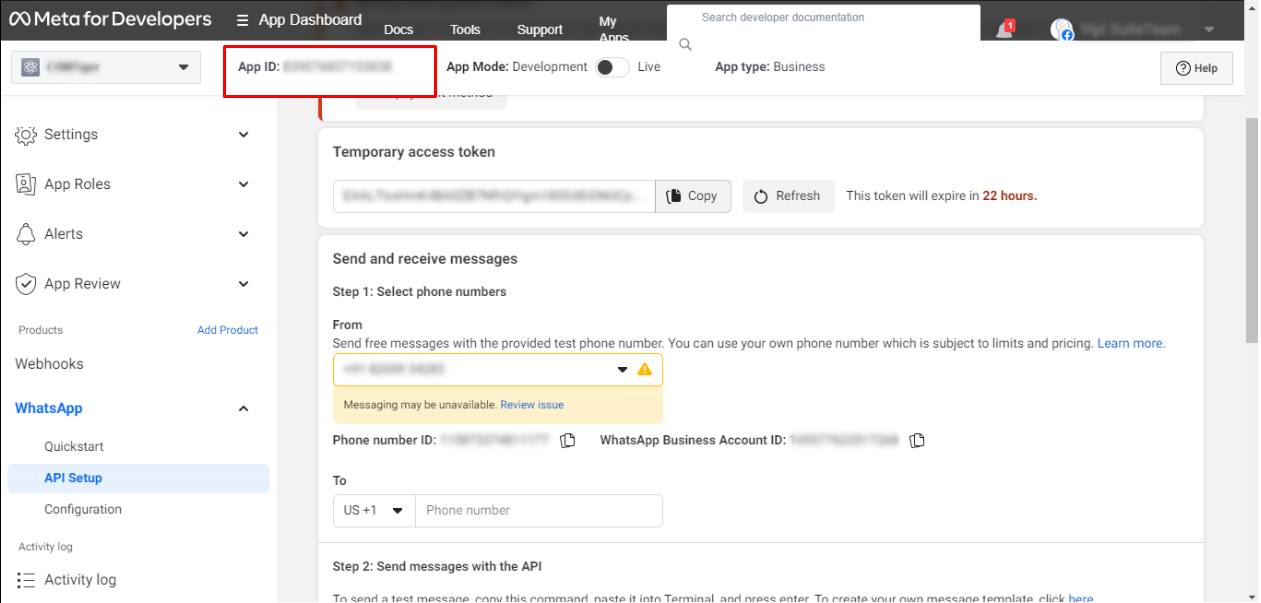
- Once you click on your SalesHiker application, you will find your App Id
- WhatsApp Business Account Id and User access token Id:
- To find WhatsApp Business Account id and User access token Id you have to follow below steps.

- Once you have navigated to the page of My App and selected your SalesHiker application, go to WhatsApp > API setup. You will find your WhatsApp Business Account ID and User Access token ID as shown in the below screenshot
- Click on Other Settings > WhatsApp Business Configuration > Add WhatsApp Business Account/Edit icon will open the Pop-up for Add new WhatsApp Business account or edit the old configured account to use Multiple WhatsApp Business Account.
-
How to setup permanent Account access token ?
Once the token has expired, you can update your token by following the steps shown in the page link: Page link
-
Before you begin
You must own a Facebook app that’s associated with your Business Manager to add system users. Learn how to add an app to your Business Manager.
Add system users to your Business Manager
- Steps to add a new system user:
- Go to Business settings.
- Below Users, click System users.
- Click Add new system user.
- Give a name to the system user and click Create system user.
- Assign assets such as your Pages, ad accounts and catalog.
- Click Generate new token. Click here
- Select your app and your permissions, then click Generate token.
- Copy and save your token. Remember, you can only share a token once. Each new system user requires a new generated token.
- Steps to add a new system user:
-
How to Get a Permanent Access Token?
- To get a permanent access token that does not expire after 23 hours, you will need to go through a few steps. Go to the Business settings of the Business your app is registered with on the Meta/Facebook Developer Dashboard. To do that, just click on the Business name that appears as a link in blue.
 Then in the Sidebar navigate to Users > System Users Click “Add”
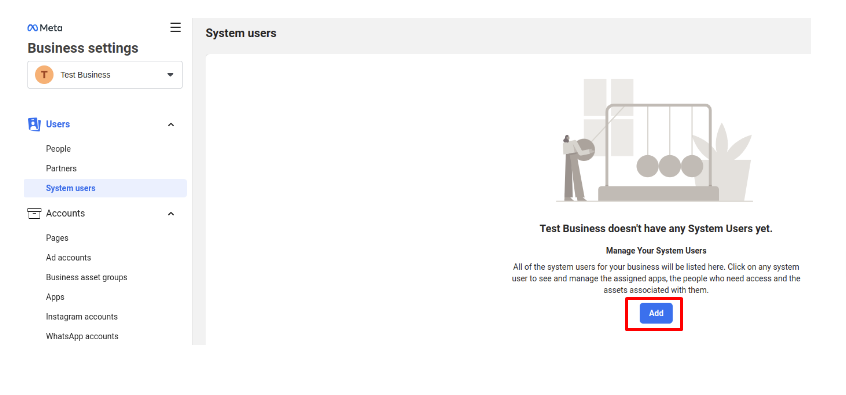 Add a “System Username” and choose a role.
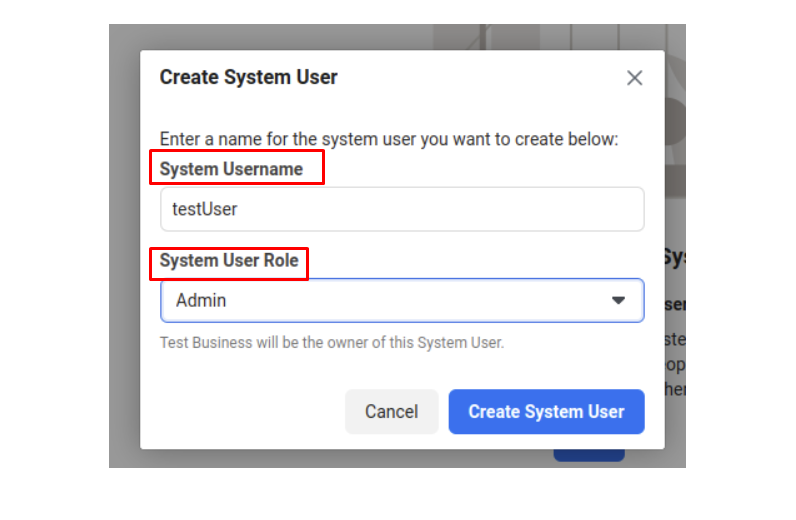 Click “Add Assets”
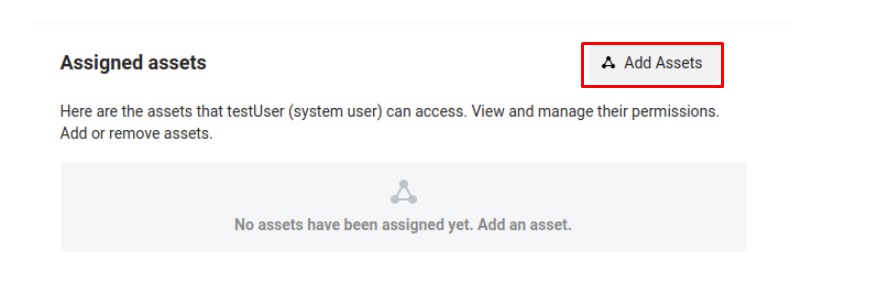 Go to “Apps”, select the app and enable the “Manage App” option and save changes.
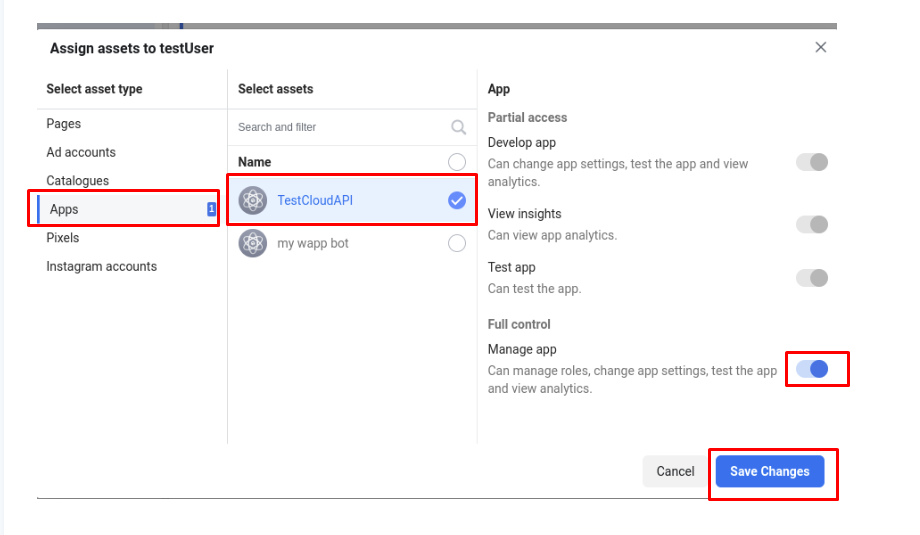 Click “Generate Token” and choose the App you want to generate a token for.
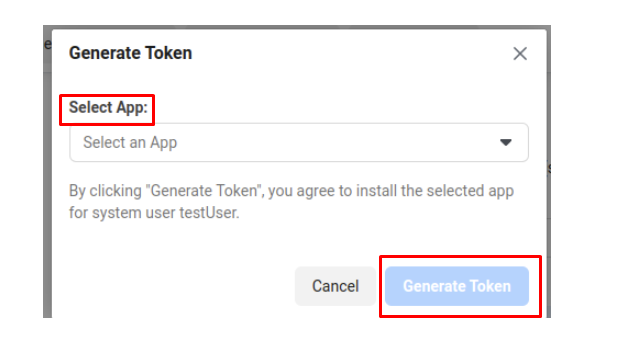 From available permissions choose “whatsapp_business_messaging” and “whatsapp_business_management” and click “Generate token”.
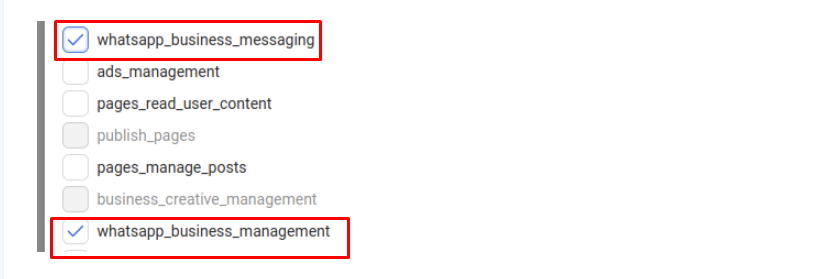 Use the generated “Access token” instead of the “Temporary token” that was provided before, and use it in the “WhatsApp Settings” on the Cognigy. AI platform as an Access Token. Remember, you can only share a token once. Each new system user requires a new generated token.
General Settings
- This option will be managed from Other Settings > WhatsApp Business Configuration > Gear Icon
 > Find General Settings.
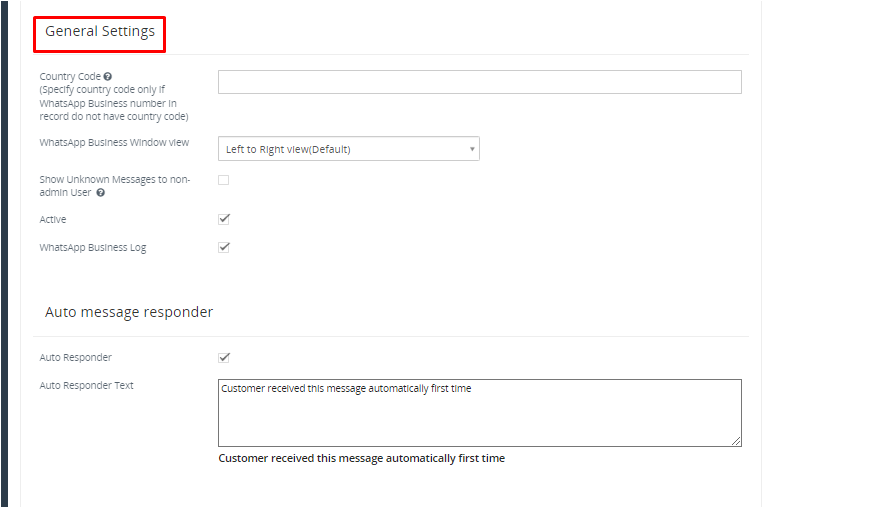 In the General Settings you can configure the Country code, WhatsApp Business Window View, Access to show Unknown Message to non-admin Users, and display the status indicating whether it is active or not.
-
Country Code
- This is an important setting before you start using WhatsApp Business integration. WhatsApp Store phone number with Country Code It means if your phone number is 6308618263 and Country code is +1 then the WhatsApp store number as “16308618263”. If you’ve a record having a phone number without a country code then follow the instructions below.
- WhatsApp Business number without country code in Records : In this scenario, if you want to apply country code as a prefix to all “Phone numbers” of all modules where you’ve to add the country code in the general setting > country code field in WhatsApp Business configuration page. So whenever a WhatsApp message is sent out from the CRM it will add a Prefix because WhatsApp requires “Country Code” to send a message to a contact.
- For example : If the connected phone number is “987654321” and the country code is “+1” than WhatsApp Business number becomes “1987654321”
- Record with country code as a prefix : If you already save a record/phone number with country code then In this scenario keep the country code field “Blank”.
-
-
WhatsApp Business Window View
- SalesHiker’s WhatsApp Business Integration allows their users to configure the WhatsApp Business Integration Window in Right to Left view which is mostly preferable in the middle east countries. SalesHiker by default supports the Left to Right view.
-
Show Unknown Message
- If a WhatsApp Business message has been sent by a customer whose number is not in the CRM as a Record and if you want to allow all non-admin users to see those numbers then enable this feature. So all non-admin users can see those messages by clicking on the Global WhatsApp icon and see it under “Message from Unknown numbers”.
-
Active Status
- This option allows you to show WhatsApp status. If you select the checkbox then it will show your status as active when you are active on WhatsApp otherwise it will not show anything.
-
Auto Message Responder
- This option will be managed from Other Settings > WhatsApp Business Configuration > Gear Icon > Auto Message Responder
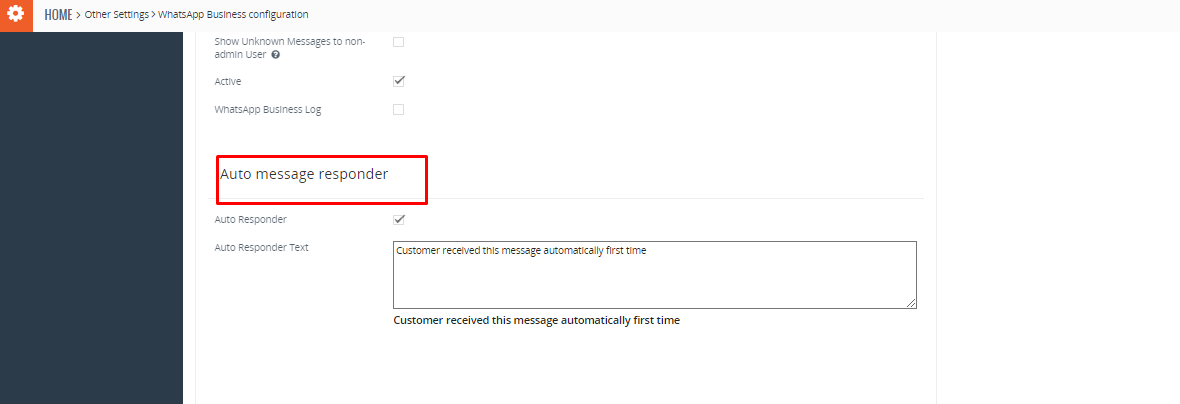
- It is helpful to give answers to messages automatically. It means you have just written a message which will be sent automatically to the sender.
- Customers received messages from auto responder message text automatically the first time or after 14 days of no activity.
- This option will be managed from Other Settings > WhatsApp Business Configuration > Gear Icon > Auto Message Responder
-
Mass Message Configuration
- This option will be manage from Other Settings > WhatsApp Business Configuration > Gear Icon > find Mass Message Configuration
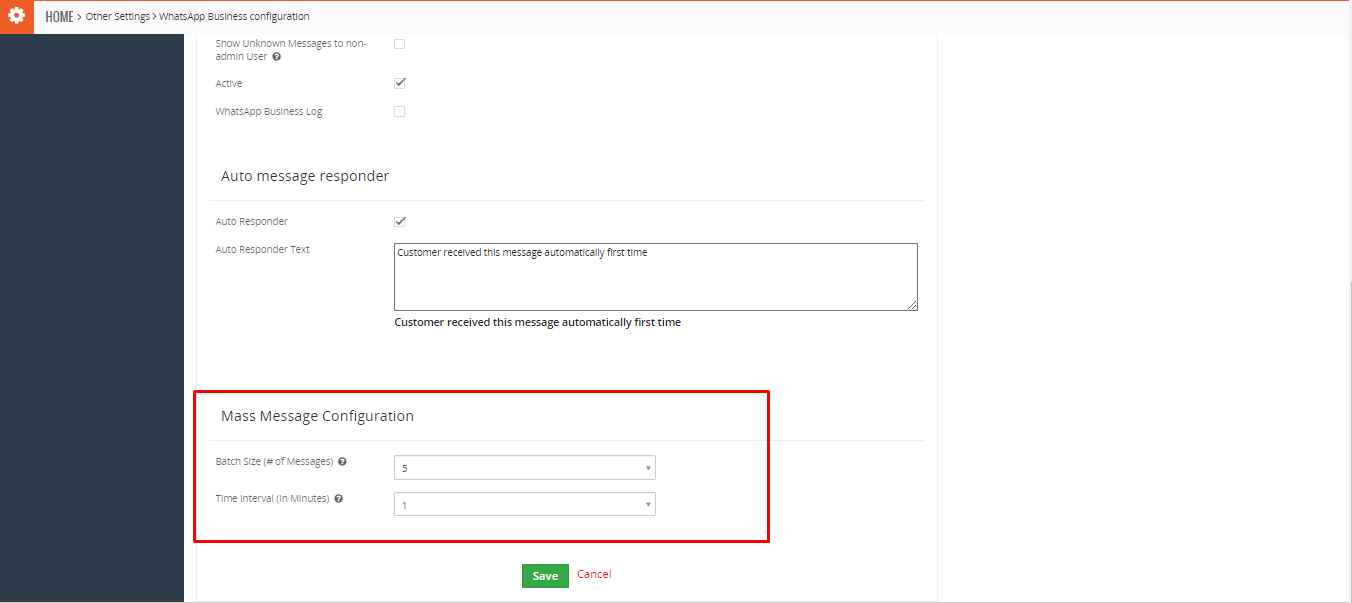
- Batch size allows the user to send mass messages in a batch of messages to avoid Spamming.
- Example : If you wish to send 500 messages and if you set a batch size 15 and Time Interval to 15 minutes. Then it will send 15 messages in each batch based on the Time Interval calculated below.
- Time to send 500 messages = (500 messages / 15 Batch size) * 15 minutes = 500 minutes = 8 Hours Approximately.

- This option will be manage from Other Settings > WhatsApp Business Configuration > Gear Icon
How to use WhatsApp Business Integration for SalesHiker?
- WhatsApp Business Integration with SalesHiker gives you the flexibility to send WhatsApp Business messages to your customers.
- You can send WhatsApp Business messages to multiple records in one shot(obviously you’ve to follow WhatsApp business guidelines for the same).
- In addition to manually sending out messages, you can also forward automatic notifications triggered by workflows in SalesHiker CRM.
Recommendation on Sending WhatsApp Business Messages
- Since WhatsApp is very skeptical about numbers that do bulk mailing, the following are recommendations:
- Send no more than 5-10 messages per minute, i.e. send messages in batches, not all at once.
- The presence of links in messages increases the likelihood of a ban.
- WhatsApp has no physical limit on the number of messages, as per their policy but there is a recommendation not to exceed certain messages per day. Again this will be as per the WhatsApp Policy, if the number of incoming and outgoing messages is about the same, then you can send a little more than 6000.
- Use the device on which there were no earlier bans.
- Receive incoming messages. The more incoming messages, the better. Incoming messages are not counted in the recommendation not to exceed 6000 messages.
Important WhatsApp Features
WhatsApp Business Integration with SalesHiker comes with various nice features.
WhatsApp Business message management
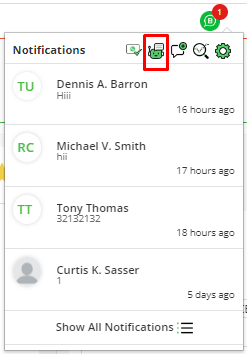
Notification
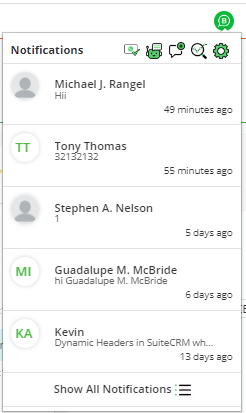
- Here we can see the new arrival messages count when any new message comes.
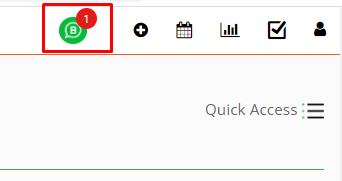
- When we click on this icon it shows the last 5 users messages in the popup.
- When you click on “Unread” message
 icon, it will mark all WhatsApp Business unread messages as read.
 - When you click on “Bot icon”
 it will take to the WhatsApp bot page
 - When you click on “New Message”
 icon, it will open a popup to send message to a new WhatsApp number.
 - When you click on “Analytics”
 icon, it will redirect to WhatsApp Business Analytics interface.
 - When you click on “Settings” icon, it will redirect in WhatsApp Business Configuration page.
- If you want to go to timeline view click on Show All Notification
 icon
icon
Send/receive messages
- Initiate WhatsApp Conversation
- To initiate a WhatsApp conversation, the user needs to send the WhatsApp template first
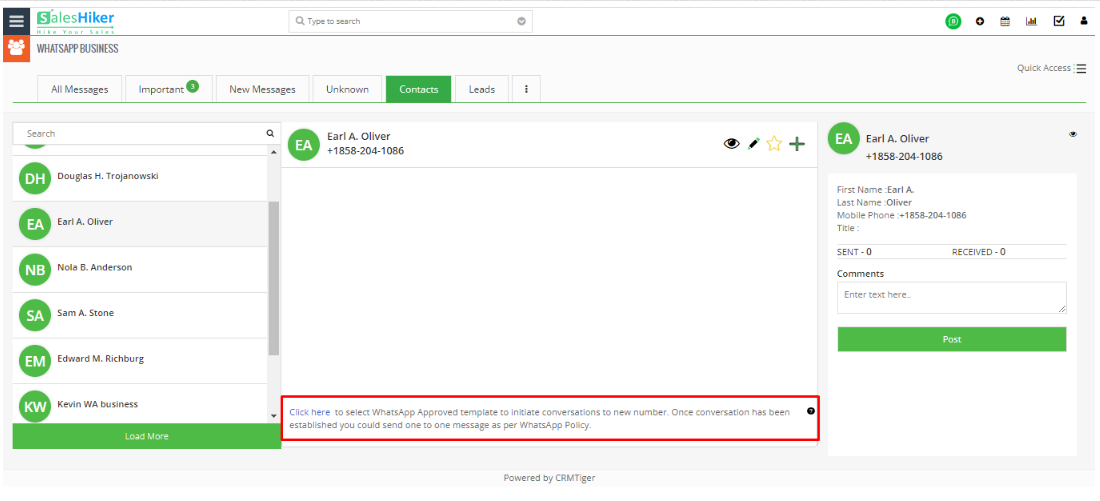
- To initiate a WhatsApp conversation from the contact’s or any other module detail screen, follow these steps:
- Click on ‘particular Module,’ then ‘Go To Record List,’ and open the record in view. You will find an option to access the ‘WhatsApp’ icon. Click on the WhatsApp icon to open the WhatsApp Business conversation chat box.
- Once the template is sent, the chat is initiated, and the user can now start the conversation.
- Click on ‘particular Module,’ then ‘Go To Record List,’ and open the record in view. You will find an option to access the ‘WhatsApp’ icon. Click on the WhatsApp icon to open the WhatsApp Business conversation chat box.
- Send/Receive message from record
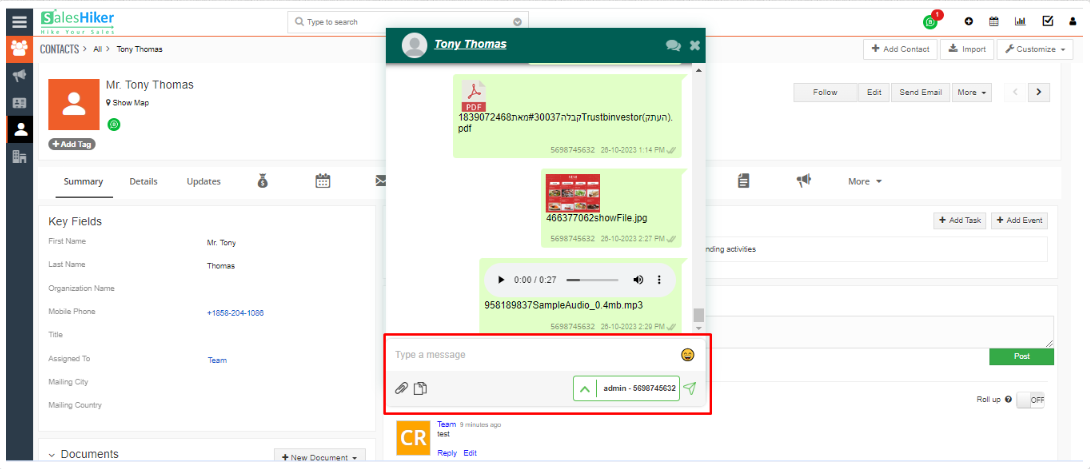
- Clicking on the WhatsApp icon will open the Chat window to communicate between the contact and user.

- Through WhatsApp Business integration you can send, Text messages Files, Images (Upto limited Size based on our file upload limit)
- You can communicate with customers only if the phone number entered in the record must be a WhatsApp number of the customer. Also “WhatsApp Business # field” specified correctly in “WhatsApp Business Configuration” settings
- “WhatsApp” uses numbers with country code so please follow the instructions mentioned in the “WhatsApp Business Configuration” section about country code.
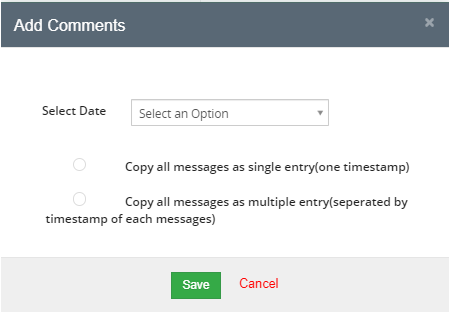
- “Add Chat as Comment” In the chat window there is the feature to add all the chat as comments in that record in CRM as single entry(one timestamp) or multiple entry(separated by timestamp of each message)
- Clicking on the WhatsApp icon will open the Chat window to communicate between the contact and user.
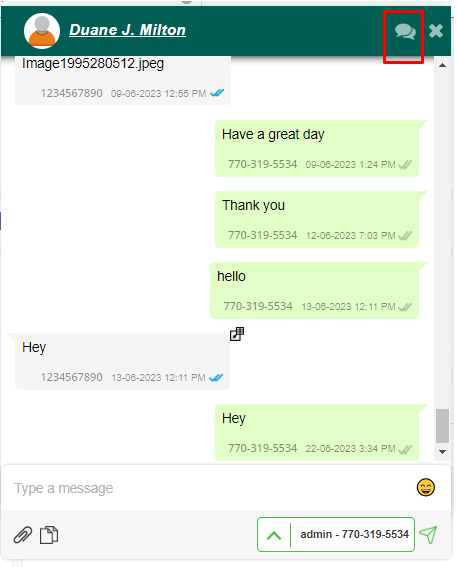
- Send/Receive message from Timeline view
General Feature
-
New Messages
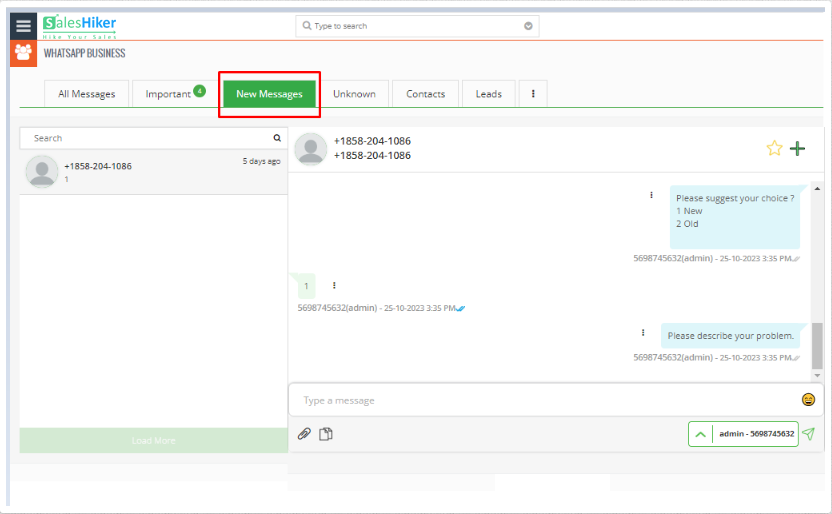
- In the WhatsApp Business Global messages, New messages area list display all unread messages either from “unknown number” or “existing contact records”
- Global WhatsApp Business messaging has the same option as sending/receiving message to individual records
- Important messages
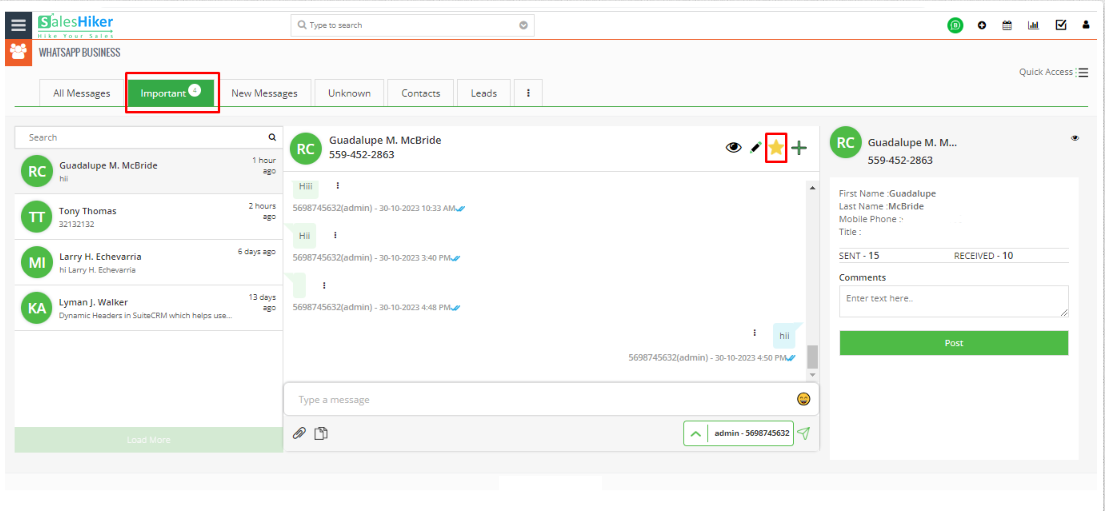
- Important feature helps you to quickly access your WhatsApp Business contact which is important.
- You can manage to move any contact under Important by simply click on
 icon to move contact under Important contact.
- Message from unknown number
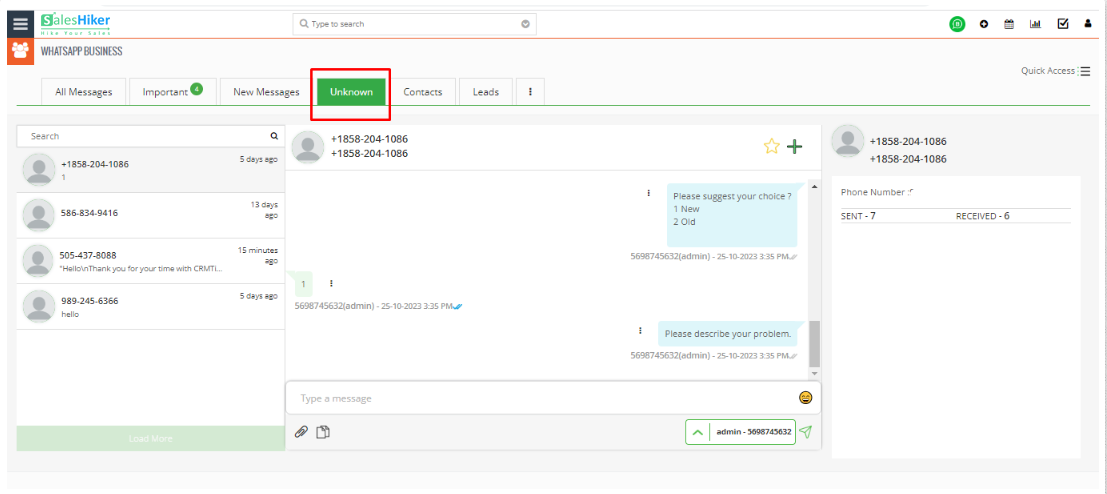
- “Unknown numbers” in the WhatsApp Business Global messages area list all messages from an “unknown number” not stored as a record in CRM.
- “Unknown numbers” messaging section has the same option as sending/receiving messages to individual records.
- From Unknown number there is an option to Create new customer record or update “Unknown number” to existing record in SalesHiker.
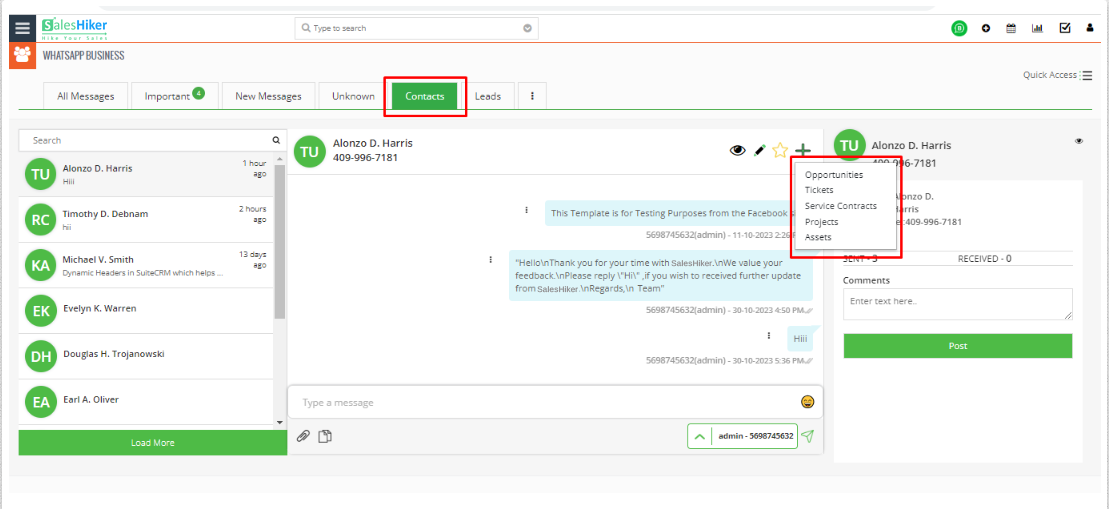
- Create Related record from WhatsApp Business message
- This functionality allow user to create record for the particular contact from message window of WhatsApp
- This functionality allow user to create record for the particular contact from message window of WhatsApp
-
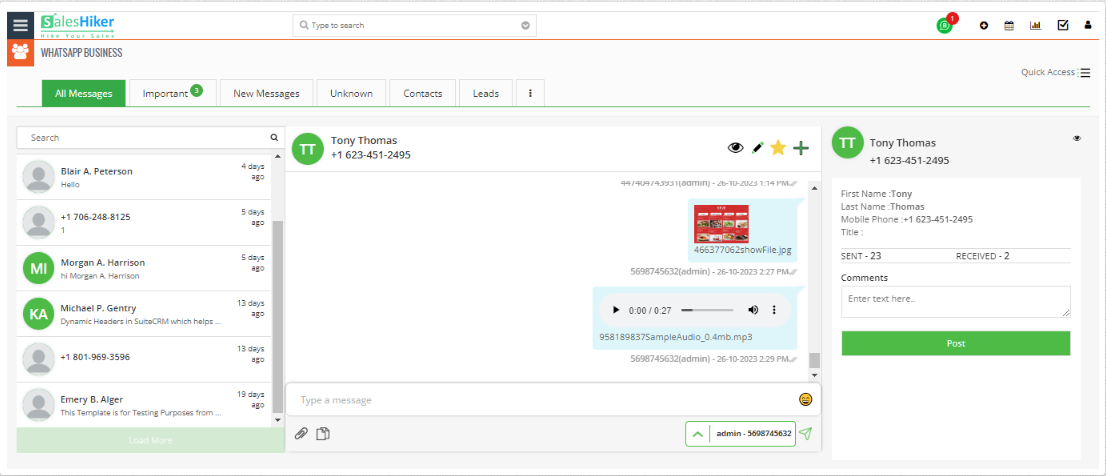
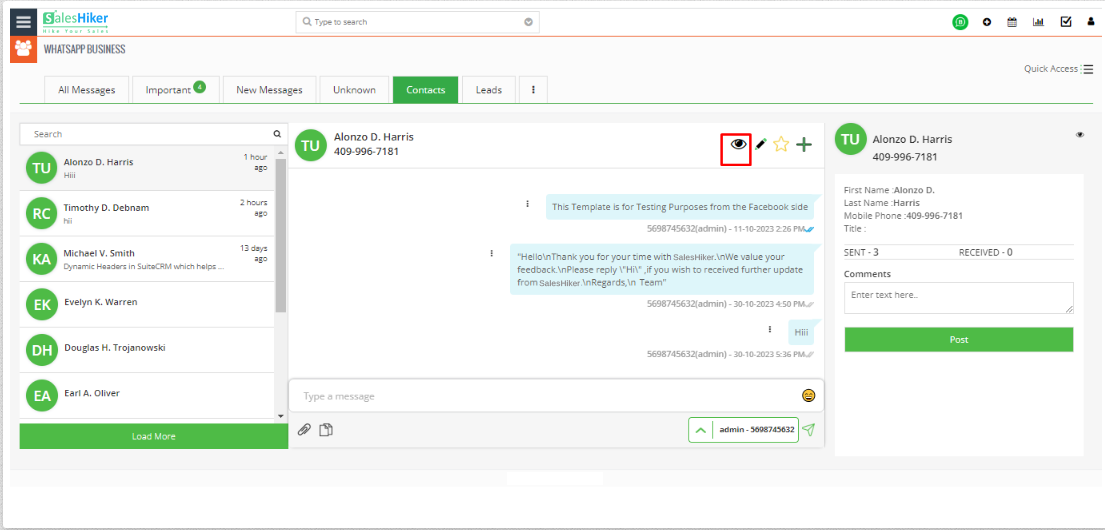
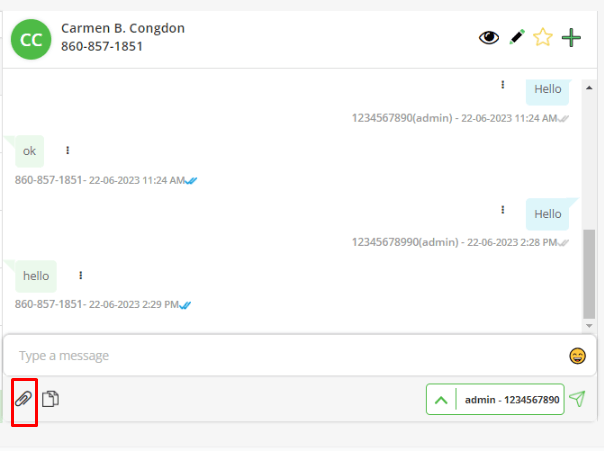
- Preview Record
- Click on Eye Icon, It will preview all the details of record.
- Click on Eye Icon, It will preview all the details of record.
- Edit Record
- Click on Pen Icon, to quick edit contact record details from the Timeline View.
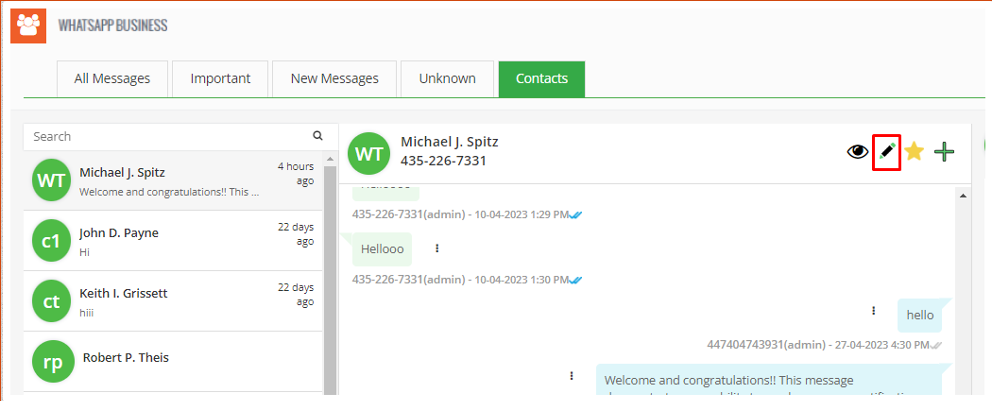
- Click on Pen Icon, to quick edit contact record details from the Timeline View.
- Reply Message
- Click on three dots of the Message you want to reply, then user can reply to that message by click on the reply feature.
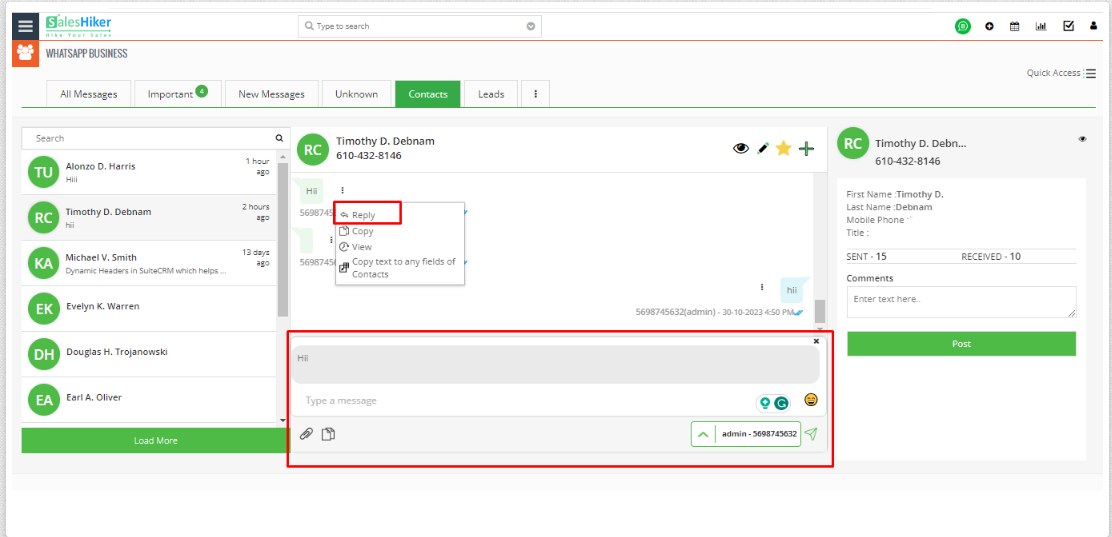
- Click on three dots of the Message you want to reply, then user can reply to that message by click on the reply feature.
- Preview Record
-
- Copy Message
- Users can copy that message by click on the “copy” feature.
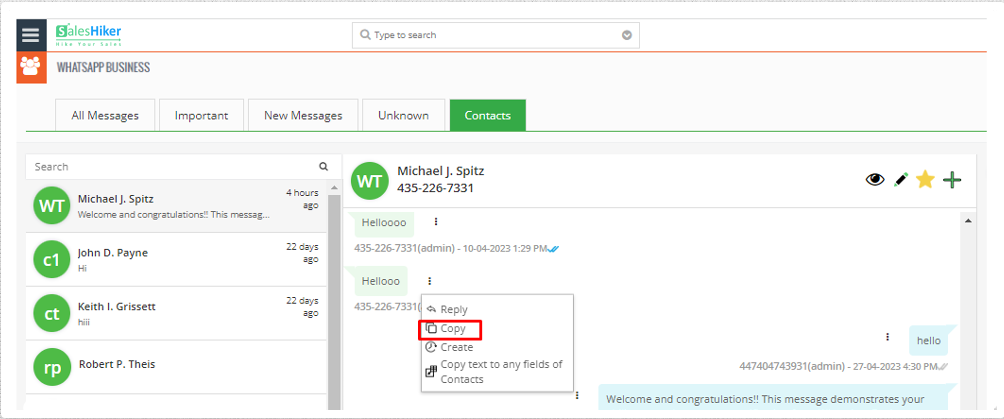
- Users can copy that message by click on the “copy” feature.
- Copy text to any fields of Contacts
- By click on “copy text to any field of contact” feature, the user can Copy the message and save it to any field of the record.
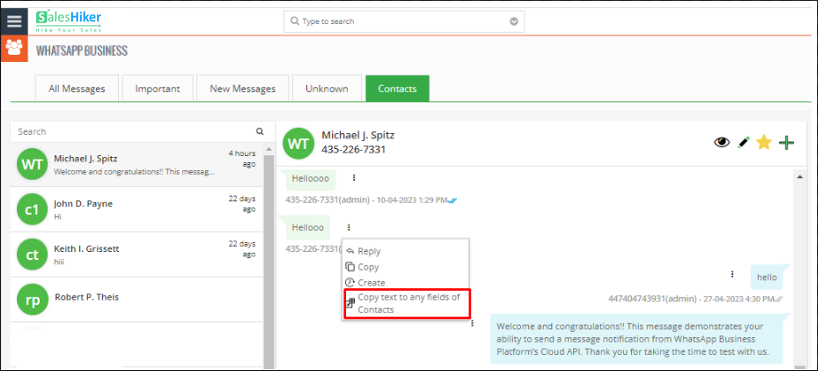
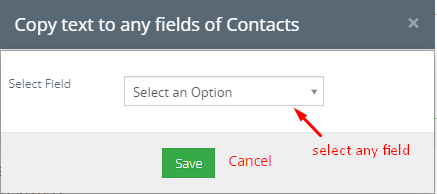
- By click on “copy text to any field of contact” feature, the user can Copy the message and save it to any field of the record.
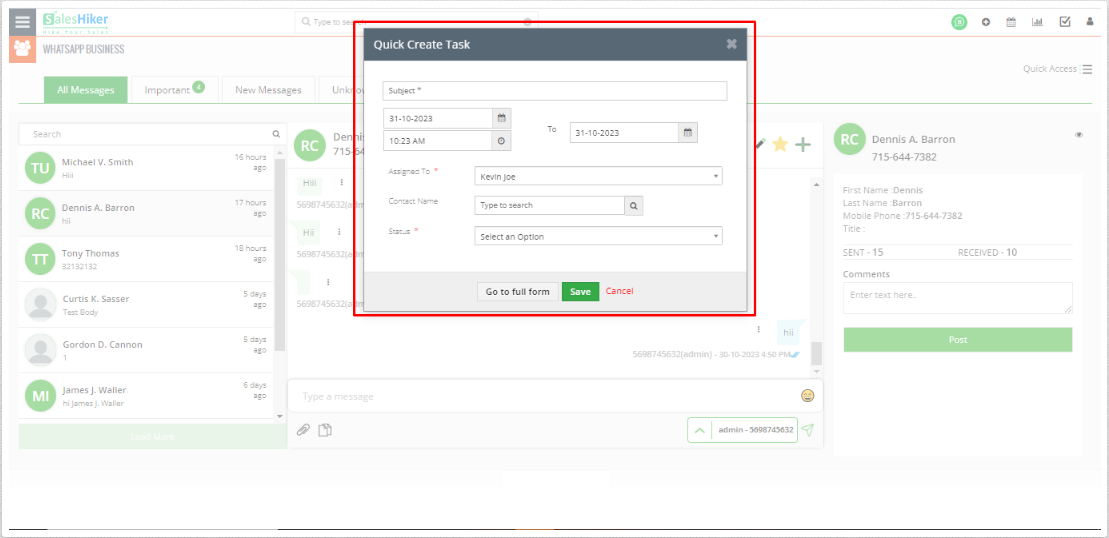
- Create Task
- Click on three dots, Go to create.
- Users can create tasks based on the messages.

- Search Contact in Timeline
- Users can search contact by Number and Name of the Contact in Timeline View.
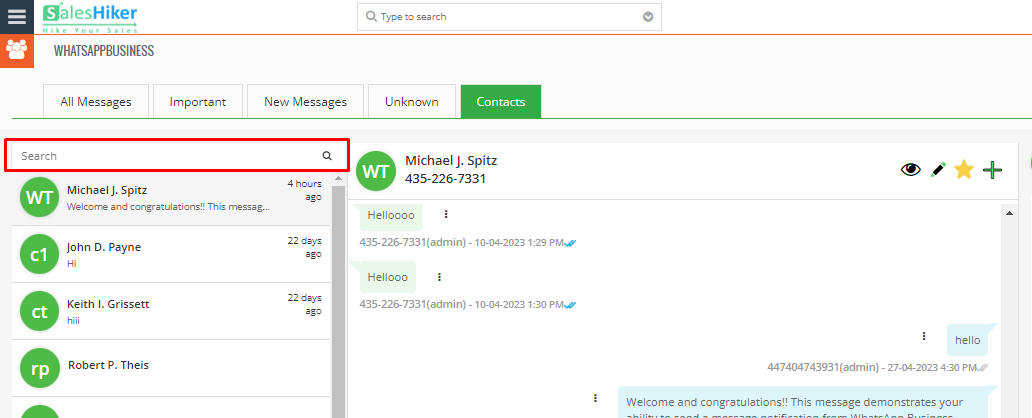
- Users can search contact by Number and Name of the Contact in Timeline View.
- Send Attached file/Document in Timeline
- User can send attachment of file/Documents directly from the timeline page
- User can send attachment of file/Documents directly from the timeline page
- Copy Message
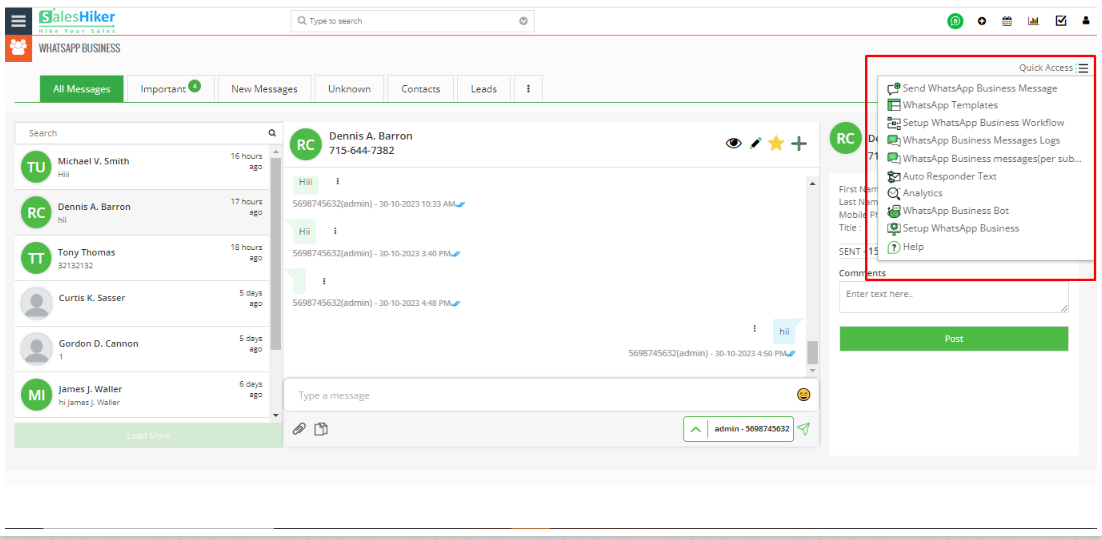
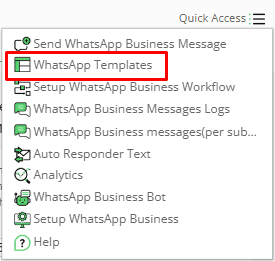
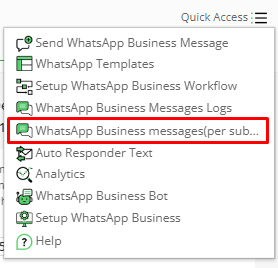
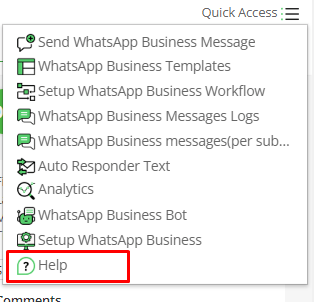
Quick Access
- Quick access in timeline view allow you to quickly access various options of WhatsApp Integration for SalesHiker.
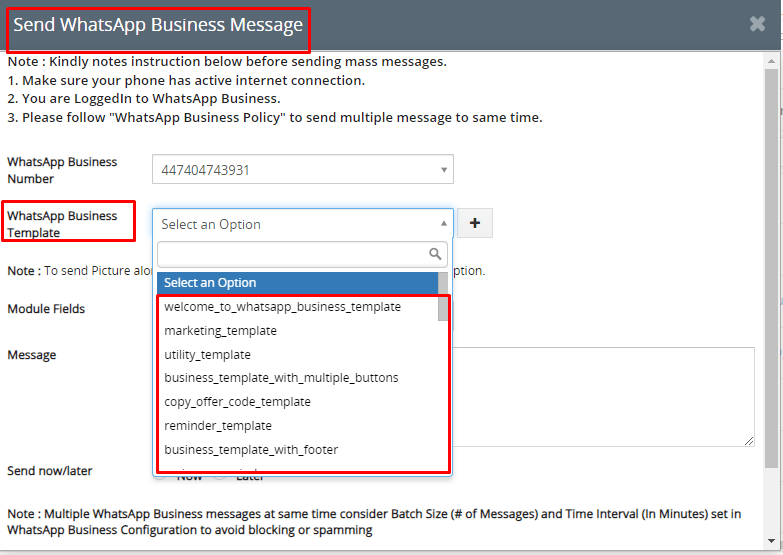
- Send WhatsApp Business Message
- WhatsApp Business Template
- Setup WhatsApp Business Workflow
- WhatsApp Business Messages Logs
- WhatsApp Business Messages Logs(per subscribers)
- Auto Responder Text
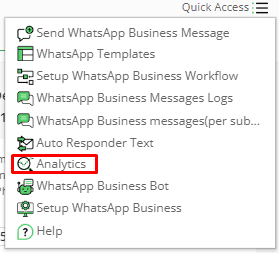
- Analytics
- Setup WhatsApp Business
- Help
- Send WhatsApp Business Message
- It provides the capability to send WhatsApp Business messages to unknown or unsaved contacts, as well as the ability to send messages from any number
- WhatsApp Business messages to New WhatsApp Number
- WhatsApp Business Message is to send Business Template to the new number directly from the timeline without saving the record to the CRM
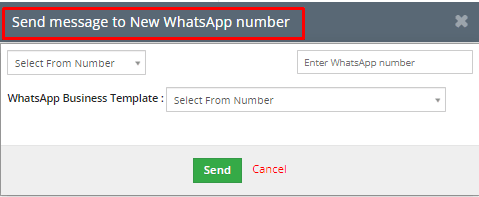
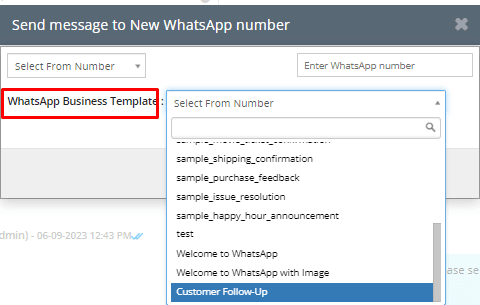
- User can select WhatsApp Business Template.
- WhatsApp Business Message is to send Business Template to the new number directly from the timeline without saving the record to the CRM
- WhatsApp Business messages to New WhatsApp Number
- It provides the capability to send WhatsApp Business messages to unknown or unsaved contacts, as well as the ability to send messages from any number
- WhatsApp Business Templates
- Create WhatsApp Business Template
Users can create a WhatsApp Business Template in two ways.
- Facebook Developer page
- WhatsApp Business Create Template page.
- Create WhatsApp Business Template
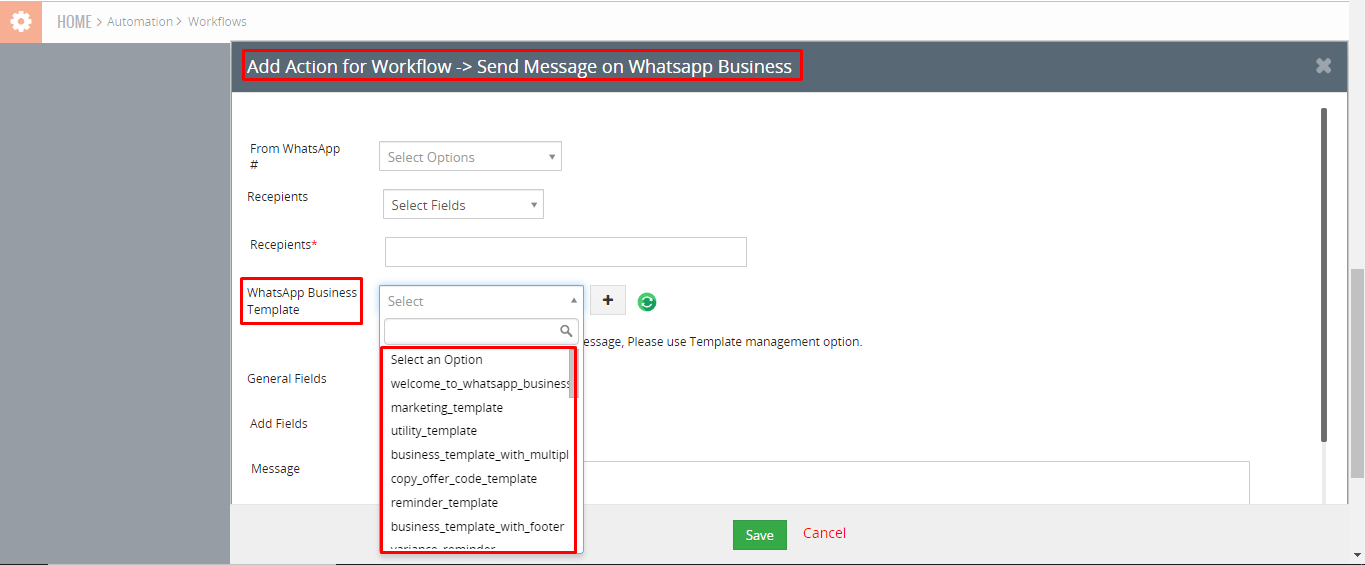
- Setup WhatsApp Business Workflow
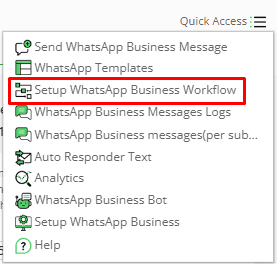
- WhatsApp Business Workflow allows sending Automated WhatsApp messages on the trigger event of any module link with the WhatsApp Business module.
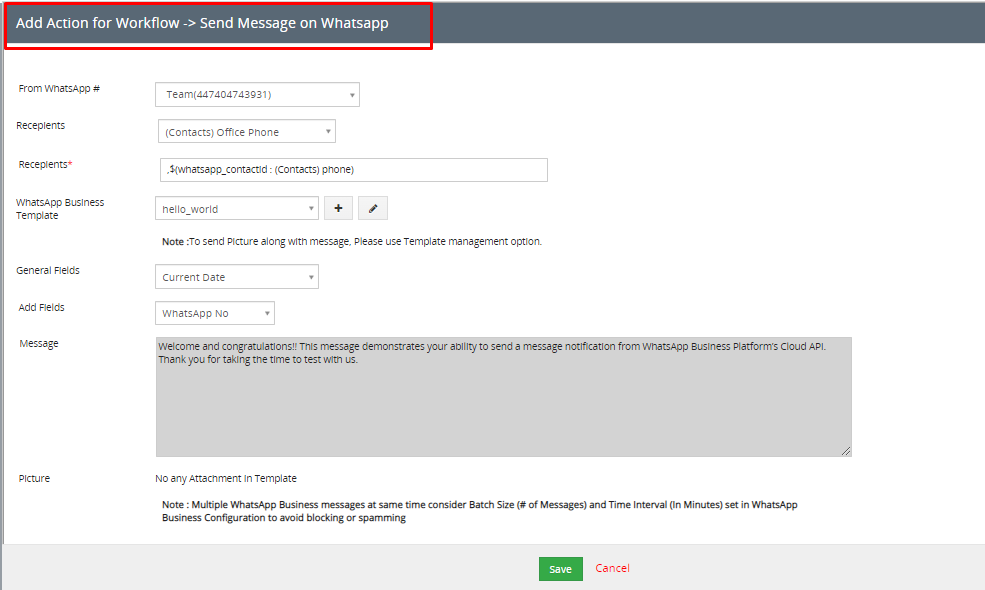
- Automated WhatsApp Business message sent to an Individual WhatsApp number associated with a selected WhatsApp Business number.
- Select “From WhatsApp#” to send WhatsApp from the selected WhatsApp number if more than one number is registered in the WhatsApp extension.
- Select “Send WhatsApp to Recipients” to send a WhatsApp Business message to record.
- The WhatsApp Business workflow can configure the WhatsApp Business messages to whom we want to send individually WhatsApp Business templates to share files or message format, general field, add fields and message.
- WhatsApp Business Workflow allows sending Automated WhatsApp messages on the trigger event of any module link with the WhatsApp Business module.
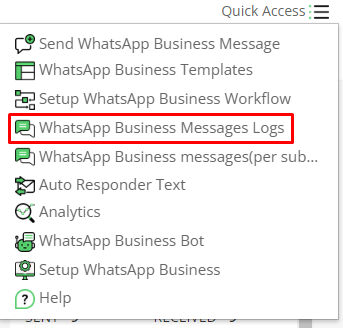
- WhatsApp Business Messages Logs
- WhatsApp Business message Logs navigate to a list screen of sent WhatsApp Business messages which displays all sent Business message logs with API Request and Response.
- WhatsApp Business message(Per subscriber)
- WhatsApp Business messages, per subscriber, can navigate to a list screen of WhatsApp logs, displaying user-specific information, or they can show a list categorized by subscribers
- WhatsApp Business message Logs navigate to a list screen of sent WhatsApp Business messages which displays all sent Business message logs with API Request and Response.
- Auto Responder text
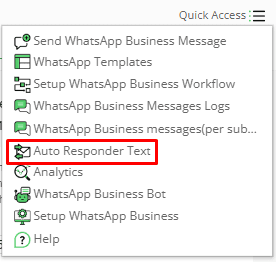
This option will be enabled from Other Settings > WhatsApp Business Configuration > Gear Icon > Auto Message Responder
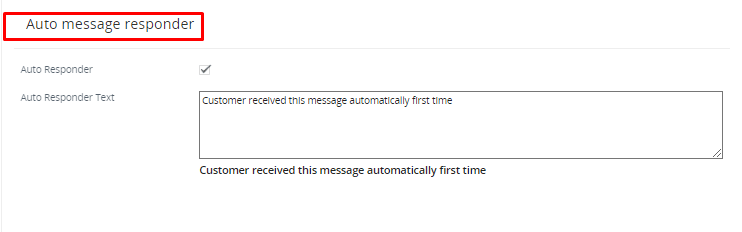
- It is helpful to enable automatic responses to messages, which means you can set up pre-written messages to be sent automatically to the sender.
Analytics
- Send / Receive statistics
- Broadcast statistics
- Chatbot statistics
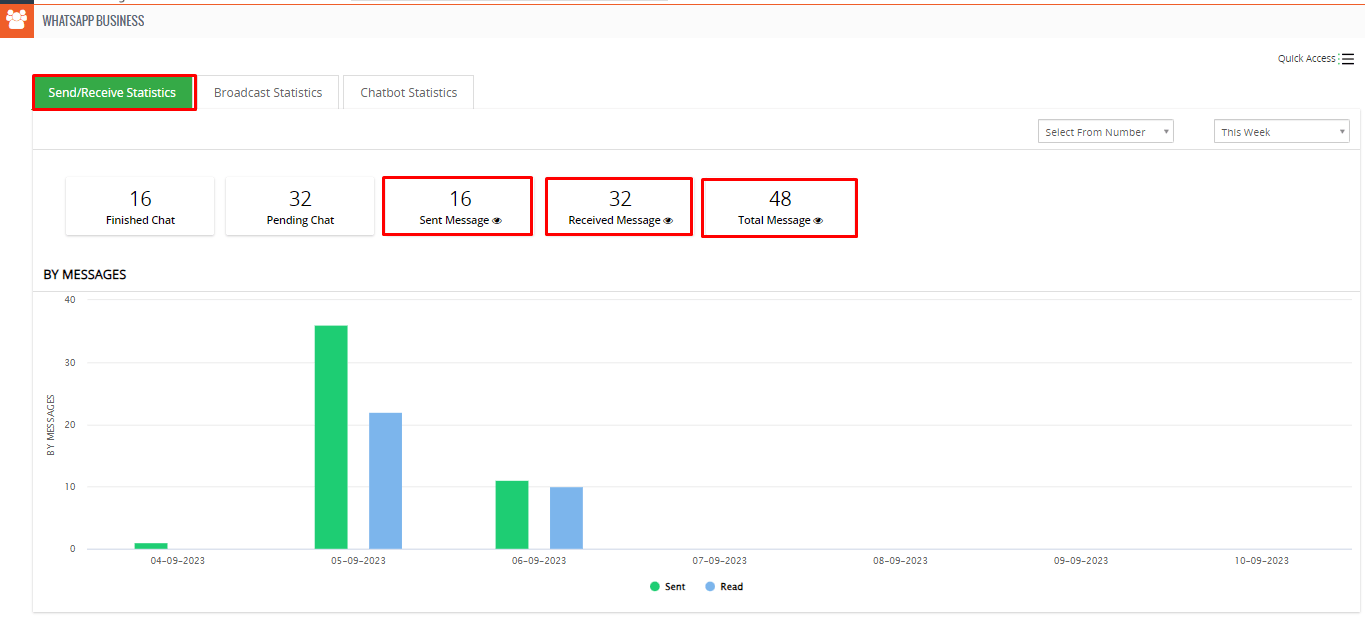
- Send/Receive Statistics
The Send/Receive Statistics will display the following information:- ‘Finished Chat’ for the last sent message from CRM
- ‘Pending Chat’ for the number of messages that are pending
- ‘Sent Messages’ for the total count of sent messages from CRM
- ‘Received Messages’ for the total count of received messages to the CRM
- ‘Total Messages’ which represents the combined count of both sent and received messages in CRM.
- Total Sent Message eye icon link will redirect to the sent message list.
- Total Received Message eye icon link will redirect to received message list.
- Total Message eye icon link will redirect to the total sent and received message list.
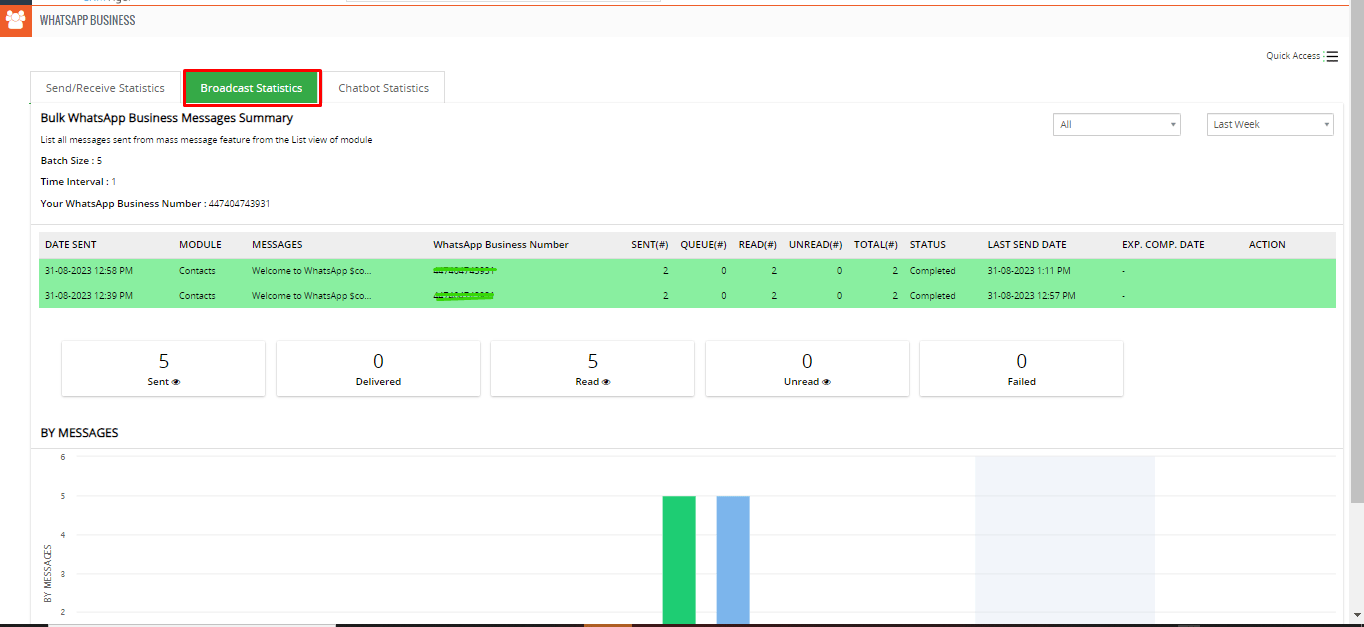
- Broadcast Statistics
- The Broadcast Statistics will display the total count of ‘Sent’, ‘Delivered’, ‘Read’, ‘Unread’, and ‘Failed’ messages for all bulk message lists.
- WhatsApp analytics accessible from WhatsApp icon on Top Right corner or click on (analytics).
- WhatsApp analytics offer you detailed reports specifically on Bulk messages sent to your customers.
- WhatsApp Business Bulk Message Summary
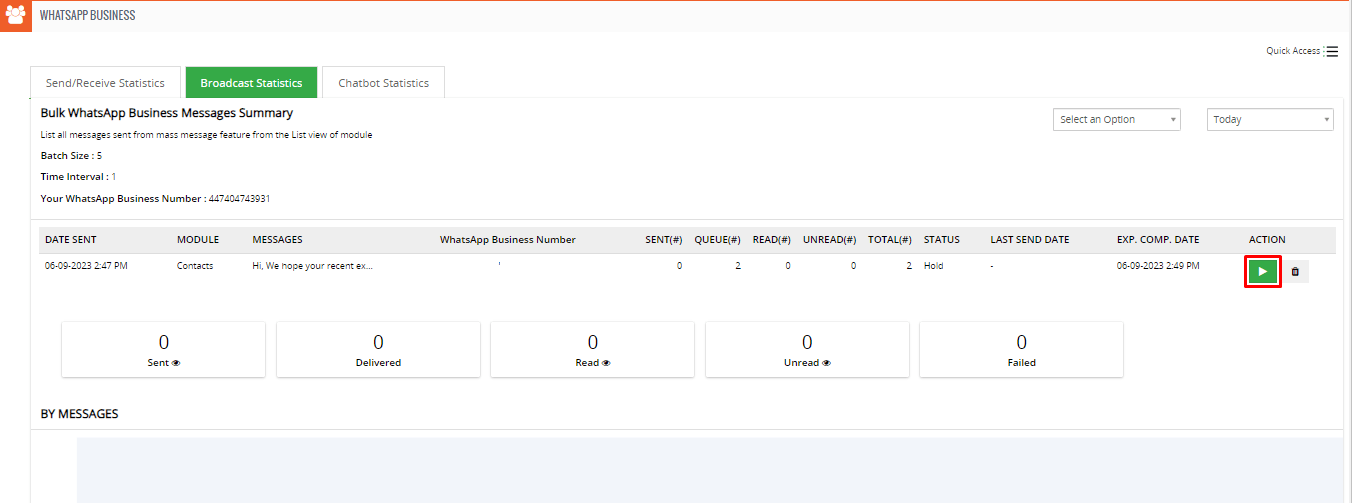
- The WhatsApp Business bulk message summary list will display the status of each message, including the number of messages in the queue, sent messages, read messages, unread messages, and the total count.
- Users can Stop/Pause bulk message operation by simply click on Start/Pause button to the message those are in Queue
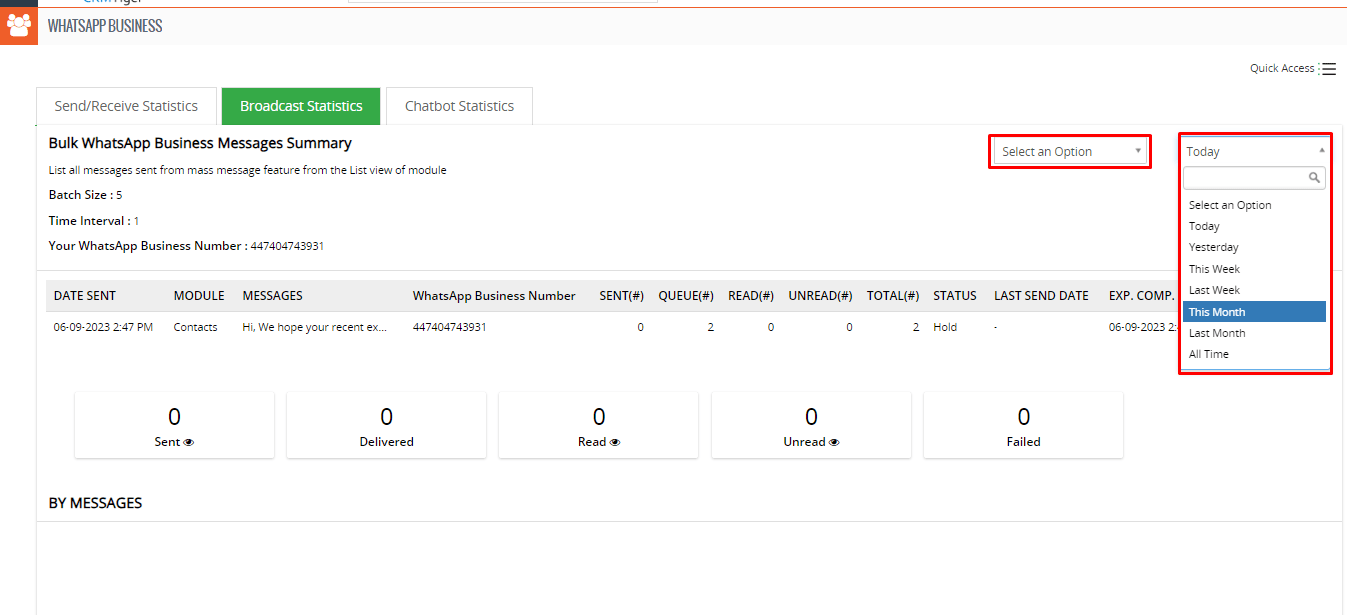
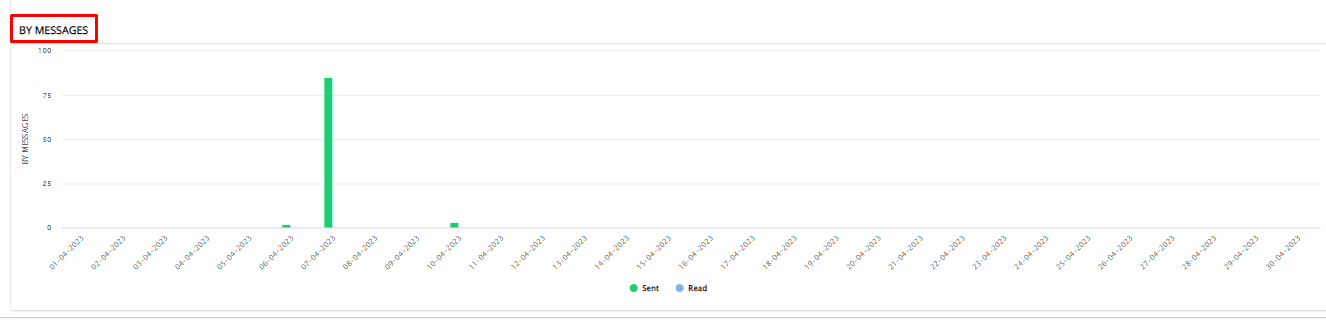
- By clicking on this feature shown in the below screenshot users can view data on sent mass messages based on the selected number and day/week/month.
- Report by message
- The Broadcast Statistics will display the total count of ‘Sent’, ‘Delivered’, ‘Read’, ‘Unread’, and ‘Failed’ messages for all bulk message lists.
- Chatbot statistic
- This Chatbot Statistic option will show total count of “Active Chat” for initiated chat of all customers, “Finished Chat” of chatbot with customer, “Sent Messages” from chatbot, “Received Message” in chatbot And “Total Messages” of all sent/received message of chatbot.
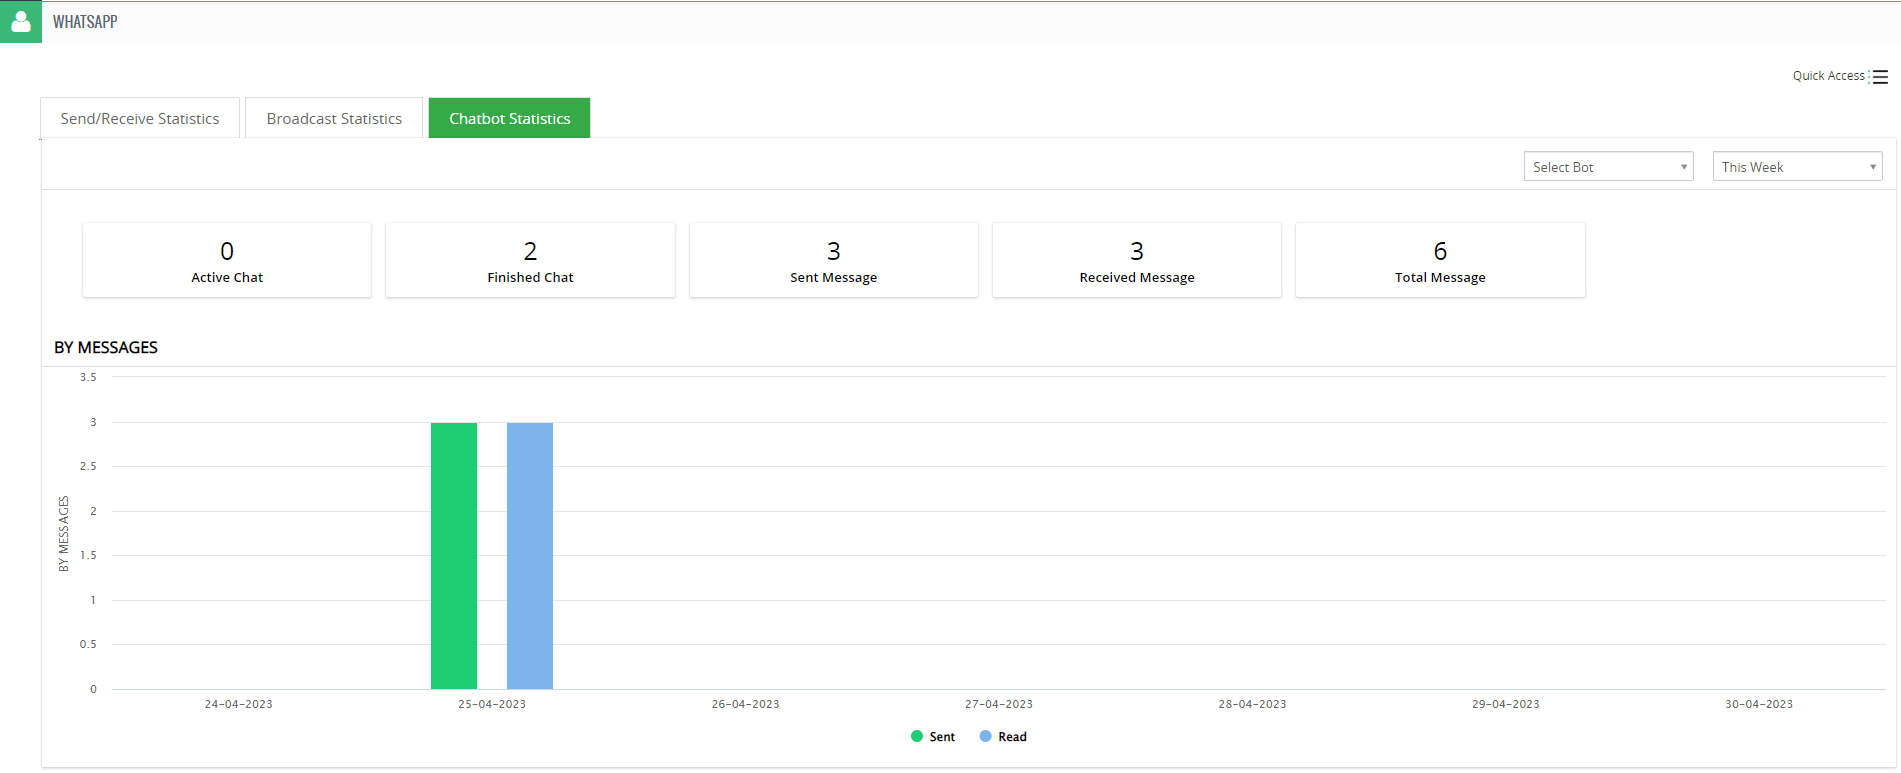
- This Chatbot Statistic option will show total count of “Active Chat” for initiated chat of all customers, “Finished Chat” of chatbot with customer, “Sent Messages” from chatbot, “Received Message” in chatbot And “Total Messages” of all sent/received message of chatbot.
- WhatsApp Business Bot
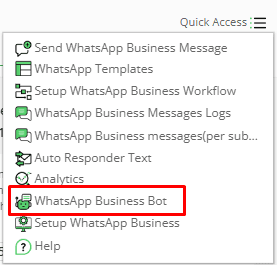
- By clicking on the WhatsApp Bot, User will move to the main screen of WhatsApp Bot.
- By clicking on the WhatsApp Bot, User will move to the main screen of WhatsApp Bot.
Setup WhatsApp Business
- By clicking on “Setup WhatsApp Business” the user get redirected to the WhatsApp Business configuration page

Help
- When the user clicks on ‘Help,’ it redirects to the SalesHiker article that helps understand how to install and use WhatsApp Business integration.
Bulk / Mass Message Configuration
- Bulk/Mass message manage from Other Settings > WhatsApp configuration > Gear Icon > find Mass Message Configuration

-
- Users can send Bulk/Mass message from Record List of CRM for those modules which are enabled from “Allow module access” feature from WhatsApp configuration page
- Users can send Bulk/Mass message from Record List of CRM for those modules which are enabled from “Allow module access” feature from WhatsApp configuration page
-
- From the record list, select multiple records, then go to ‘Send WhatsApp Business Message’ to send bulk WhatsApp messages to multiple contacts.
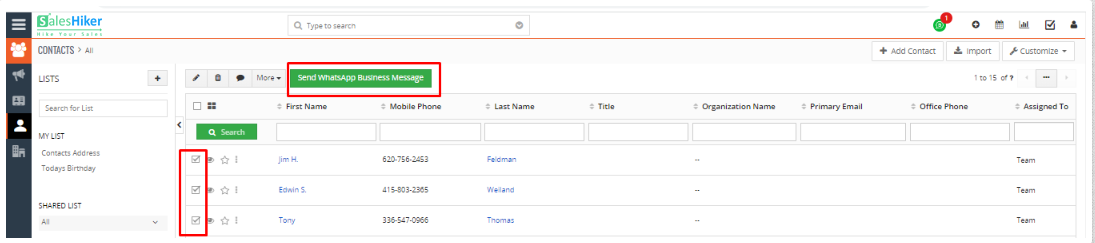
- From the record list, select multiple records, then go to ‘Send WhatsApp Business Message’ to send bulk WhatsApp messages to multiple contacts.
-
- Users can send bulk messages immediately or schedule them for a later date by selecting the desired time from the ‘Send Now/Later’ option.

- Users can send bulk messages immediately or schedule them for a later date by selecting the desired time from the ‘Send Now/Later’ option.
WhatsApp Business Chatbot
- How to Use WhatsApp Business Chatbot for CRM?
WhatsApp Business chatbot for CRM is Automated tools along with manual send/receive message to WhatsApp Business contact from SalesHiker. - How to set up a WhatsApp Business Chatbot?
- Go To WhatsApp Business Chatbot interface: by clicking on the “Chatbot” icon:
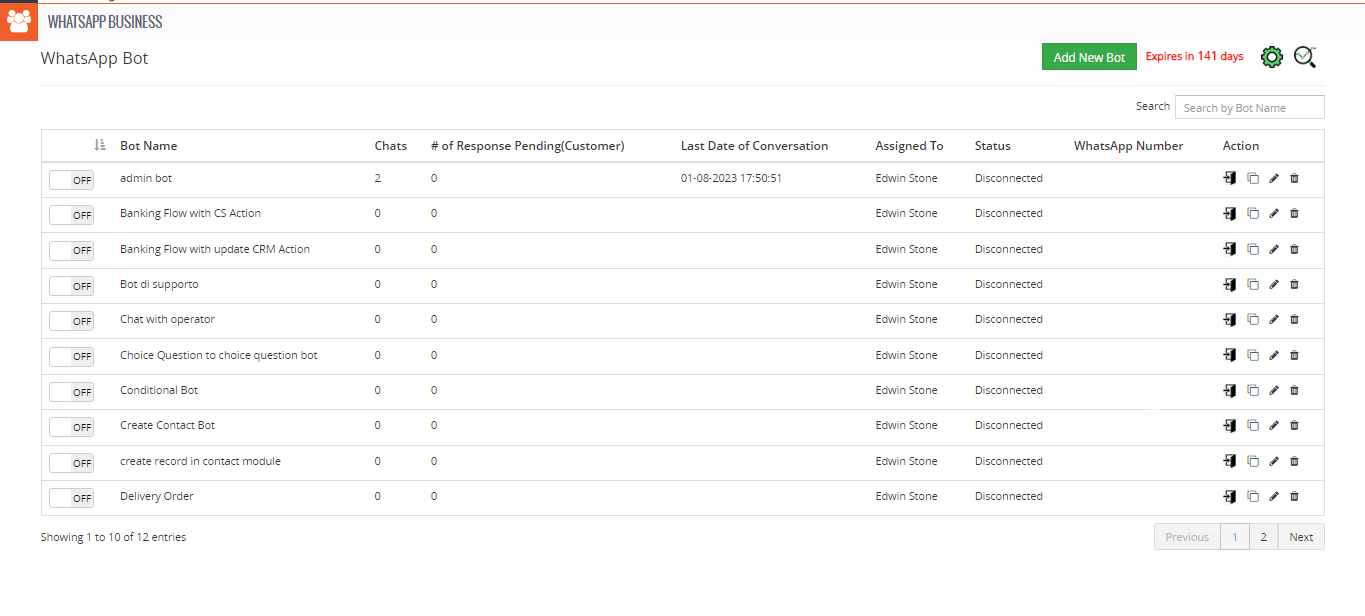
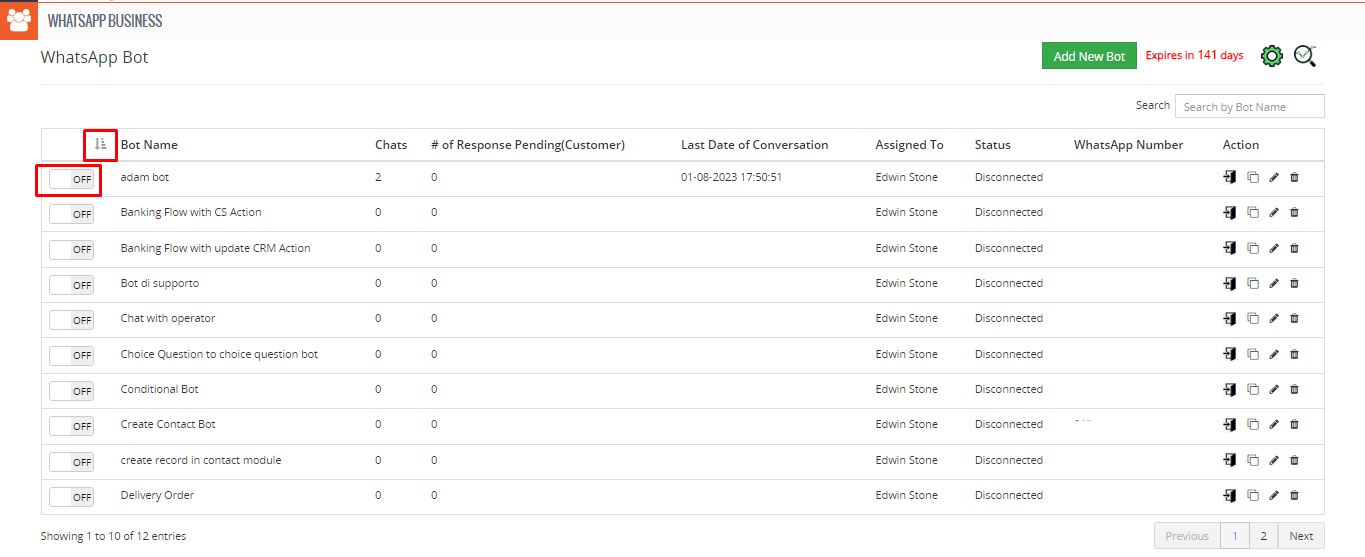
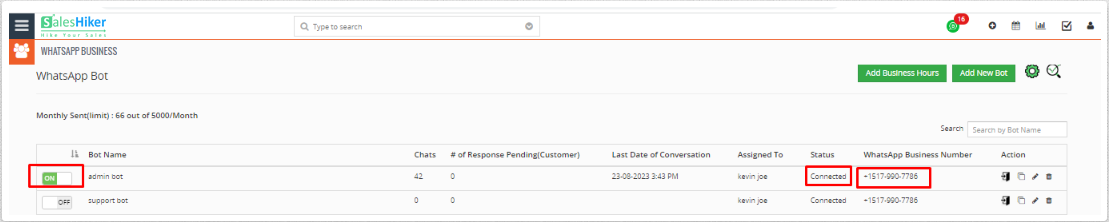
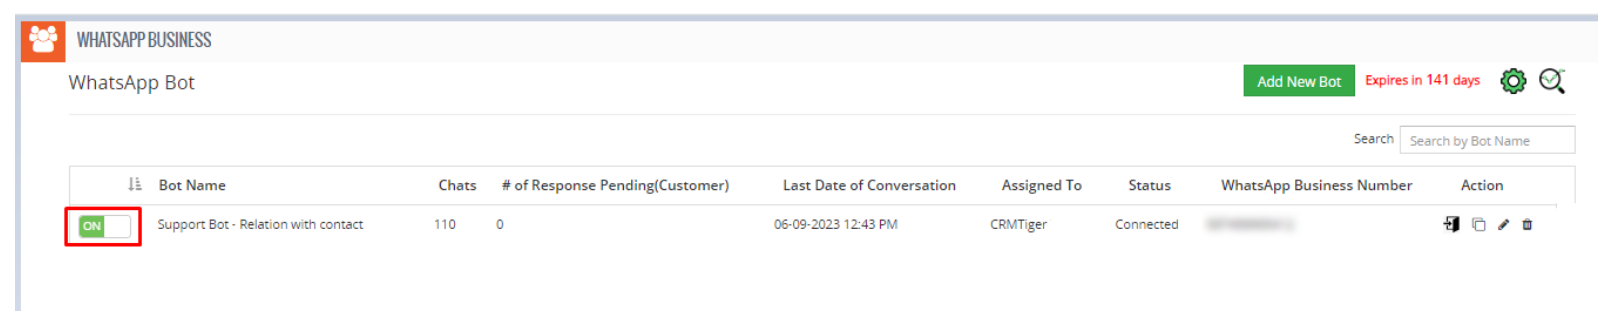
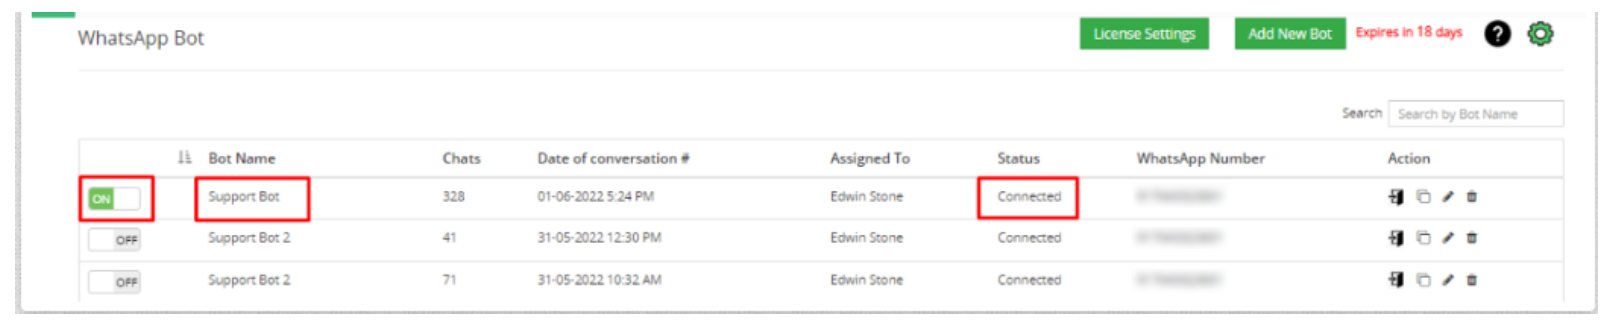
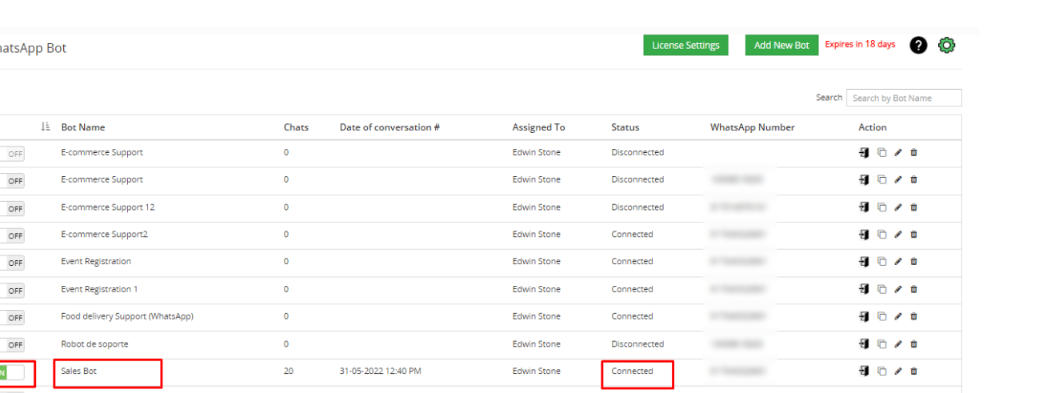
- Go to create a new Chat bot by clicking on the “Add New Bot” button.
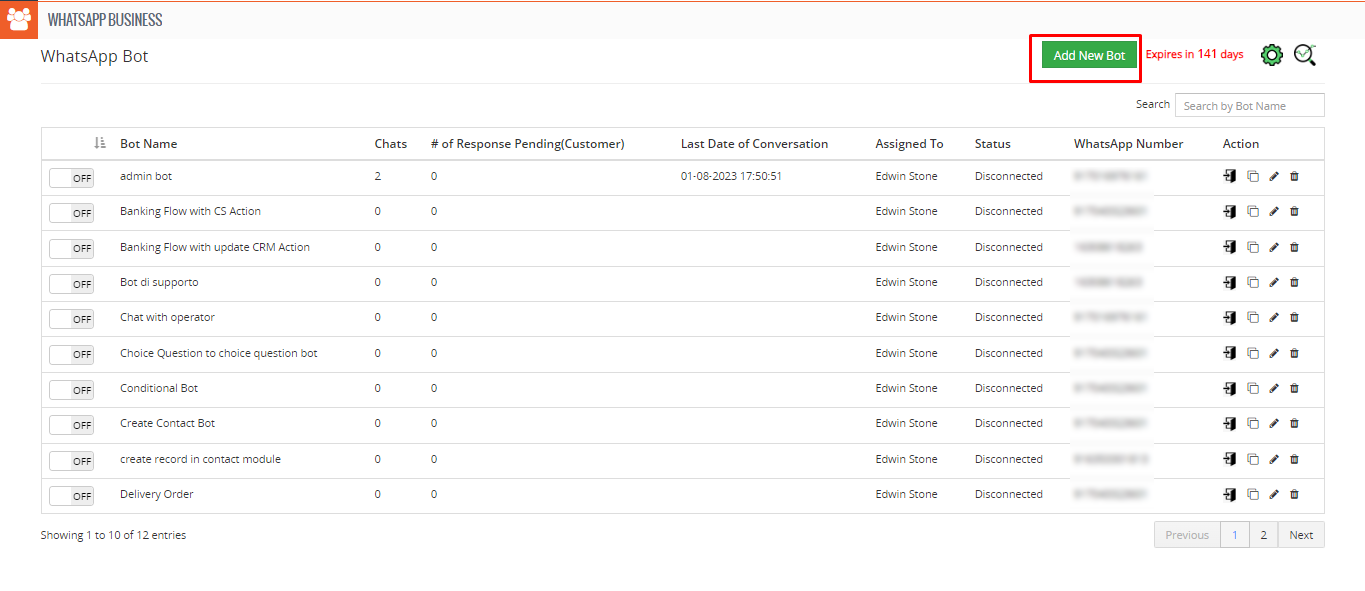
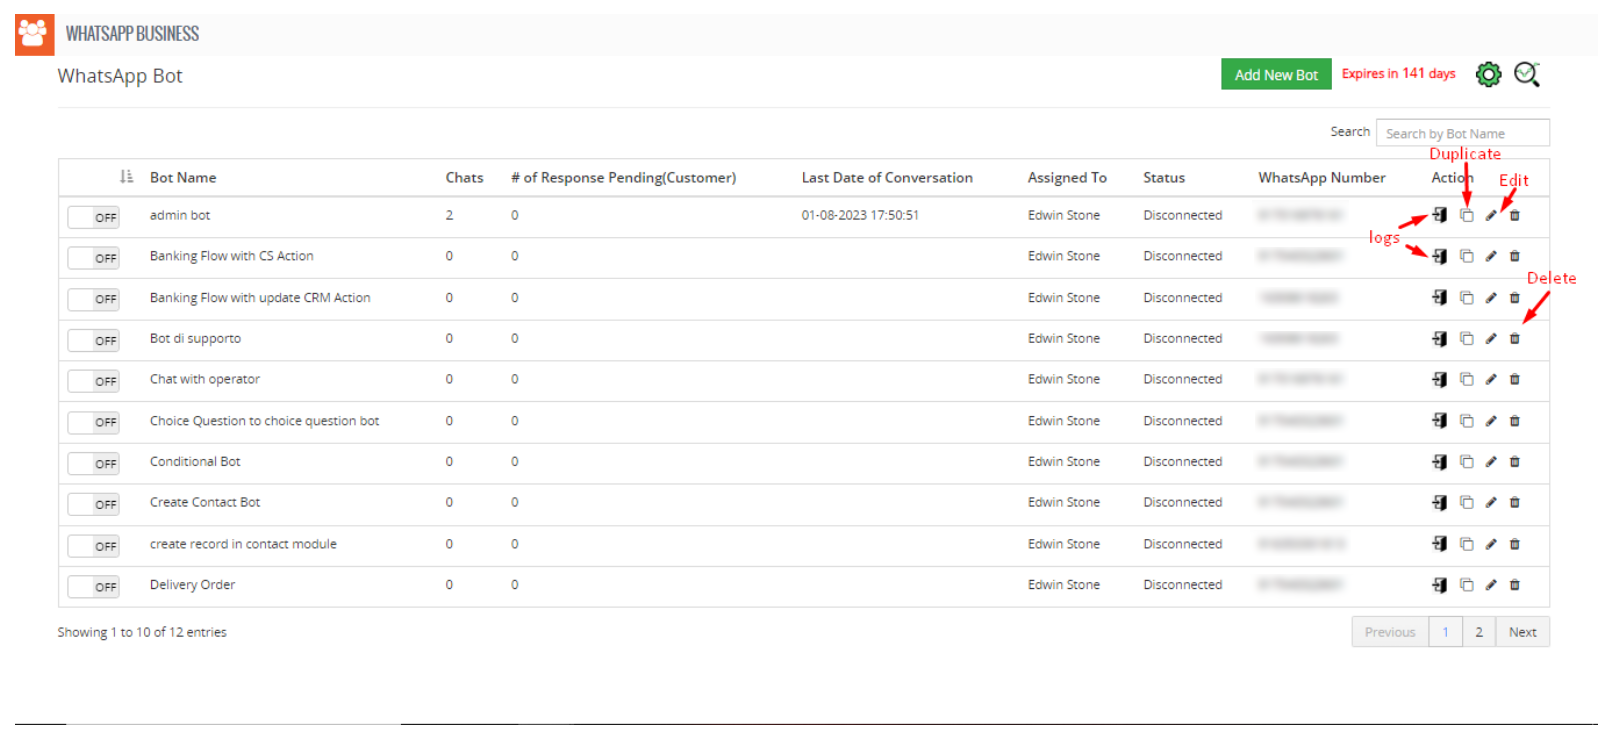
- Users can edit, duplicate and delete WhatsApp Business Bot by clicking on related icons.
- Users can view the chat for that flow by clicking on the Chat log according to Bot ID.
- Chats display the total numbers of the message conversations for that bot from different numbers.
- Users can see the modified date and time of the conversation for the flow which is displayed in the Date of conversation column.
- Go To WhatsApp Business Chatbot interface: by clicking on the “Chatbot” icon:
- Search in WhatsApp Business Bot Listing
- Users can search Bot from List of Bot by entering Bot name.
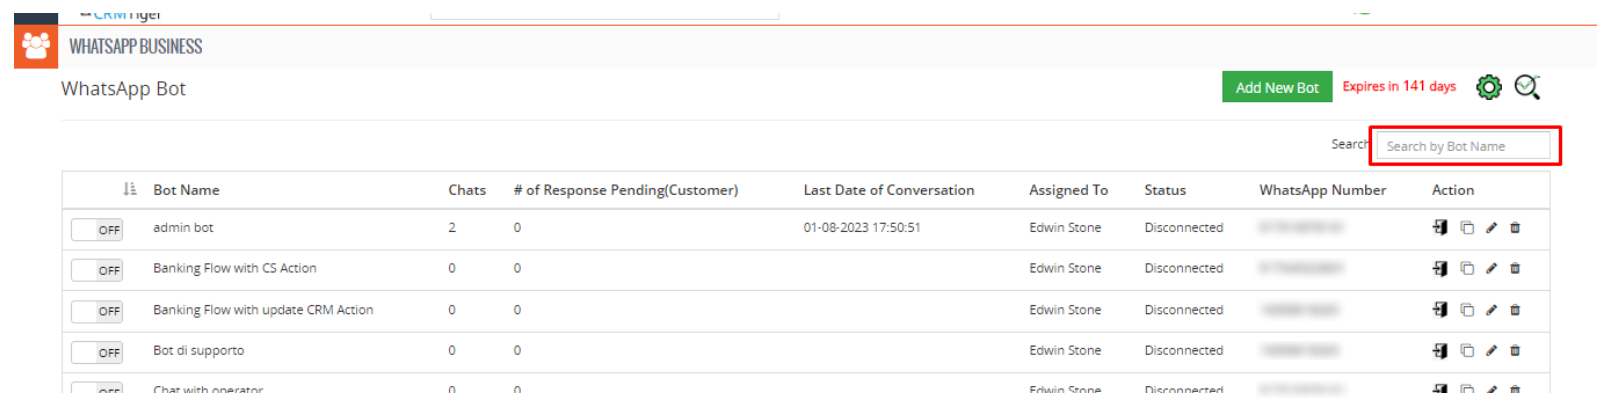
- Users can search Bot from List of Bot by entering Bot name.
- How to create a Chatbot button?
- Users can design a WhatsApp Business Chat button to place on your website integrated with the WhatsApp Business Chat Bot.
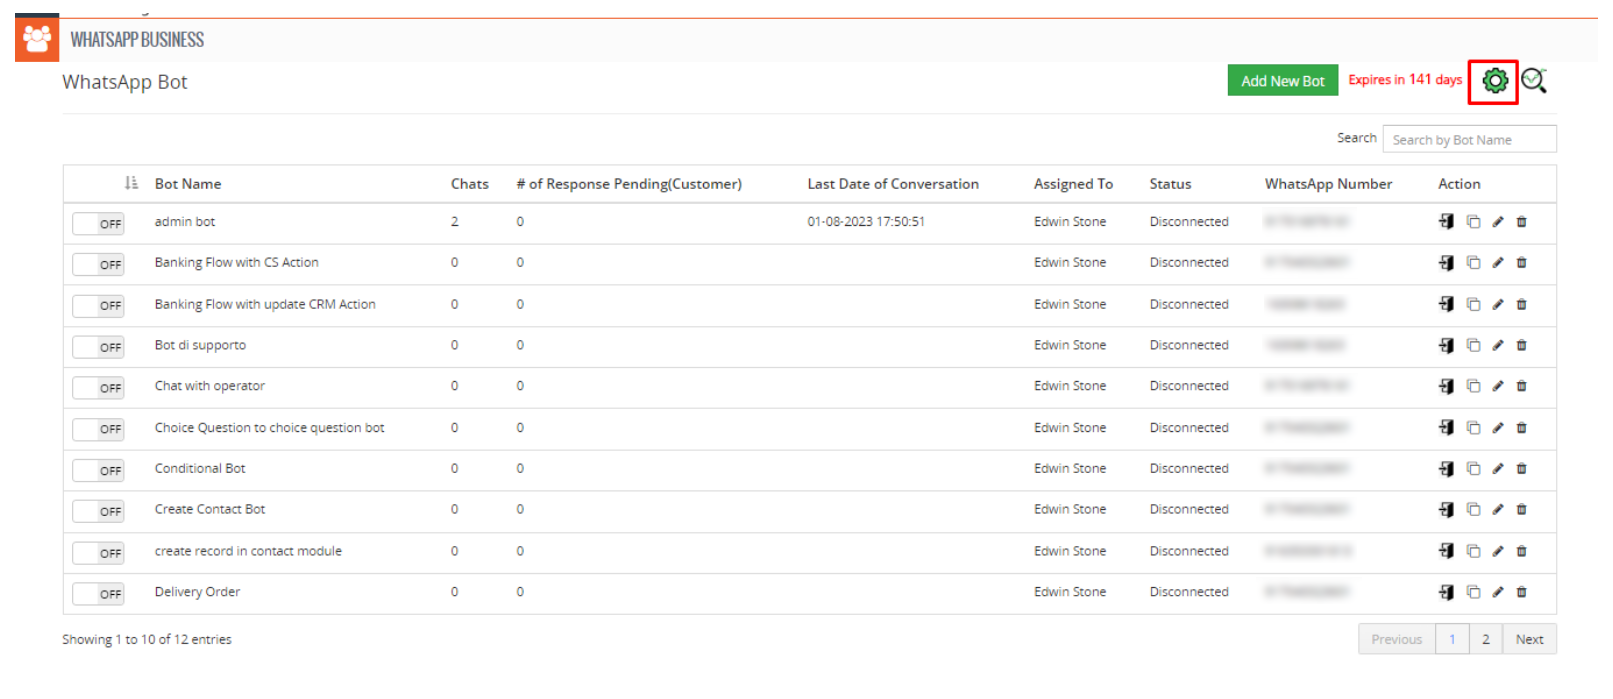
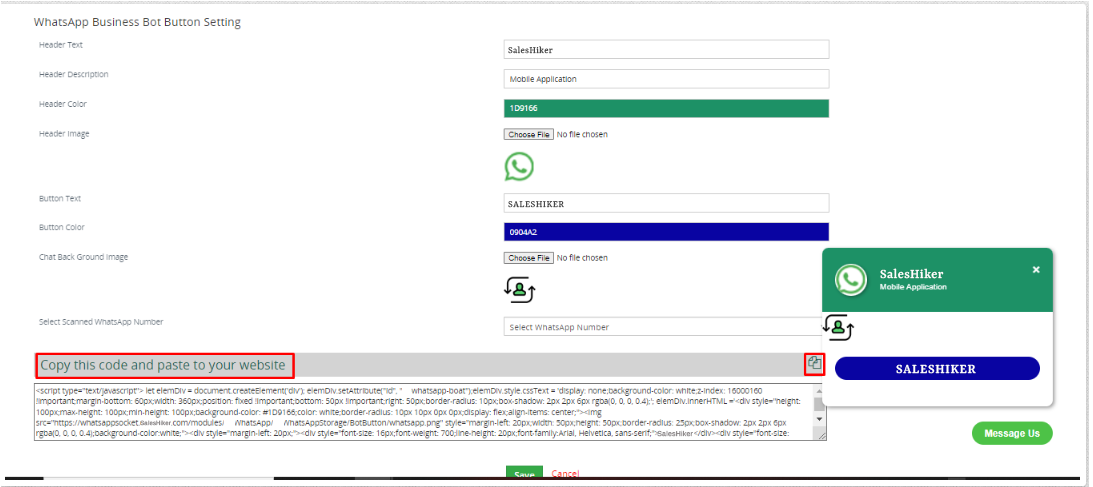
- Users can create a Chatbot button for their website by clicking on the WhatsApp Business Bot Settings icon > WhatsApp Business chat Button > WhatsApp Business Bot Button Setting.
- Users have to fill in all the required details to design the Chatbot button and select the connected number and save it.
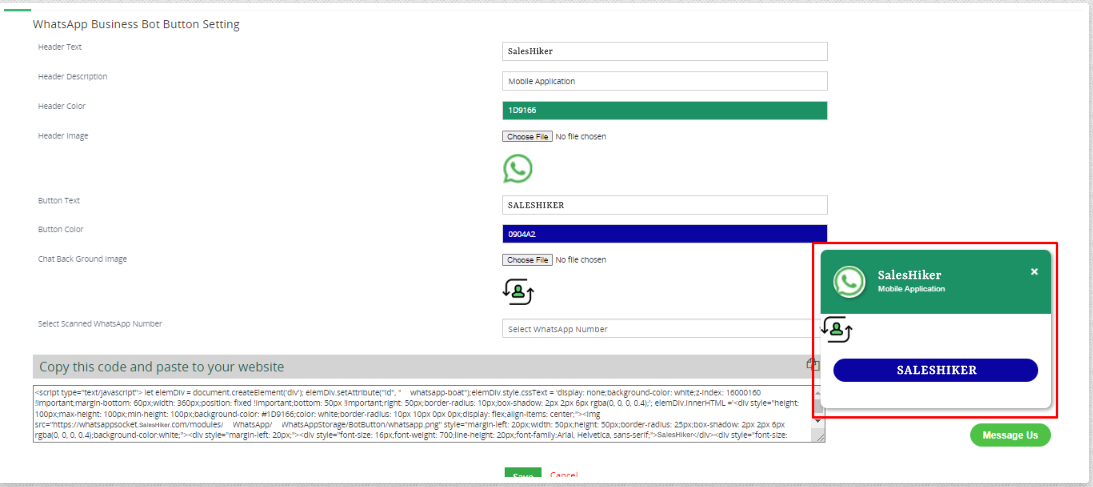
- After that users have to copy that script and paste it to their website where this Chatbot button is required to display.
- Users can activate or in-active WhatsApp Business Bot by clicking the ON/OFF button accordingly.
- Users can also sort Bot Names alphabetically.
- Users can design a WhatsApp Business Chat button to place on your website integrated with the WhatsApp Business Chat Bot.
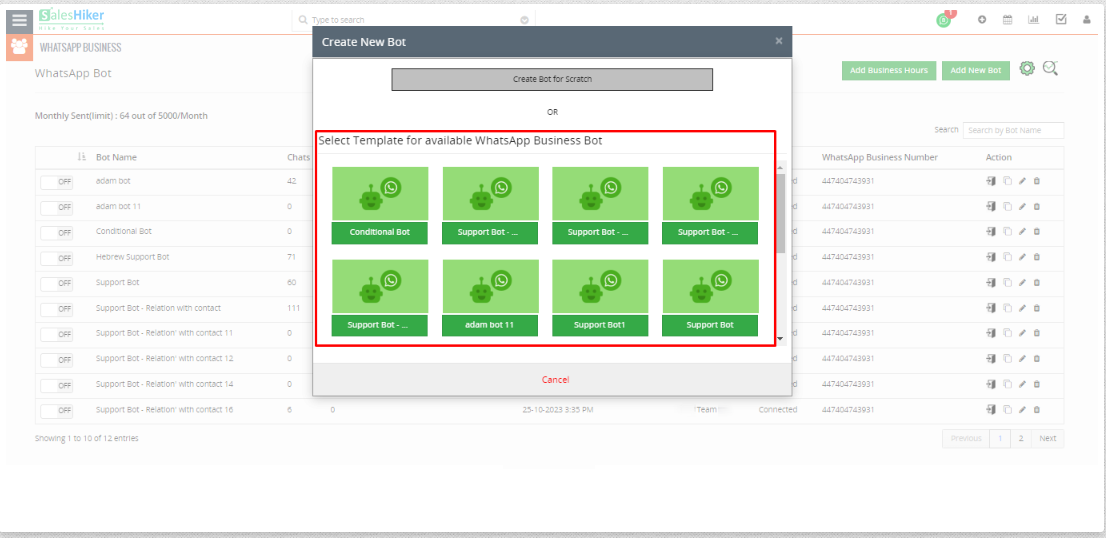
- How to use WhatsApp Business bot template?
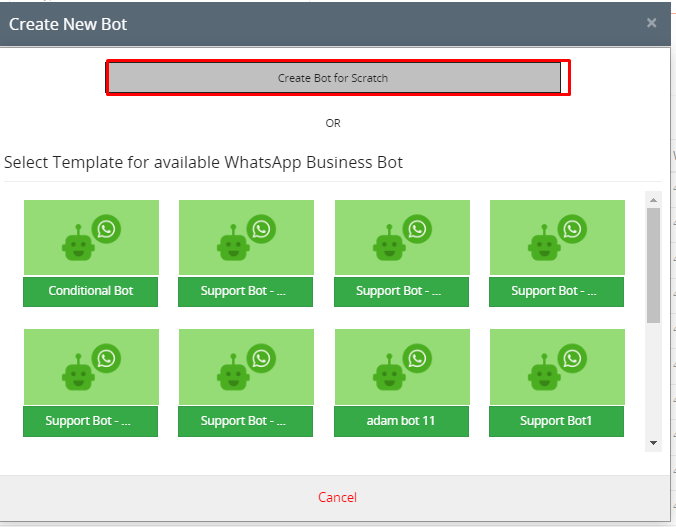
- Users can use template from the created bot by clicking on the “Add New Bot” button, and selecting available template.
- You can use predefined templates offered by the SalesHiker team for WhatsApp. You’ve 2 options: either Create Bot from Scratch or Select template for available WhatsApp Business Bot.
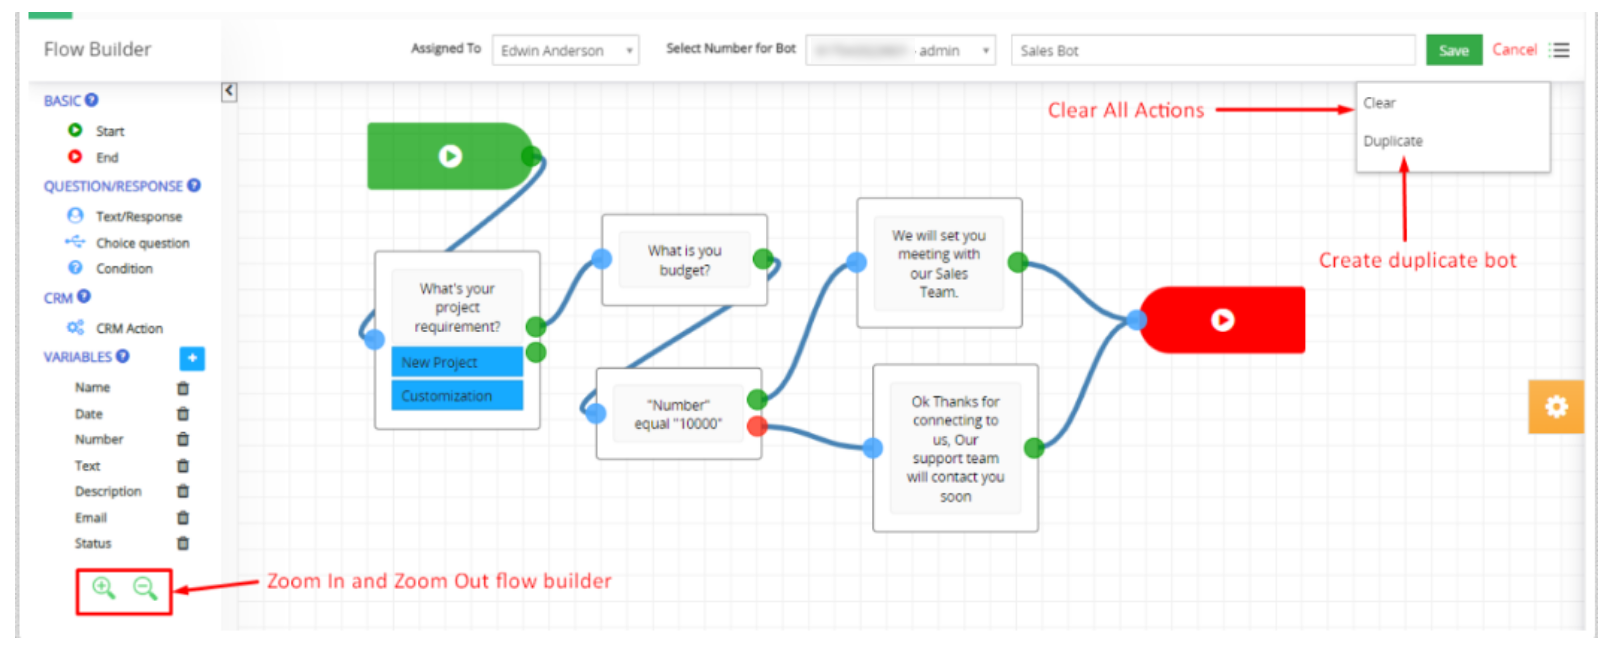
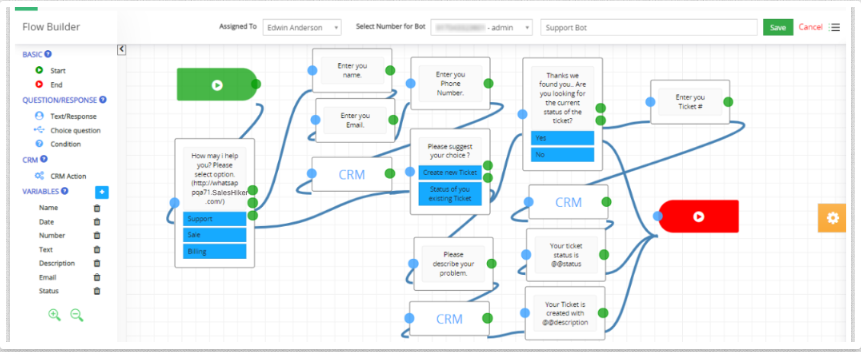
- How to Build/Design Flow for WhatsApp Business Chatbot?
- Users can set the flow according to the requirement for the Bot.
- Basic:
- Start: Use this node when you start designing the Bot flow.
- End: Use this node when you end designing the Bot flow.
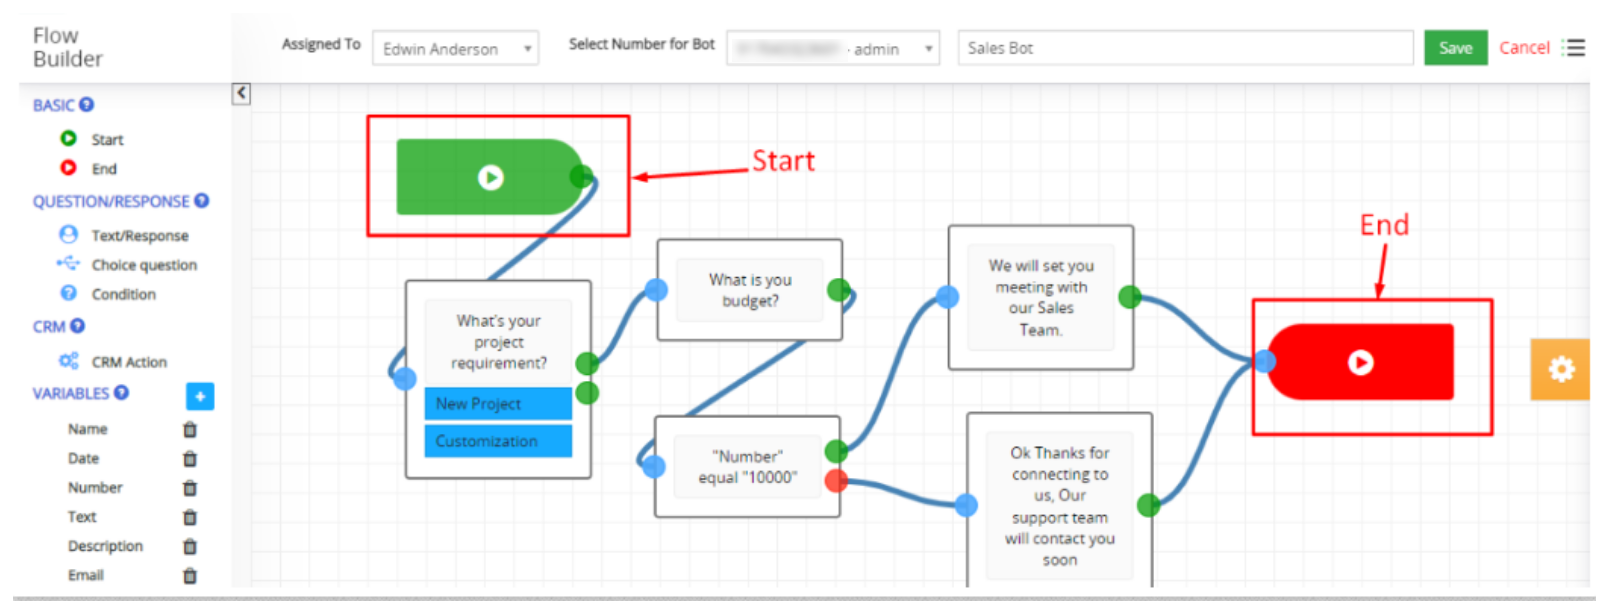
- NOTE : Bot must start with a choice question.
- Question/Response:
- With this feature, users can set various types of questions in flow to Ask customers.
- Add Condition to check it against a response from a customer in Bot.
- Question/Response Action Settings:
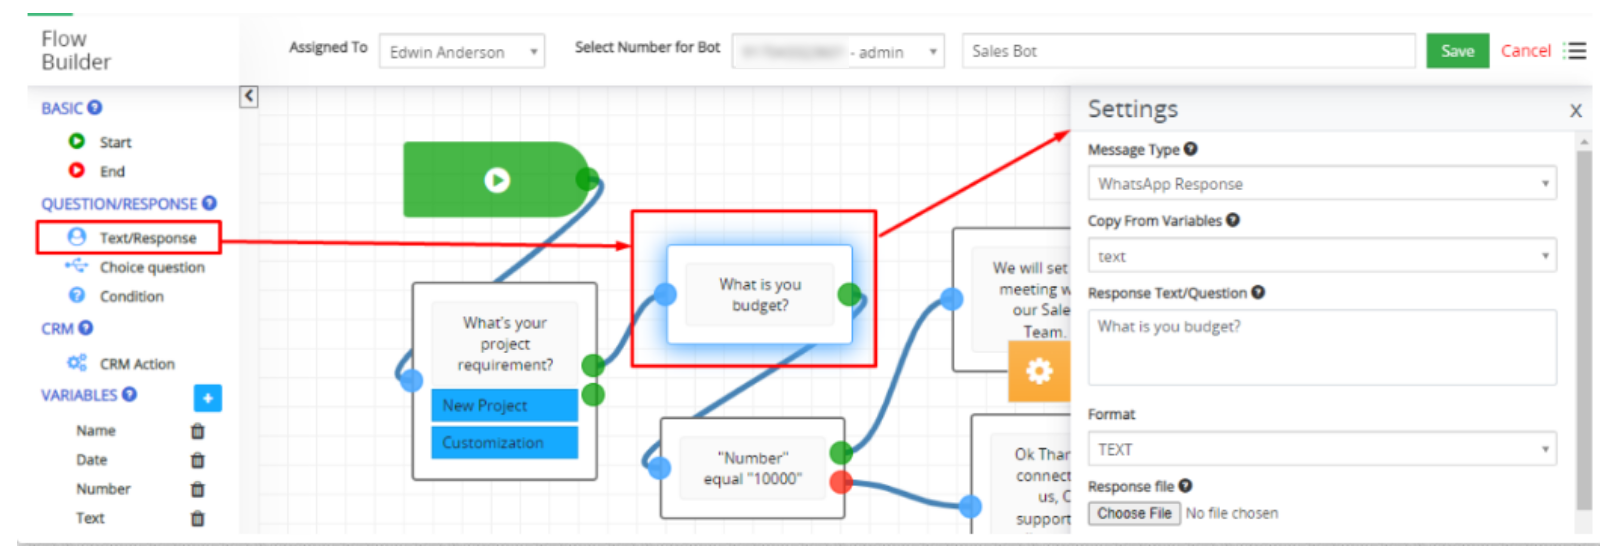
- Text/Response
- Message Type:
Regular message – This is a regular message type format sent to customers from Bot.WhatsApp Business Response – This message type will display responses to customers in WhatsApp format. - Copy from Variables: Select variable to add or copy to the message which converts to actual value when sent message to customer.
- Response Text/Question: Type a message as a response or ask a question to the customer.
- Format: Select any format like text, number, email and date for response.
- Response file: Send Image as response to the customer along with text.
- Response copy to variable: Copy customer answer of question from bot to variable which can be used to store in CRM or reply to customer on various stages of Bot flow.
 NOTE: After Text/Response question node, Choice question will not work to show option.
- Message Type:
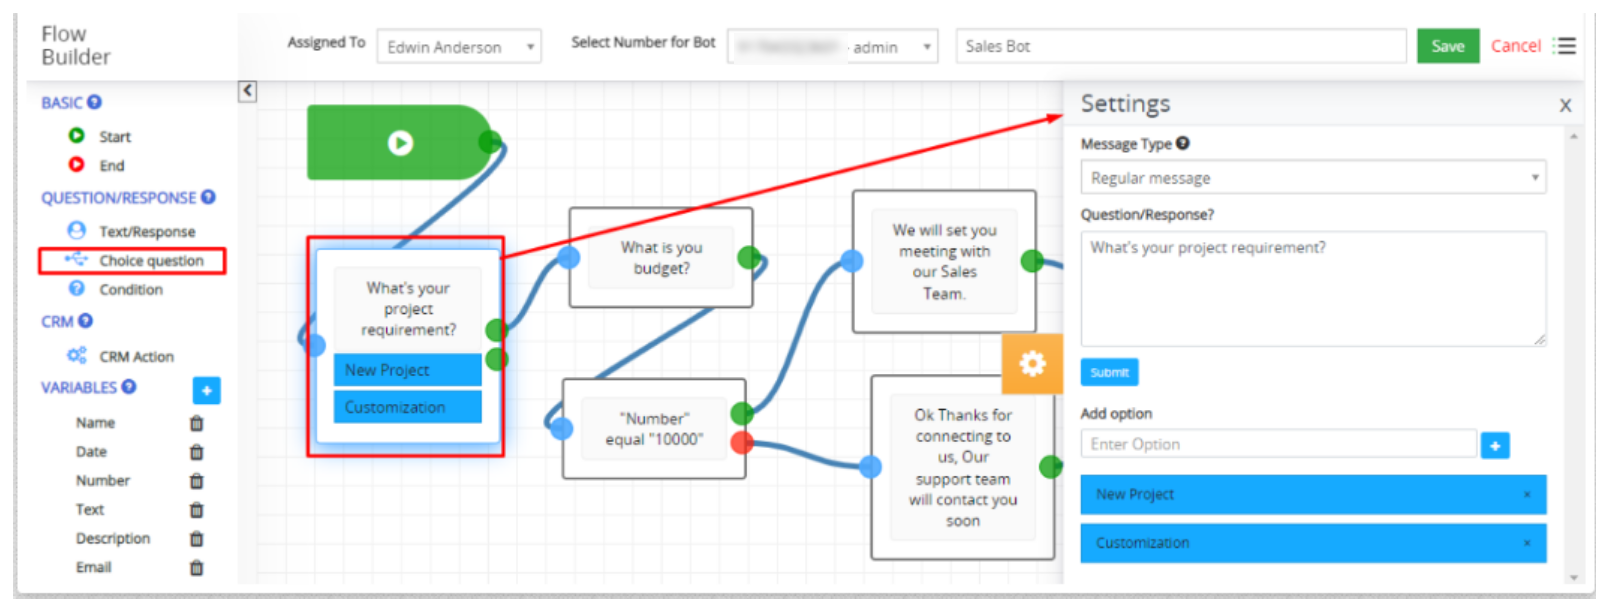
- Choice Question
- Message Type
- Regular message – This message type will display responses to customers in WhatsApp Regular format.
- WhatsApp Button message – This message type will display a response to the customer in WhatsApp button format.
- Question/Response: Add a question for the flow according to your choice.
- Add Option: Add an option for the question according to your choice.
- Message Type
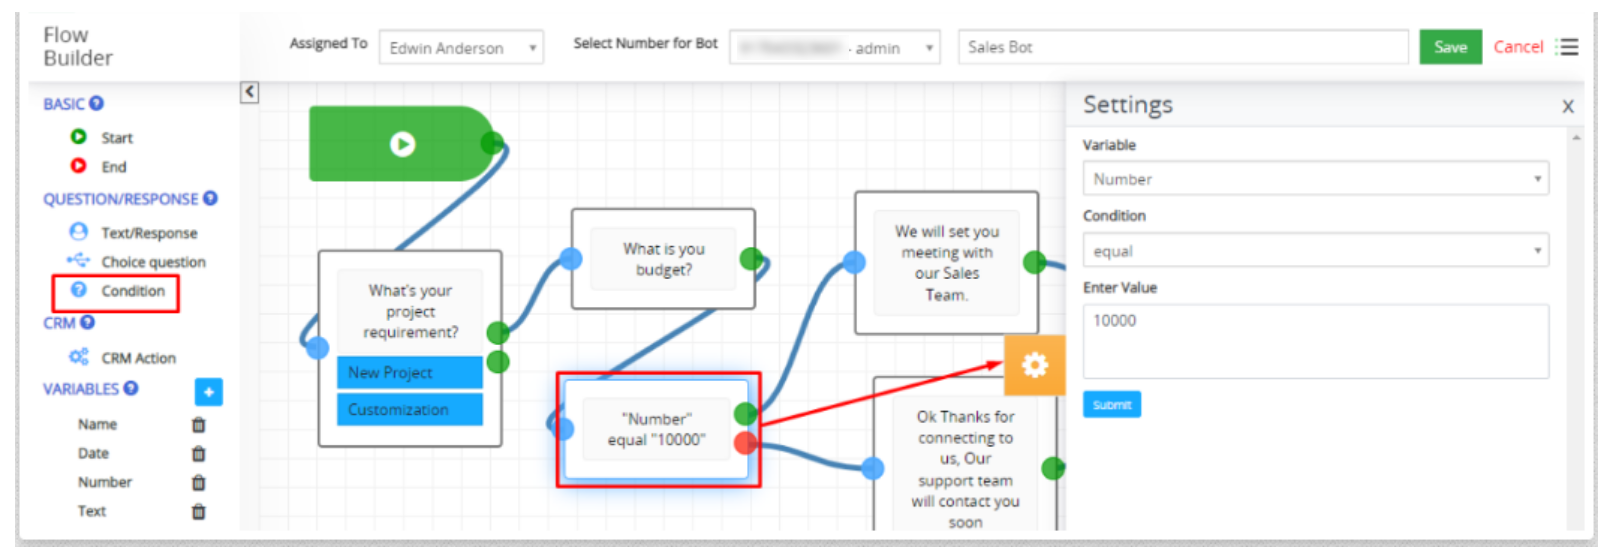
- Condition
- By selecting condition, User can add condition for the question if it’s true then it will fire the value which is set.
- Variable: Select a variable like number, email, date or description for the value.
- Condition: Select the condition for the question like a value equal to 10000 etc.
- Enter Value: Enter value according to variable type selected.
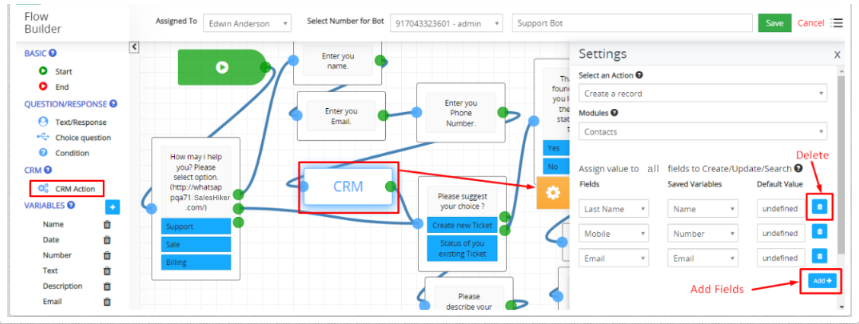
- CRM
- CRM Action: With CRM Action You can Insert/Update/Search record To or From CRM.
- CRM Action Setting:
- Select an Action: Select an Action should allow the user to select various operations on CRM.
- Create a Record – It allows you to Create records in CRM from responses from the customers.
- Search a Record – It allows you to search records from CRM from the value pass to CRM field.
- Modules: Select module to search/create/update record to or from CRM
- Assign value to CRM fields to Create/Update/Search
- SalesHiker field – Select SalesHiker fields to copy value to SalesHiker fields from available variables.
- Saved variables – Select available variables used to store customer’s input from chatbot’s questions.
- Save variable(Response) from SalesHiker field : On create/update/search on CRM it will return selected field value to customer to be displayed in WhatsApp Business bot.
- Copy to variable – Select variable type as name, email, date or description for copy variable.
- Copy from SalesHiker Field – Select fields for copying variables from SalesHiker field.
- Variables
- Variables used to copy answers from customers using bot like their name, email, phone etc. This will be used to map with respected CRM fields to Add/Search/Update To or From CRM.
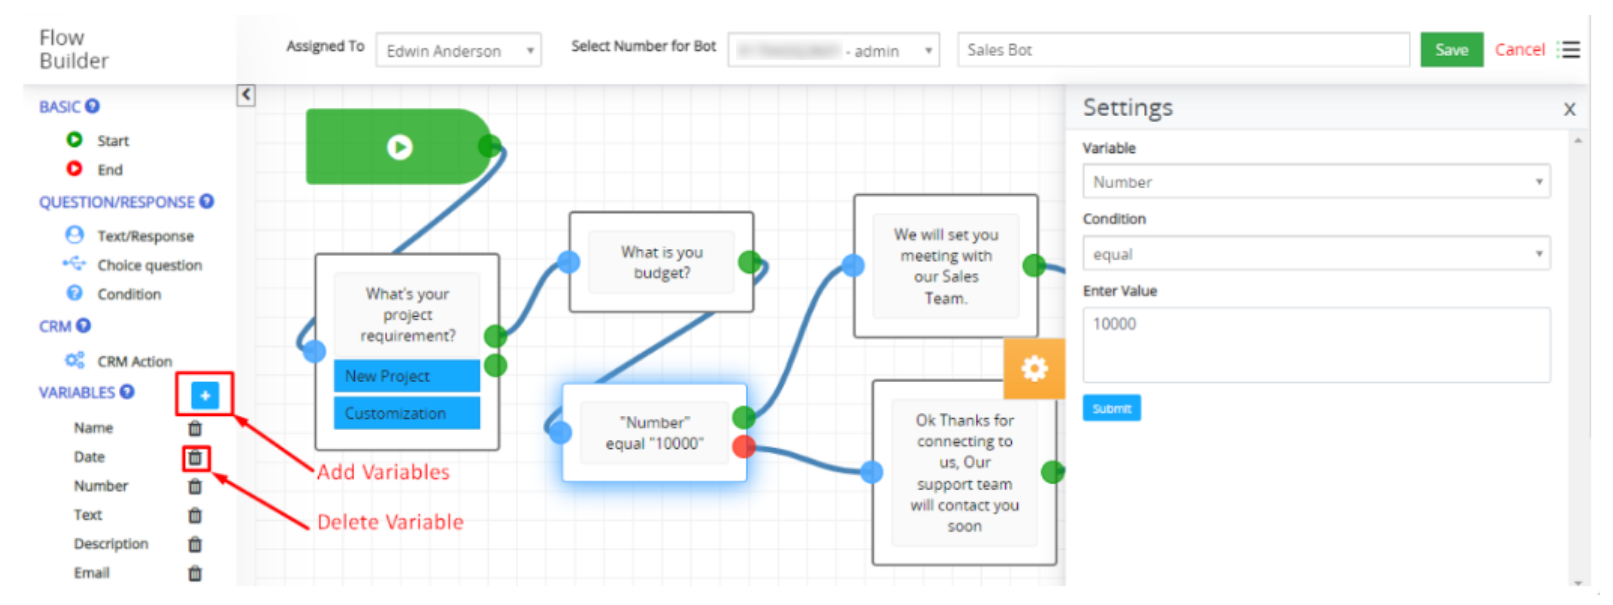
- Variables used to copy answers from customers using bot like their name, email, phone etc. This will be used to map with respected CRM fields to Add/Search/Update To or From CRM.
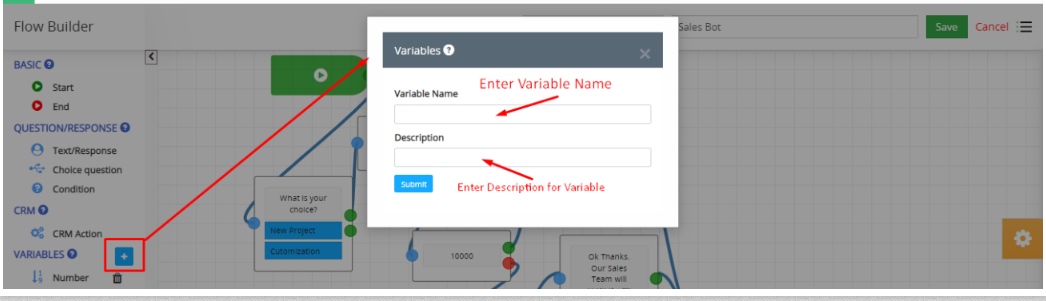
- Add Variable Pop-up
- Variable Name: Enter name for Variable
- Description: Enter Description for Variable
 Users can Clear all the added actions by clicking on the Clear option and also duplicate the created Bot from the Flow Builder.
Zoom In and Zoom Out buttons are also there for the flow builder.
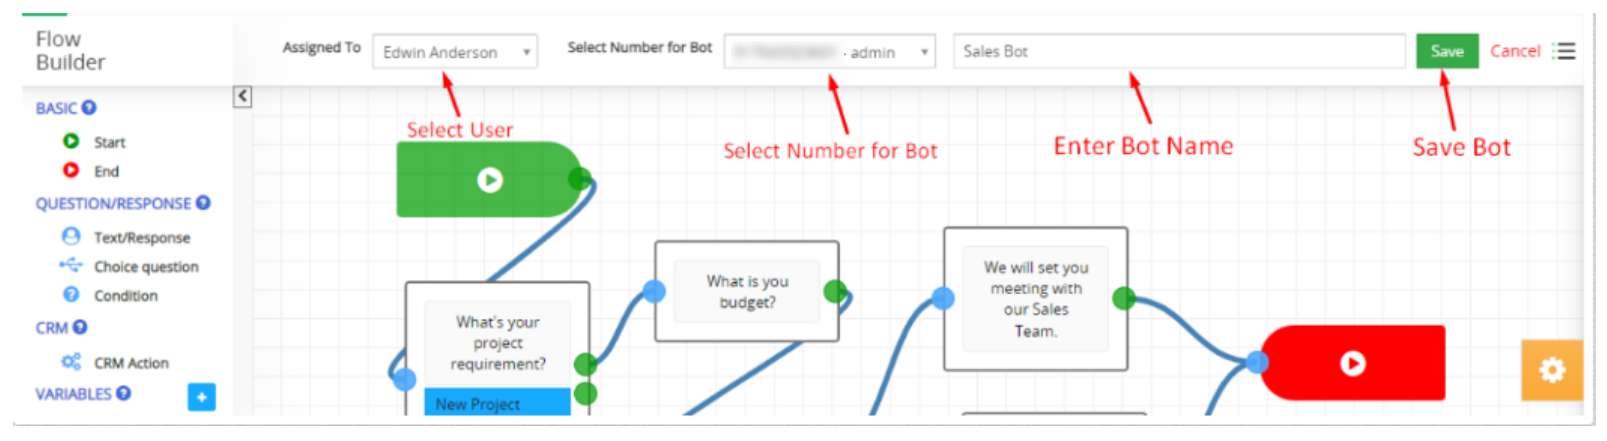
- How to create a WhatsApp Business bot?
- Select the ‘Assigned To’ user, and have that user connect the WhatsApp number.

- “Select Number for Bot” drop list will show the connected WhatsApp Business number of the user according to the “Assigned To” user.
- Select WhatsApp Business Number for bot from “Select Number for Bot”.
- “Select Number for Bot” drop list will show a connected number which is accessible to the user.
- Enter Bot Name.
- Add Start Node for designing bot flow
- Create Flow by using Question/Repose, CRM Action, and Variables according to your business requirement.
- Connect End Node for designing bot flow
- Save Bot By clicking on the “Save” button.

- Enable Bot for connected WhatsApp number.
- Note: WhatsApp Business Bot will only be enabled for those users who have been connected to the selected WhatsApp Business numbers from Settings > WhatsApp Business configuration > Add / Delete users / groups to use multiple WhatsApp Business numbers

- How to Convert Chat to Manual / Robotic Mode?
- Clicking on the on/off button will stop automatic conversation from the Bot to the selected customer number.
- If Whatsapp business chatbot is enable from the Whatsapp Business configuration > quick edit in the connected user or add WhatsApp business account
- Clicking on the on/off button will stop automatic conversation from the Bot to the selected customer number.
- How does WhatsApp Business Chatbot work?
- Note: It must be activated for Multiple WhatsApp Numbers for users.
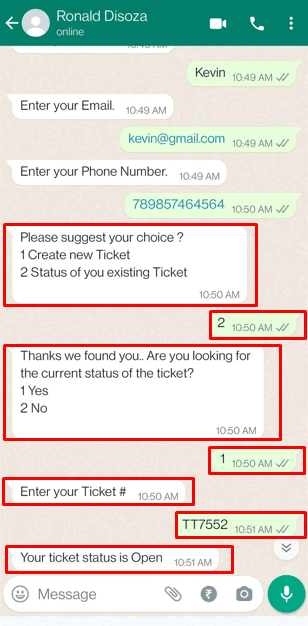
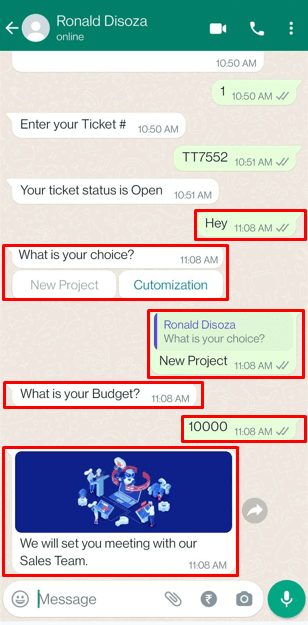
- How does the WhatsApp Business Chatbot for the Support team work ?
- Activate “Support Bot” to connect your WhatsApp Business Number.
- When you start messaging as “Any message”, Bot will auto-respond according to the flow.
- Select the “Support” choice as its set flow for that.
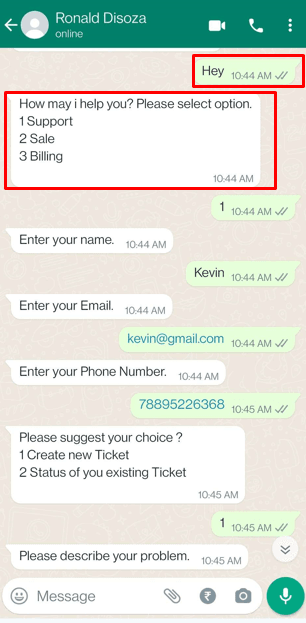
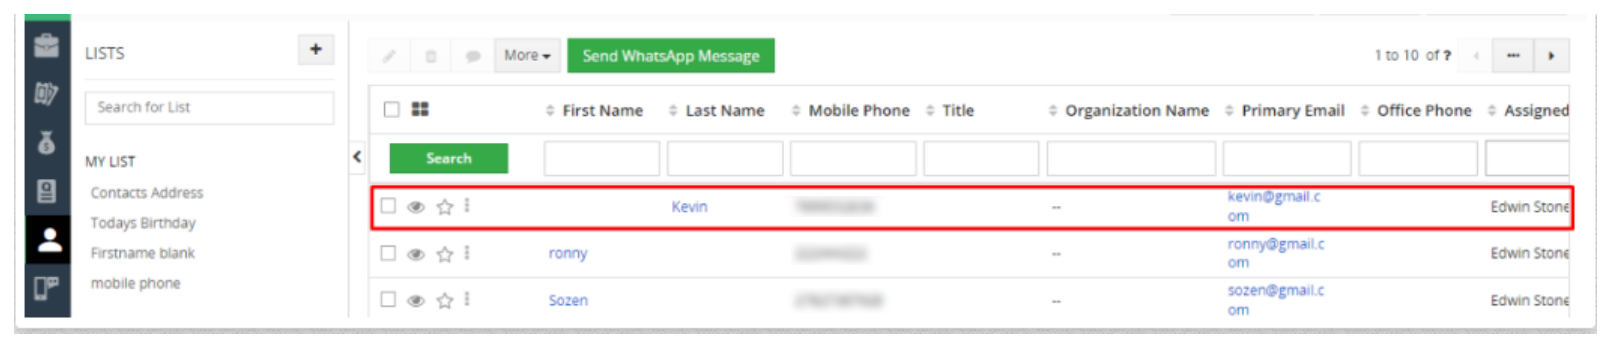
- Enter Name, Email and Phone Number, that will create contact according to the details you entered detail as its set CRM Action in flow.
- Enter your choice “To create a new ticket” or “Status of existing ticket”.
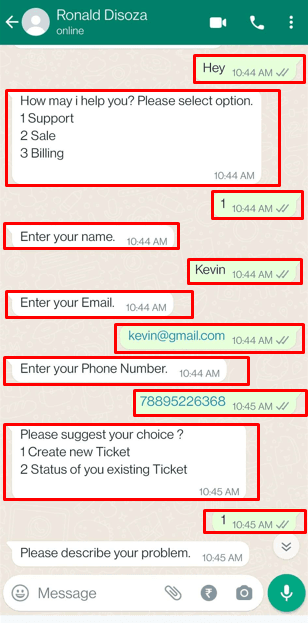
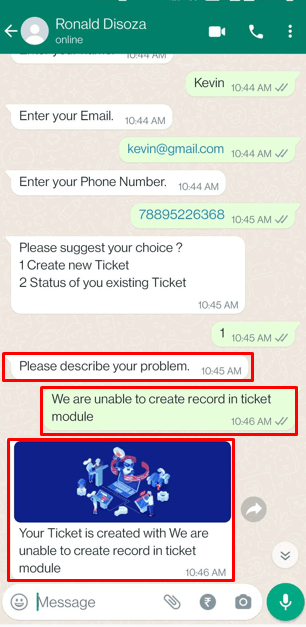
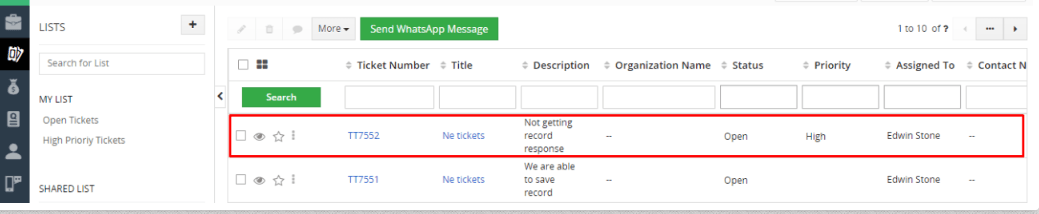
- If you select “Create New Ticket” by entering number as 1 will ask to describe your concern.
- It will create a ticket in CRM against your concern.

- OR If you select “Status of your existing Ticket” by enter number as 2 will ask you to enter the ticket number to show ticket status.
- Activate “Support Bot” to connect your WhatsApp Business Number.
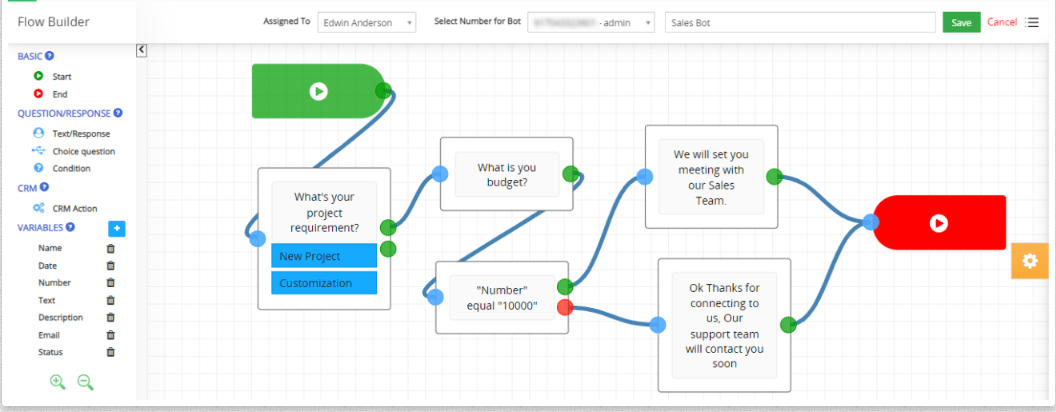
- How does the WhatsApp Business Chatbot for Sales team work ?
- Activate “Sales bot” to connect your WhatsApp Number.
- When you start messaging as “Any message”, Bot will auto-respond according to the flow.
- Select the “New Project” choice as its set flow for that.
- Enter your amount in response to the message “What is your budget?”
- If you enter “10000” according to the set condition as “Number equal to 10000”, then the condition will be true so it will respond
- with a message as “We will set up a meeting with our Sales Team.”
- OR If you enter not equal to “10000” according to set condition as “Number equal to 10000”, then condition will be false so it will be responding message as “Ok Thanks. Our Sales Team will contact with you soon….”
- Activate “Sales bot” to connect your WhatsApp Number.
- Select the ‘Assigned To’ user, and have that user connect the WhatsApp number.
- Text/Response
- Users can set the flow according to the requirement for the Bot.
How to setup template for WhatsApp Business ?
Overview :
WhatsApp Business Template helps users to create/manage WhatsApp business templates to send template messages using our extension.
Features :
- You can add a message template in a specific language when creating a template.
- You can create templates with the “Marketing” or “Utility” category.
- You can create templates with various text, media, and interactive components, based on your business needs.
- You can also see Template Message Preview.
- When you send template create requests, Facebook immediately validates its category using Templates Guidelines.
Create WhatsApp Business Template
Users can create a WhatsApp Business Template in two ways.
- Facebook Developer page
- Whatsapp Business Create Template page
How to create WhatsApp Business Template from Facebook Developer page?
- User have to go and login to the developer’s Facebook page
- Once you login the page click on My App
- Once you click on My App the page will look like below screenshot, Click on your SalesHiker App
- Once user click on SalesHiker app it will redirect to the App Dashboard, user have to click on WhatsApp in the sidebar > API Setup
- Once user click on SalesHiker API setup it will take user to the API setup page, scroll down to step 2 – To create your own message template click here
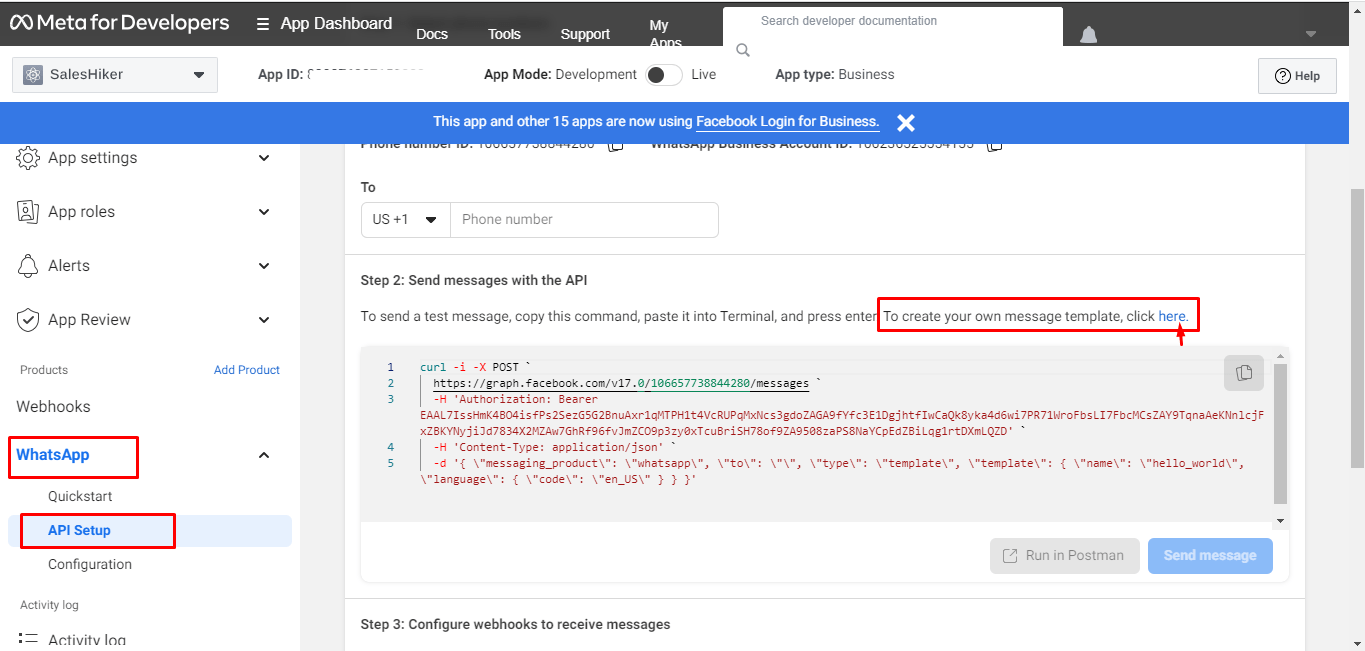
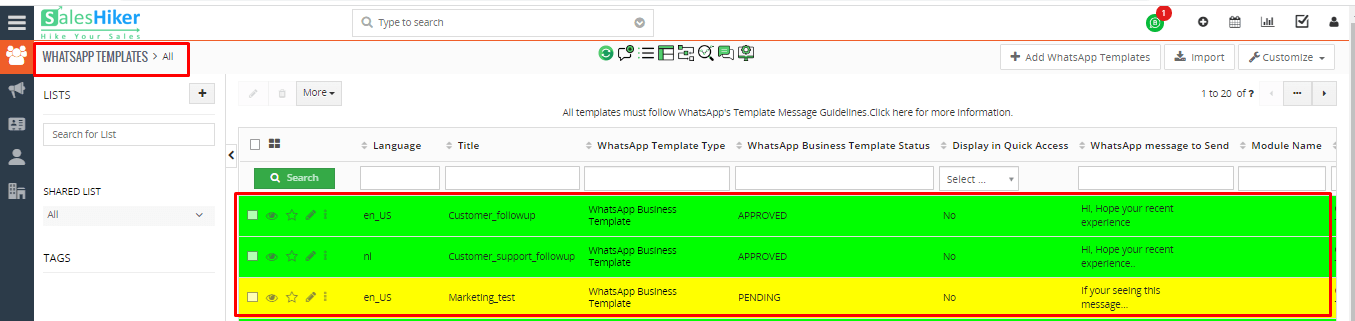
- After clicking on the link, it will open the page displaying a list of the created templates.
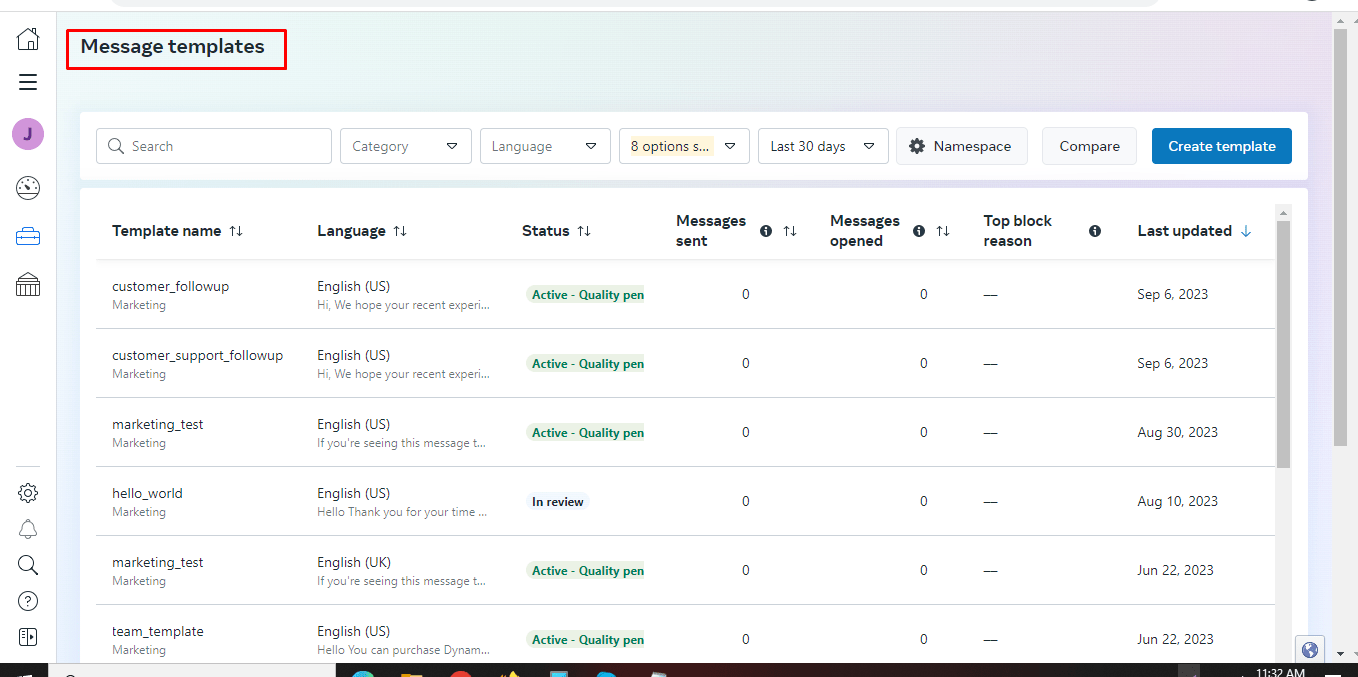
- Click on create template button

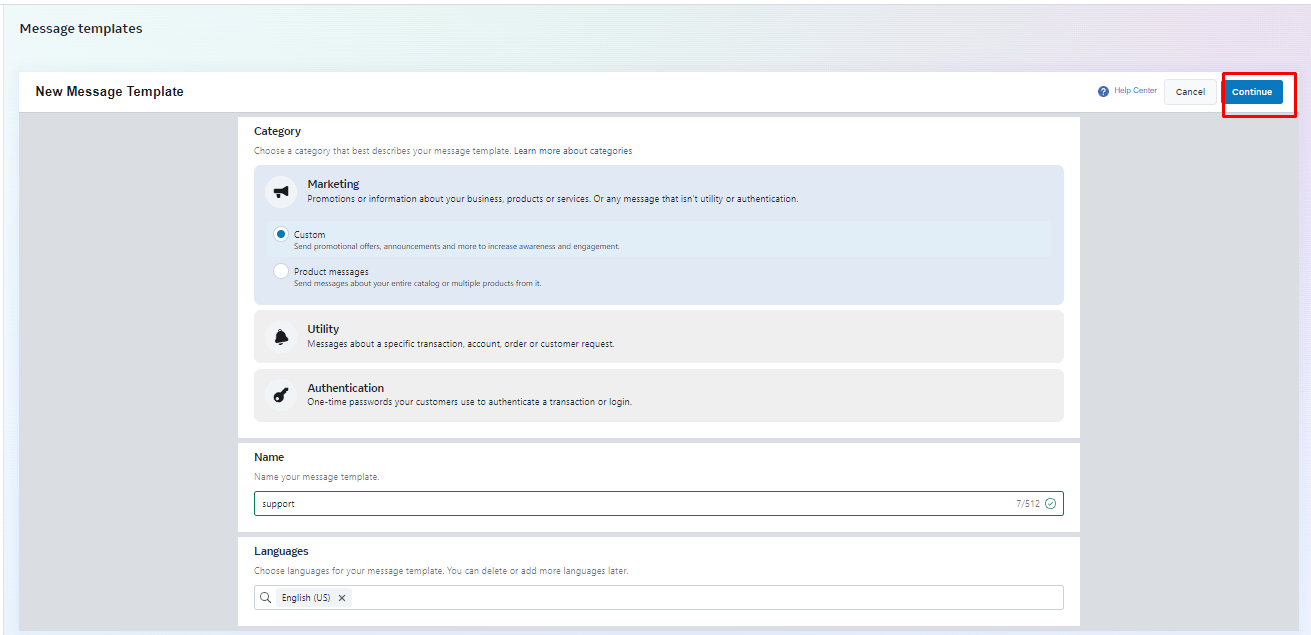
- User have to select the category, name and language of the Creating template
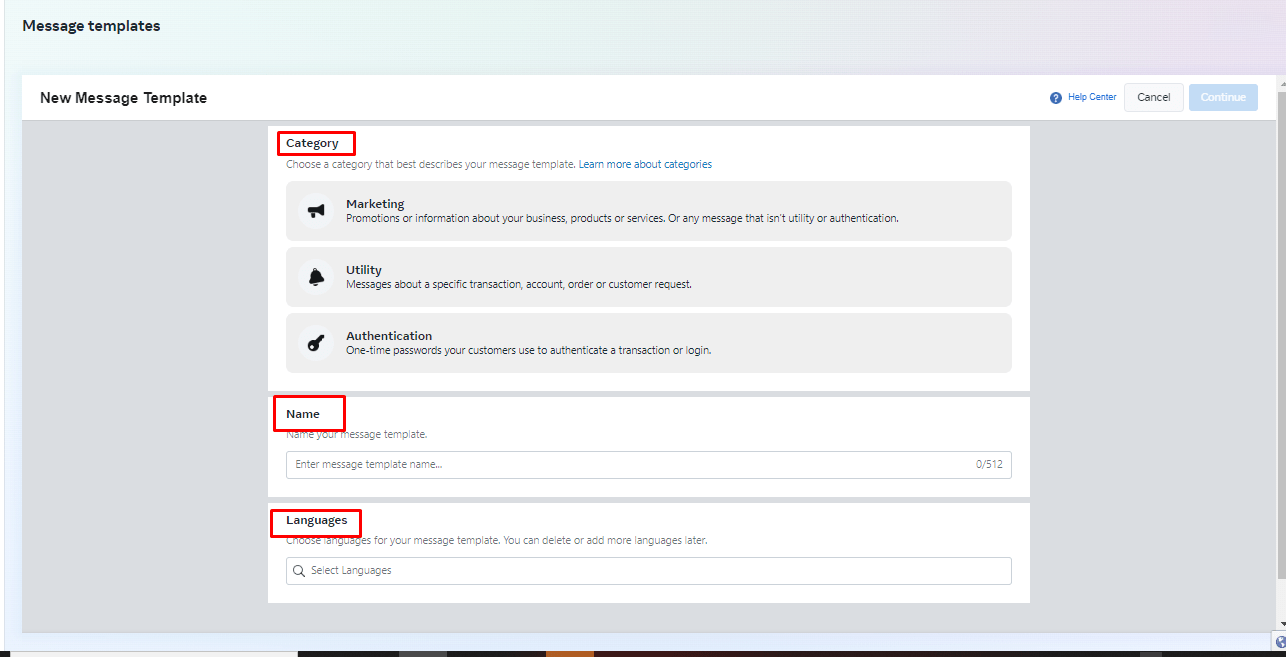
- After selecting the category and language, and entering the template name, the ‘Continue’ button will be enabled, and the user will have to click on the ‘Continue’ button.
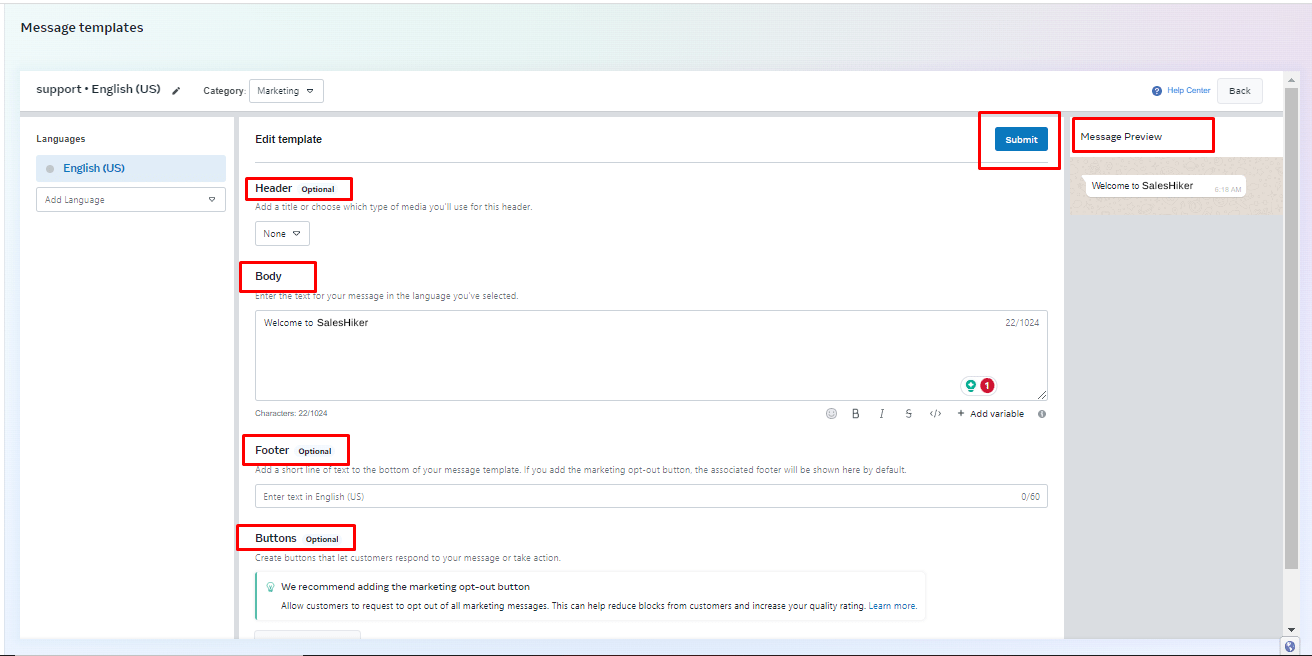
- After the user clicks on ‘continue,’ they will be taken to the following page where they can add a header, body, footer, and buttons to the template.
- Users can also preview how the message will be displayed. And at last By clicking the ‘submit’ button, the template will be created
- Once the template is created, it will be submitted to Facebook for approval, and users can view the status of the created template on the list page under the ‘Status’ column.
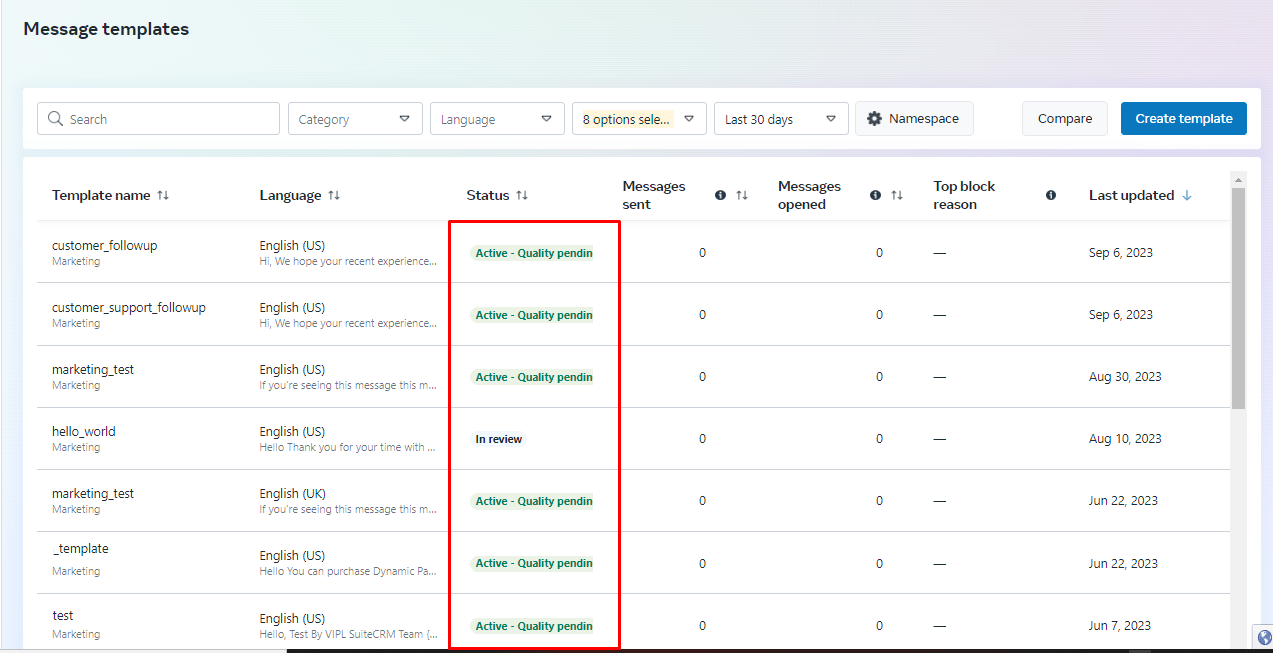
- Once the template is approved by facebook, Template will automatically sync to the CRM WhatsApp Business Template list
- How to create a WhatsApp Business Template from CRM?
- SalesHiker offers two types of template for WhatsApp Business Integration
- Regular Template
- Regular template used to send template messages to contacts in which conversations have been established.
- You can send any templates with text, media or video to promote your business / services / products to contacts to their WhatsApp number.
- WhatsApp Business Template
- WhatsApp Business template used to send template messages to contacts in which conversations have not been established. It means you’ve to first approve templates with WhatsApp and it will take 1-5 days time by WhatsApp to approve templates.
- Once Template has been approved by WhatsApp then only you can send template messages to unknown contacts.
- SalesHiker offers two types of template for WhatsApp Business Integration
Some of the steps of setting up WhatsApp Business template
How to setup WhatsApp Business Template ?
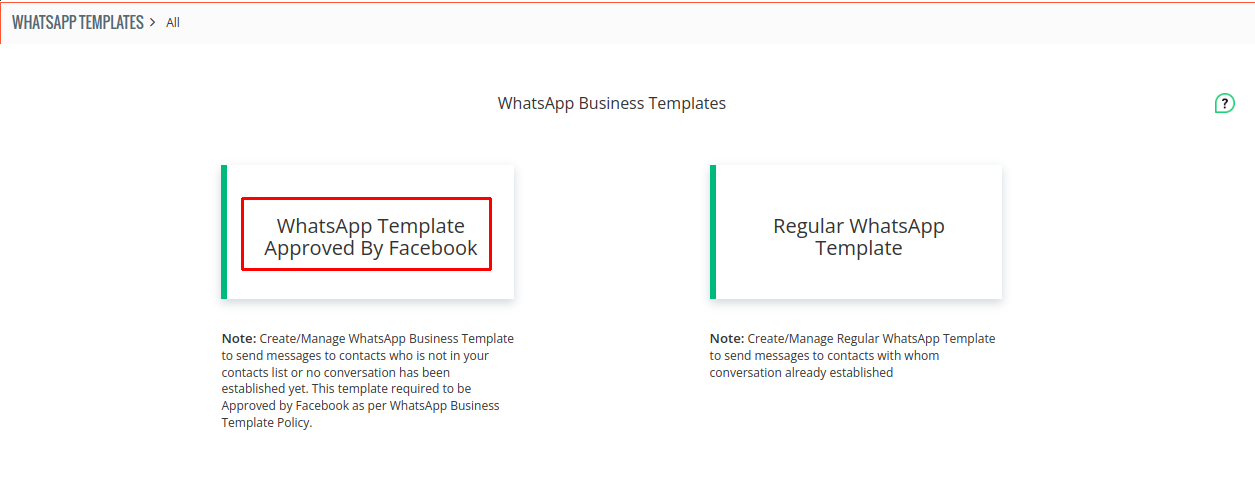
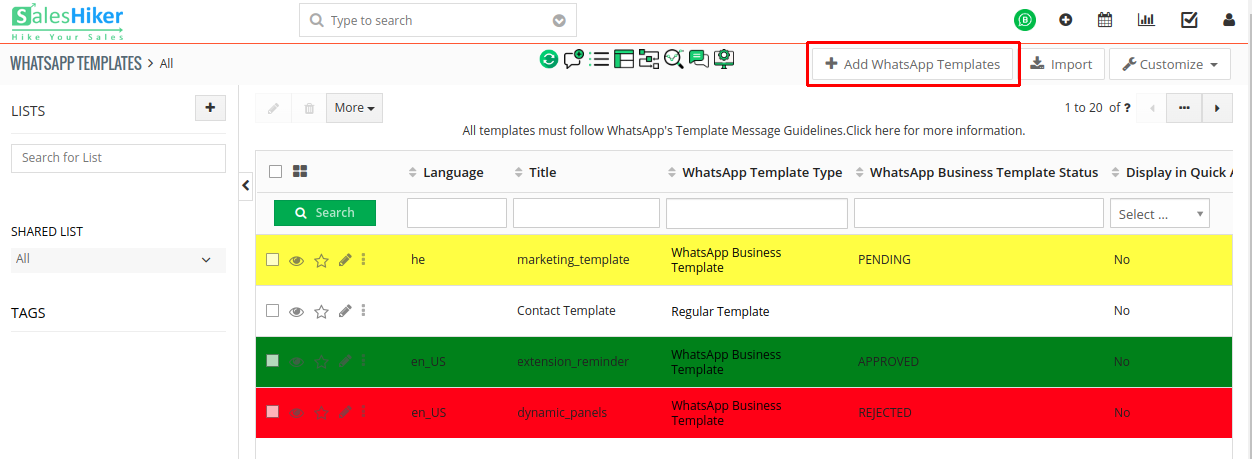
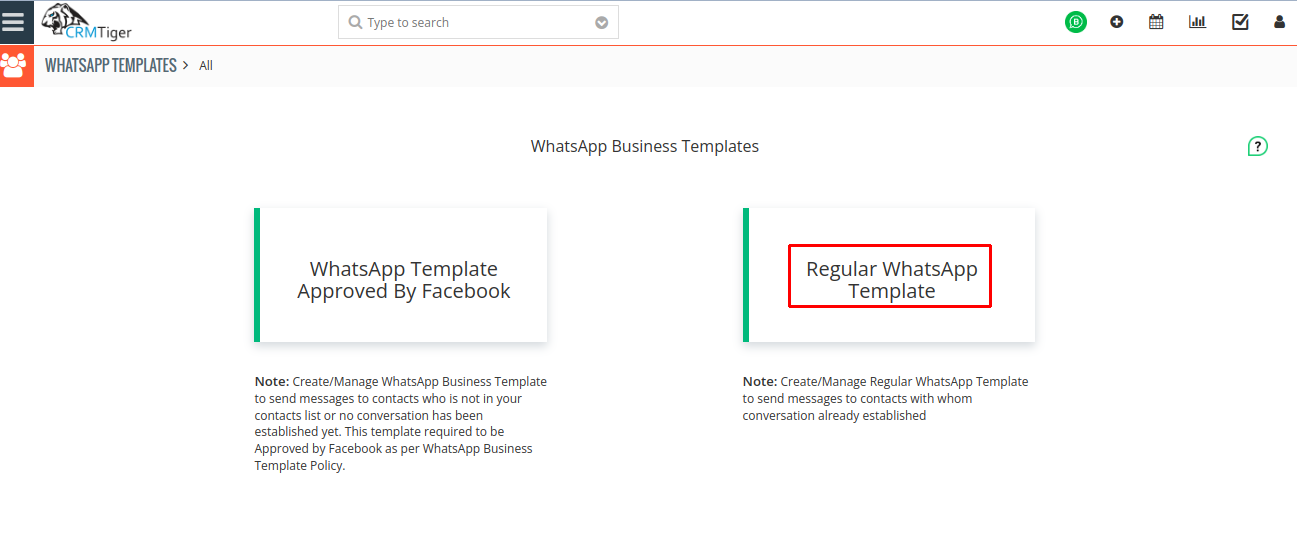
- To create WhatsApp Business Template click on “+ Add WhatsApp Templates” button as shown in below screenshot.
- Click on “WhatsApp Template Approved by Facebook” widget as shown in below screenshot.
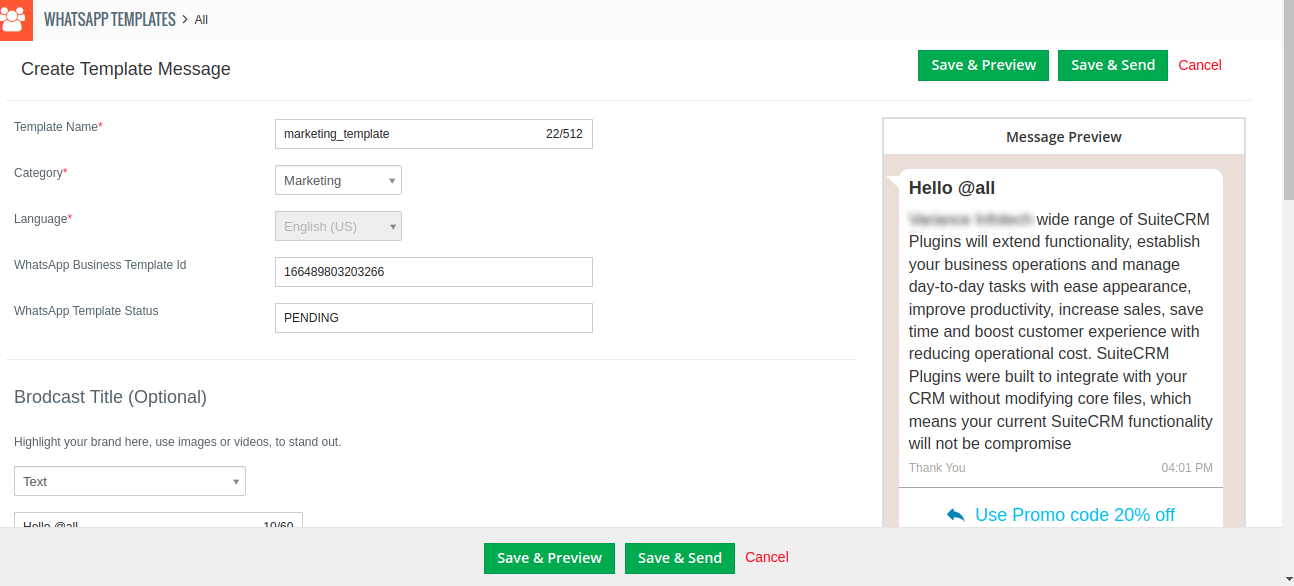
- Enter all details as shown in the below screenshot.
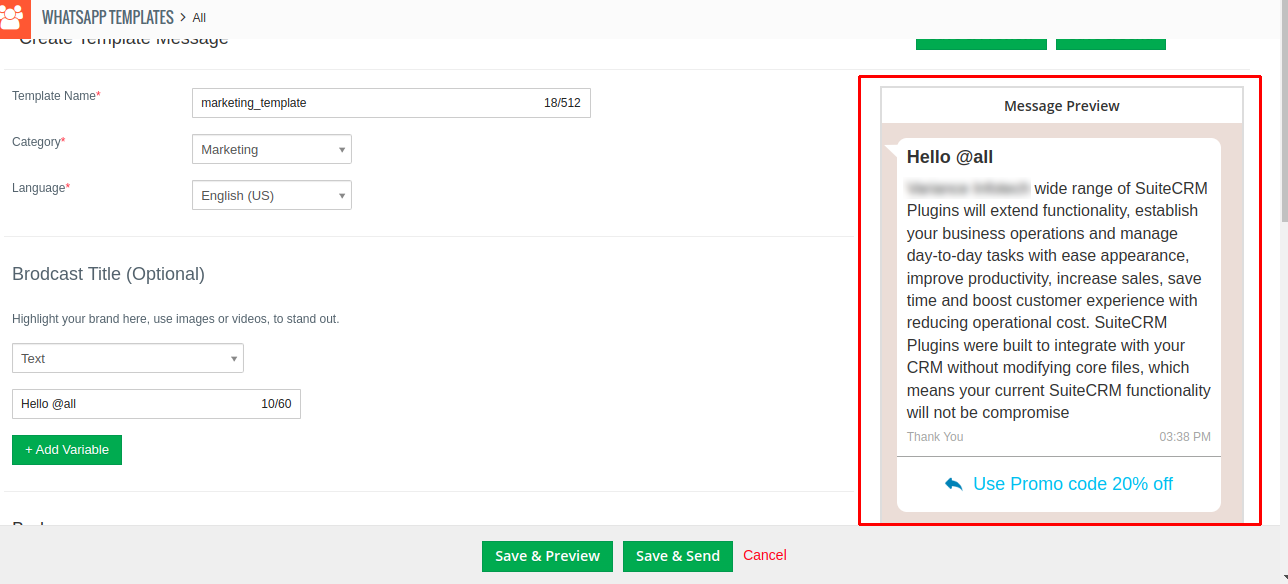
- Template Name: Enter the template name with lowercase, numbers, and underscores.
- Category: Select template category.
- Language: Select template specific language.
- Broadcast Title:
Headers are optional components that appear at the top of template messages.- Header Type: Select header type for template.
- If you select Header Type TEXT then Enter the Header Text & you can also add the one variable in the header.
- If you select Header Type Media then you can select Media Type like, (Image/Document/Video) & attach media.
- Header Type: Select header type for template.
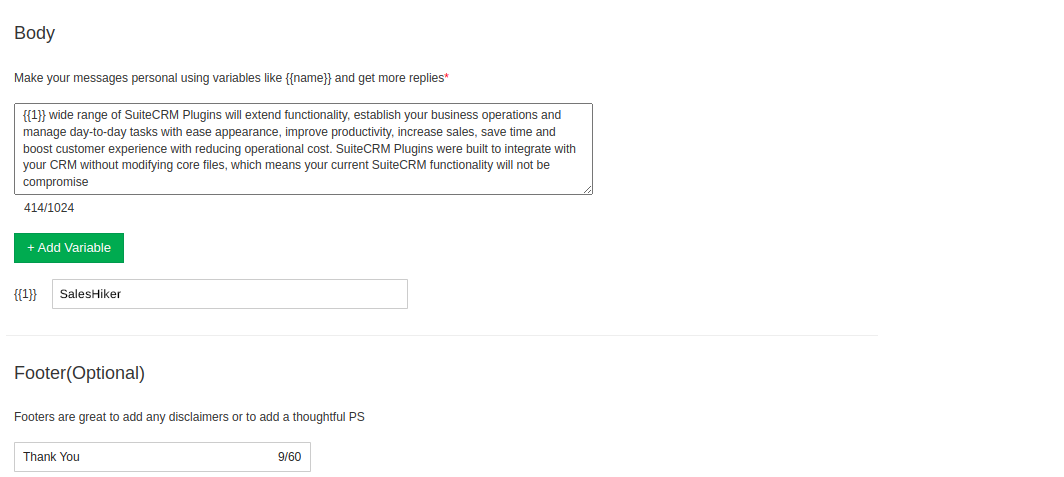
- Body: Add body text with variables. To Add Variable in body click on “+ Add Variable” button.
- Footer: Enter Footer text. Footers are optional that appear immediately after the body component.
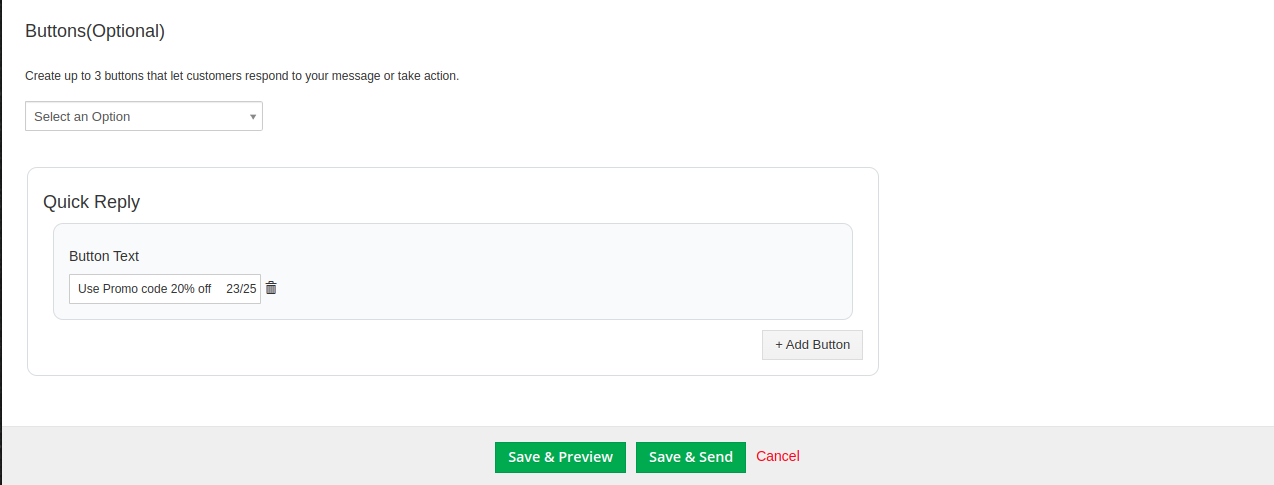
- Buttons: Select buttons from button type dropdown. Buttons are optional. It’s an interactive component that performs specific actions when tapped.
- Limitations:
- You can enter template name with lowercase, numbers & underscores & template name field is limited to 512 characters.
- Header Media Valid values are application/pdf, image/jpeg, image/jpg, image/png, and video/mp4.
- Body text field is limited to 1024 characters.
- Footer text field is limited to 60 characters.
- You can add a total of 10 buttons in one template.
- You can add a maximum of 2 Visit Website type buttons.
- You can add only one Copy Offer Code & Call Phone Number type buttons.
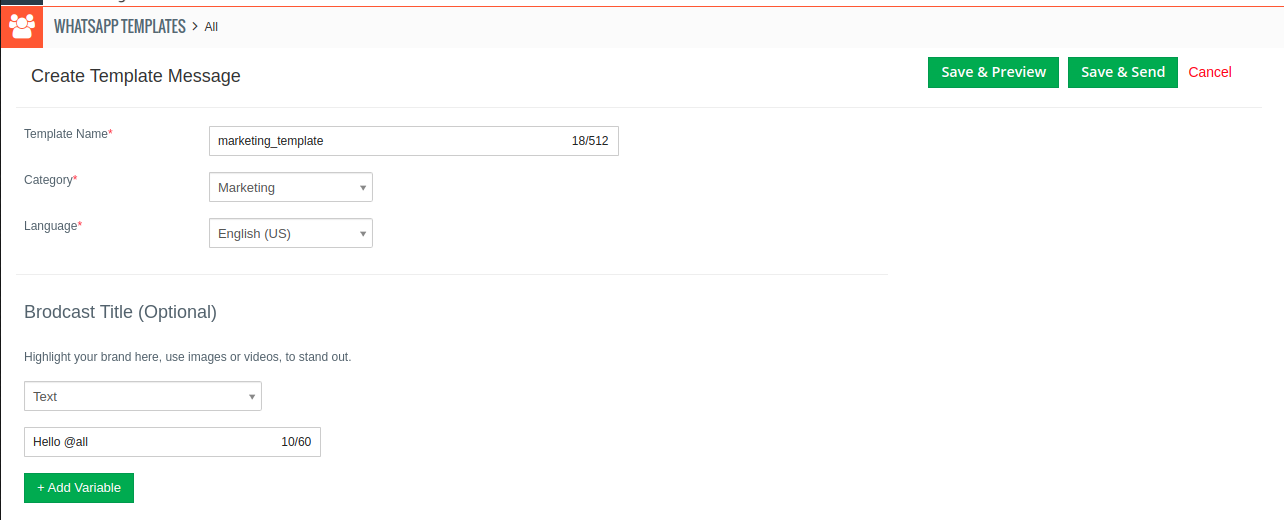
- To see Template Message Preview click on the “Save & Preview” button as shown in below screenshot.

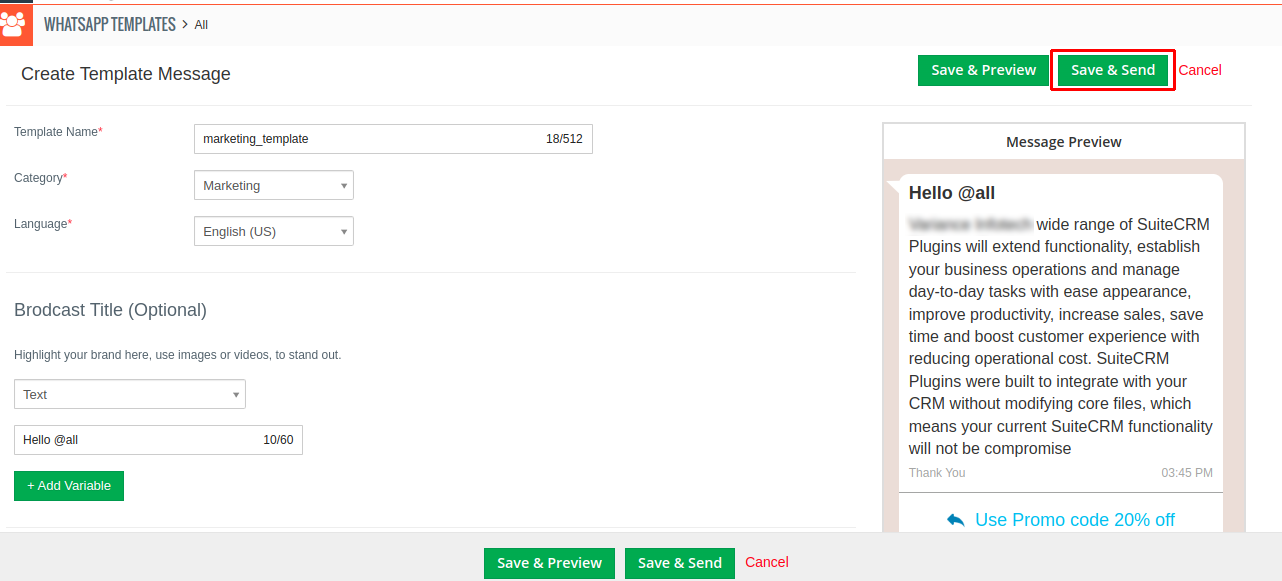
- To send template create requests on Facebook side click on “Save & Send” button as shown in below screenshot.
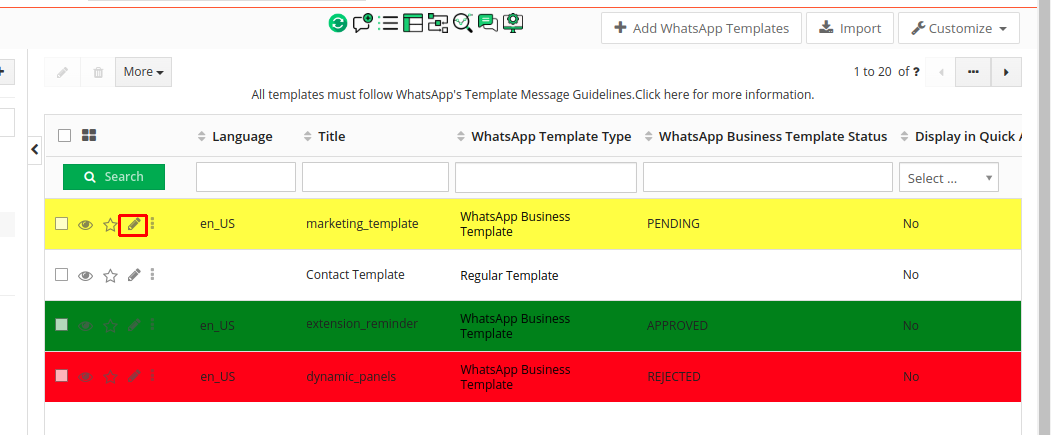
- You can edit the template from list view as shown in the screenshot below.
Steps of setting up Regular template
How to setup Regular WhatsApp Template ?
- To add Regular Template click on the “Regular Template” widget as shown in the below screenshot.
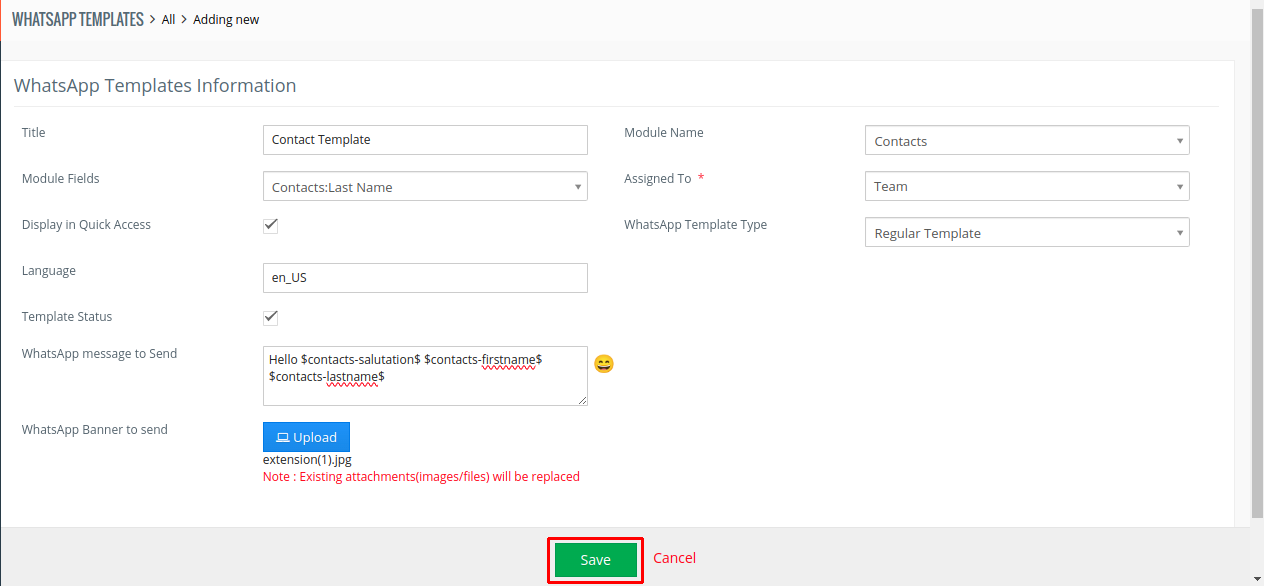
- Fill up all the details for the Regular template & click on “SAVE” button as shown in the below screenshot.
How to use WhatsApp template in SalesHiker ?
Once a template has been approved by Facebook for WhatsApp business template OR for regular template you can access it using various places of WhatsApp Business screen inside your SalesHiker system.
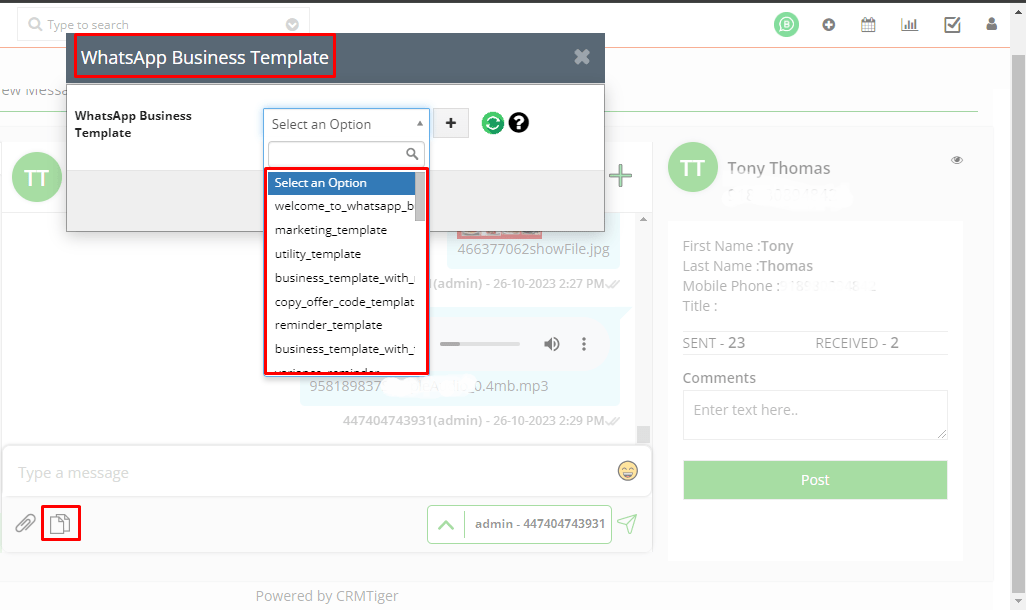
- Send Template message from Timeline view
- Send Template message from Workflow Automation
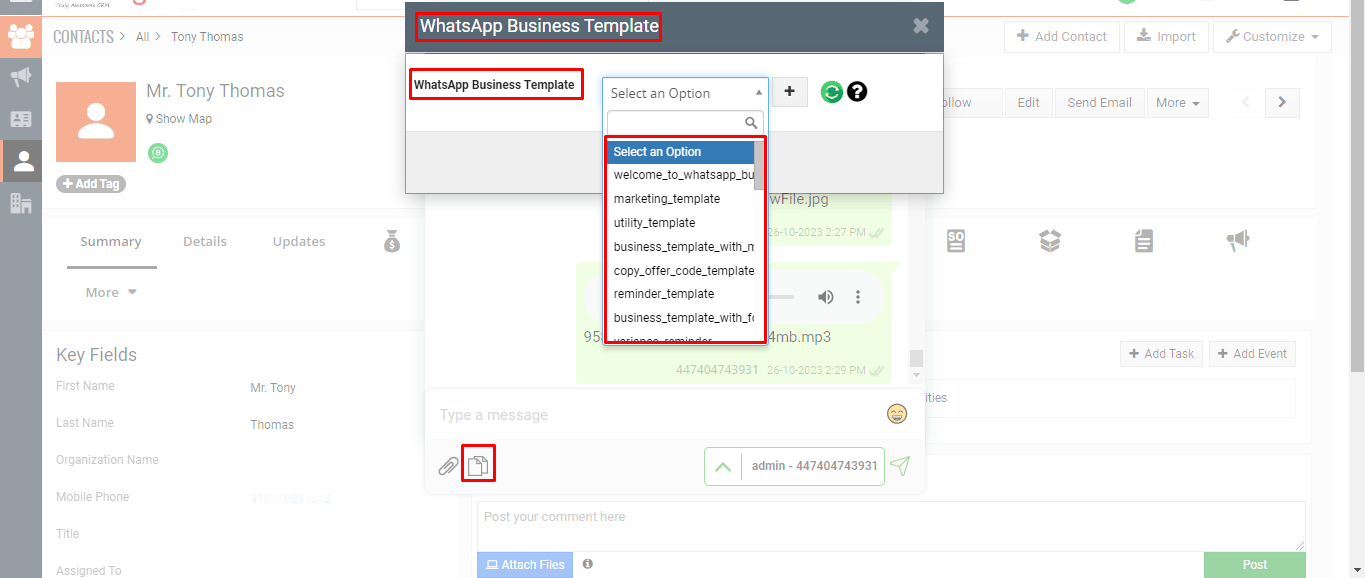
- Send Template message from contact conversation
- Send Template message from mass messages area