Step-by-Step Guide to Meta Business Verification
Facebook Business Manager Verification Requirements
Before starting the process, you need to fill out the Business Info section of your Facebook Business Manager. Here, you have to provide details such as business legal name, address, phone number, email address and website.
Make sure the information you provide aligns with the details registered with local authorities. As long as Facebook can verify your business from the info given, there is no need to provide supporting documents for verification.
If Facebook cannot identify your business, you need to provide evidence of the following legal details with the right documents
Business legal name: Business license, Certificate of Incorporation or tax or VAT registration certificate
Business address and phone number: Utility bill, bank statement or business license with your address and phone number on it
Here’s a list of the documents that are mandatory for Facebook Business Verification for Indian Business (in order of recommendation).
For India
Certification of Incorporation/Formation
Articles of Incorporation
Business Bank Account Statements
Udyog Aadhar UID
Business Credit Reports
Business Licence and Permits
Utility Bills
Permanent Account Number Card (PAN)
Shop Establishment Certificate
For Other Countries
Utility bill like a phone or electricity bill
Bank statement
Business Tax or VAT registration certificate
Certificate of formation or in corporation
EIN confirmation letter from the IRS (U.S. only)
Federal tax returns to the IRS by company (U.S. only)
Business credit report from one of the reporting agencies
Business bank account statements
Business licenses and permits from any level of government
Documents not accepted for Business Verification
Any kind of Invoices or tax filed by the company
Purchase Orders
Self-filled applications for the company
Website print
Other documents like company flyers,letterhead, etc.
Now that you have your business information filled and supporting documents ready, let’s start the business verification process.
Go to Facebook Business Settings and navigate to the Security Centre. You can see the business verification option once you’ve signed up for WhatsApp Business API. Click on the Start Verification. If you’re unable to see the business verification option, please contact us.
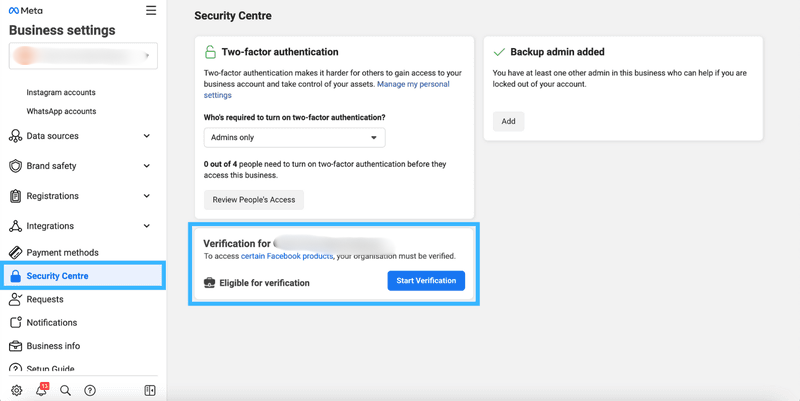
Navigate to the Security Centre of your Facebook Business Manager and click on Start Verification
Add your organization’s details. If you’ve filled in your company details in the Business Info section, this section will be auto-filled. Double-check the information to ensure that they are accurate
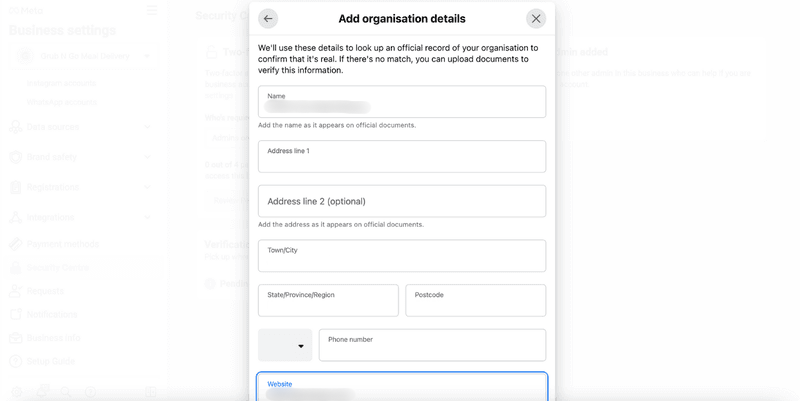
Add your organization’s details
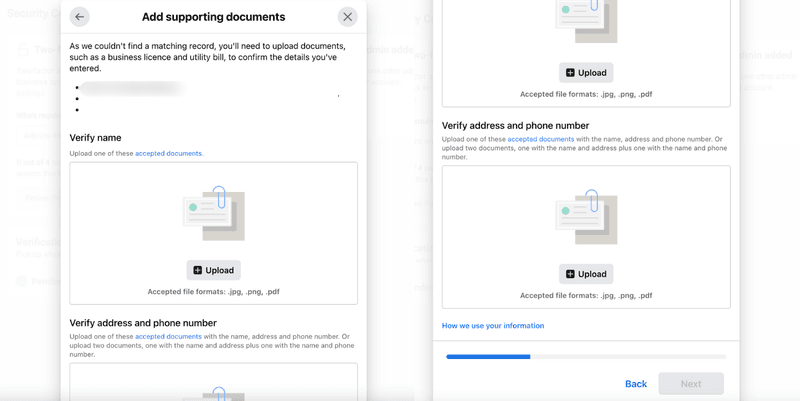
Add supporting documents to prove your business’ legal details and submit.
Select your preferred contact method to receive a confirmation code to confirm your connection to the business. If you have a website, you can submit your application right away, without having to receive a confirmation code.
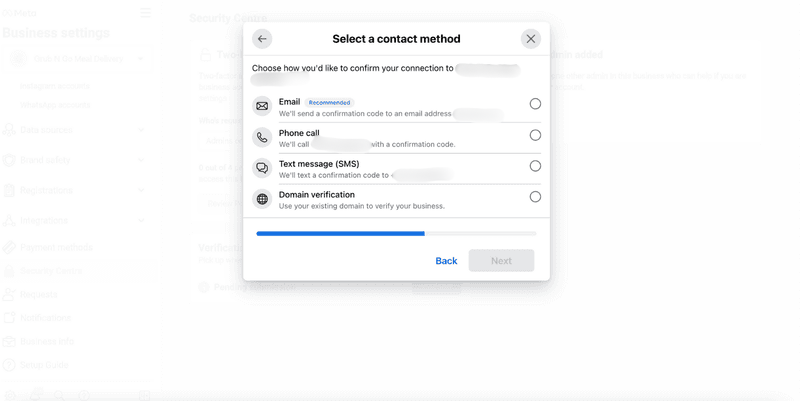
Select your preferred contact method
Enter and confirm your phone number and click Text Me Now to get a confirmation code. This step depends on the contact method you’ve selected in the previous step.
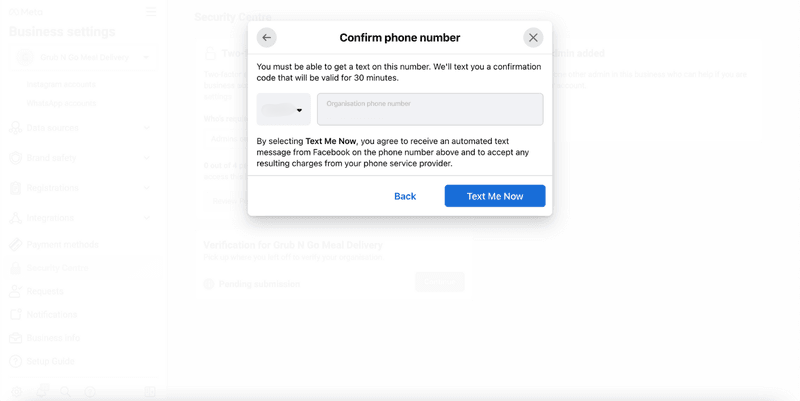
Confirm your phone number and click Text Me Now
Input the confirmation code and click Next. If you did not receive a verification code, click on Resend Code. You can also change your preferred contact method if your chosen method isn’t working.
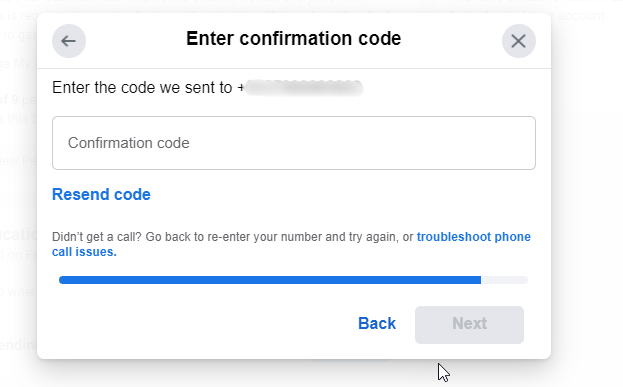
Insert the confirmation code and click Next
How Long Does Business Verification Take
After completing the verification, you’ll get an email and a notification in your Facebook Business Manager and Page within 1-3 days. You can also check your status in the Business Info or Security Centre sections.
If Facebook doesn’t verify your business, you can appeal by sending more documents. Facebook may ask for your Government ID and two other documents.
When submitting your ID, show all its information and corners. Place it on a dark, flat surface for the photo. Facebook won’t accept digitally altered images. If you have problems with verification, it might be because your application is incomplete, documents are unclear, or the details don’t match.
If you need more help, visit the Meta Business Help Centre or contact us about verifying your ID and business details.
Display Name Review
After you finish verifying your business, Facebook will review the display names for all your phone numbers. The display name is what customers see as your business name on WhatsApp.
Make sure your display names are clearly linked to your business, follow Meta’s guidelines, and don’t break WhatsApp’s rules for Commerce and Business. Once your business is verified and your display names are approved, you can send more messages and use more phone numbers
Getting your business verified on Facebook is key to growing your reach on WhatsApp. With verification, you’ll be able to send more messages and use more phone numbers, which means better engagement with your customers.
Once you’ve verified your business, you can take your messaging game to new heights with an AI-powered customer conversation management platform and badge Meta Business Partner with saleshiker.com .
Select Users Who Can Access the WhatsApp Business Account
- User Selection:
- In this section, you will see a list of users who are part of your CRM.
- Select Users:
- Choose the users who will have access to the WhatsApp Business Account.
- These users will be able to send and receive messages via WhatsApp, manage templates, and handle conversations.
- User Groups:
- In the next field, you’ll need to select user groups that will have access to the WhatsApp Business Account.
- What are User Groups?
- These groups represent different teams or departments within your organization (e.g., Sales, Customer Support).
- Select the groups that need access to manage WhatsApp communication.
Activate the WhatsApp Business Channel
- Select Active Checkbox:
- To make the WhatsApp Business Channel active, ensure the Active checkbox is selected.
- This will enable the channel and allow users within the selected groups to begin using it.
- Save Settings:
- After selecting users and user groups, and ensuring the Active checkbox is ticked, click the Save button to finalize the settings.
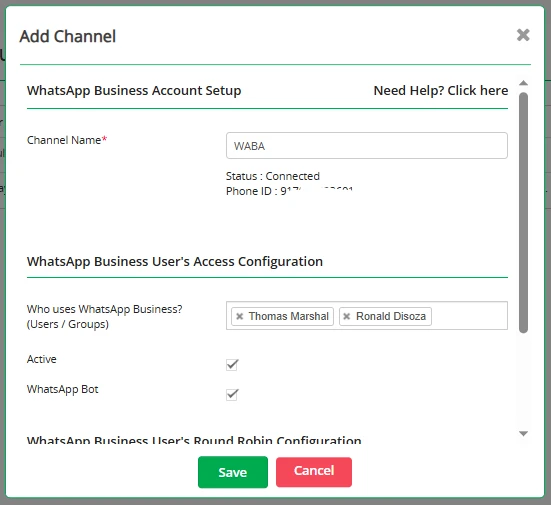
- After selecting users and user groups, and ensuring the Active checkbox is ticked, click the Save button to finalize the settings.
- Click Save Button:
- After selecting users and user groups, and ensuring the Active checkbox is selected, click the Save button to finalize and activate the WhatsApp Business channel.
 by
by