


WhatsApp chatbot for SalesHiker is Automated tools along with manual send/receive message to WhatsApp contact from SalesHiker.
How to Setup a WhatsApp Chatbot?
To access WhatsApp bot click on WhatsApp Bot in the top navigation bar.

To Access bot for WhatsApp click on below icon.

Clicking on this WhatsApp icon from the bot pop up below screen will appear.
In this WhatsApp bot screen the list of WhatsApp bot will be visible.

Creating a New Bot

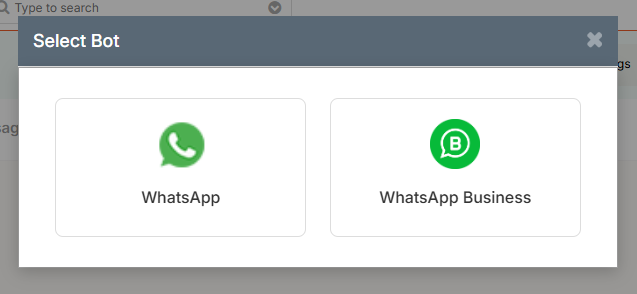
When you click on the “Add New Bot” button, you have two options to create a bot:
- Select from Existing Bot Templates
- A list of pre-designed bot templates will be displayed.
- Browse through the available templates and select one that fits your needs.
- Once selected, proceed with customization and configuration.
- Create a Bot from Scratch
- Click on the “Add New Bot” button again.
- Enter the required details, such as bot name and purpose.
- Configure the bot settings as per your requirements.
After completing the setup, your bot will be created and ready for use.
- Users can edit, duplicate and delete WhatsApp Bot by clicking on related icons.
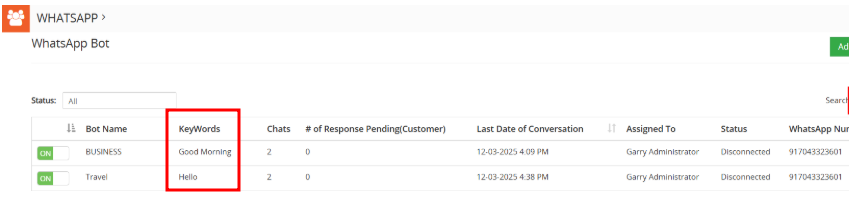
- Users can view the chat for that flow by clicking on the Chat log according to Bot ID.
- Chats display the total numbers of the message conversations for that bot from different numbers.
- Users can see the modified date and time of the conversation for the flow which is displayed in the Date of conversation column.

Search in WhatsApp Bot Listing
- Users can edit, duplicate and delete WhatsApp Bot by clicking on related icons.

How to Create a Chatbot Button?
- Users can design a WhatsApp Chat button to place on your website integrated with the WhatsApp ChatBot.

- Users can create a Chatbot button for their website by clicking on the WhatsApp Bot Settings icon > WhatsApp Chat Button > WhatsApp Bot Button Setting.
Keywords
- Keywords are used to initiate a bot.
- Multiple bot can be activated simultaneously so the user can initiate multiple bot by entering keywords.
- For example , When a customer sends a message ‘Hi Education’ – then Education bot will initiate.
- When a customer sends a message ‘Hi Real State’ – then the Education bot will initiate. so on for other industries .

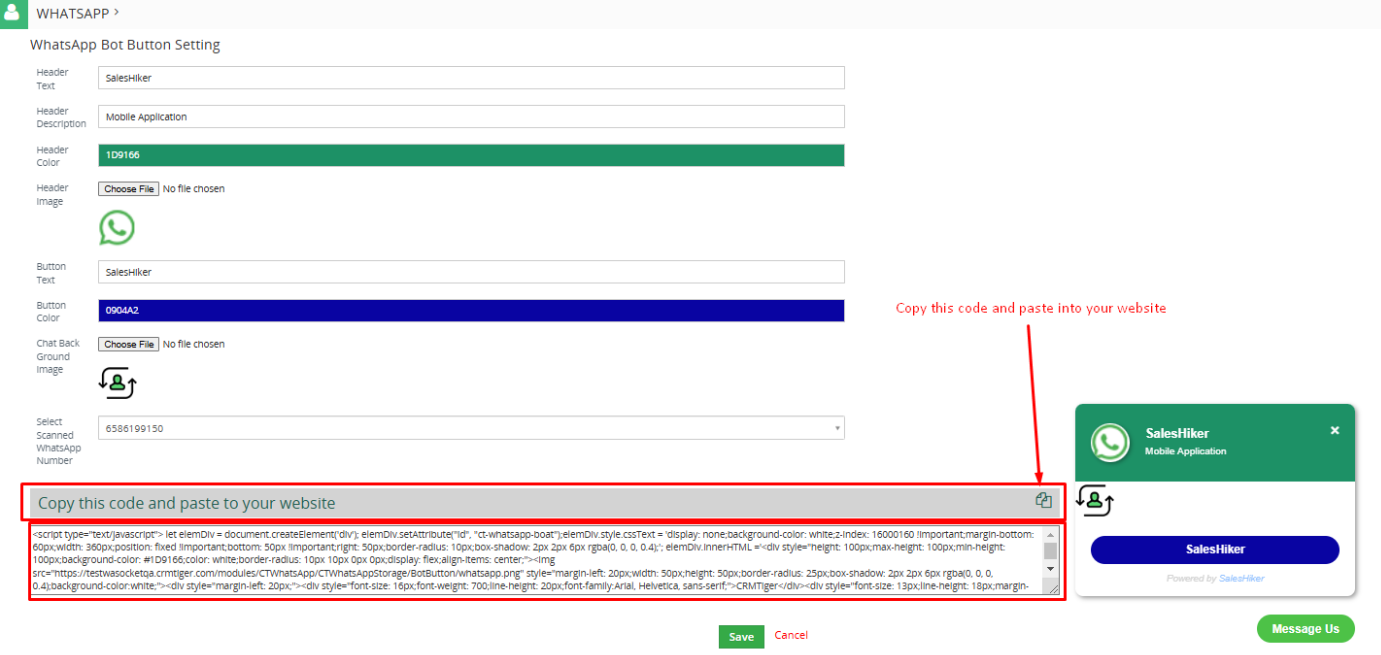
- Users have to fill in all the required details to design the Chatbot button and select the scanned number and save it.
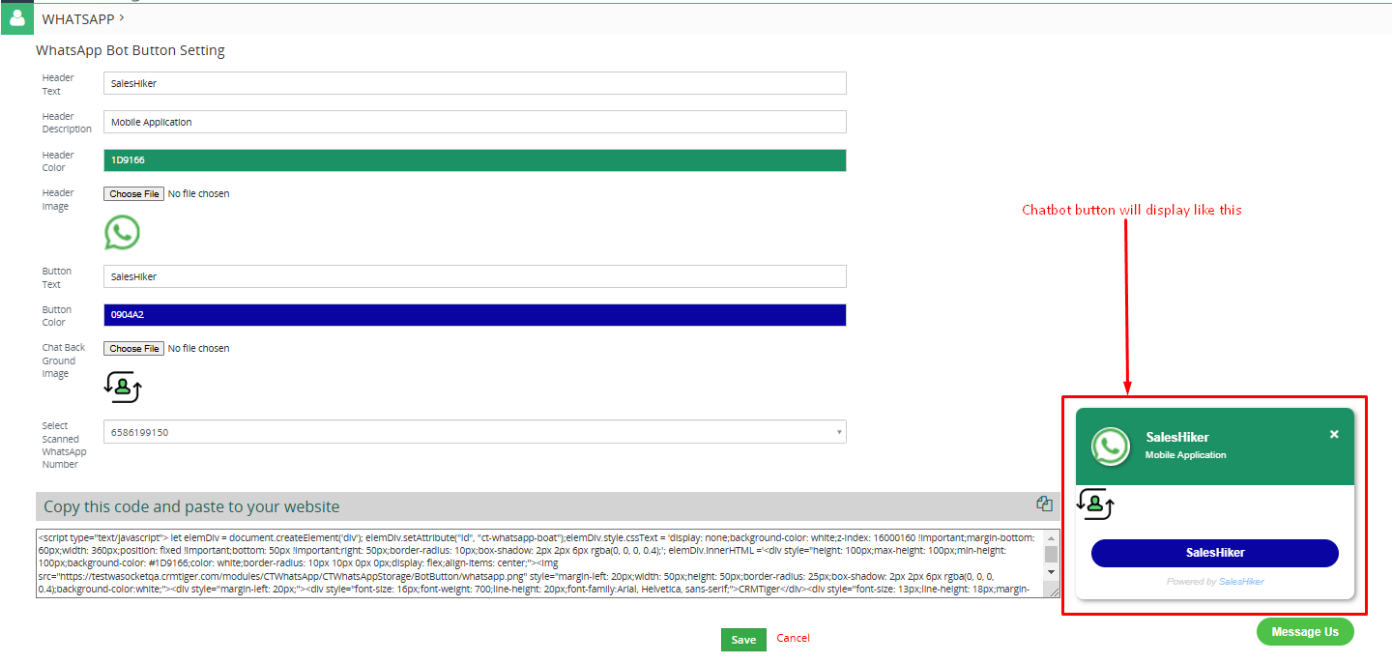
- After that users have to copy that script and paste it to their website where this Chatbot button is required to display.
How to use WhatsApp Bot template?
- Users can use template from the created bot by clicking on the “Add New Bot” button, and selecting available template.
- You can use predefined templates offered by the SalesHiker team for WhatsApp. You’ve 2 options: either Create Bot from Scratch or Select template for available WhatsApp Bot.
By clicking on ‘Add New Boat’ below the screen will be open.

- Select the “Assigned To” user, and that user scans the WhatsApp number.
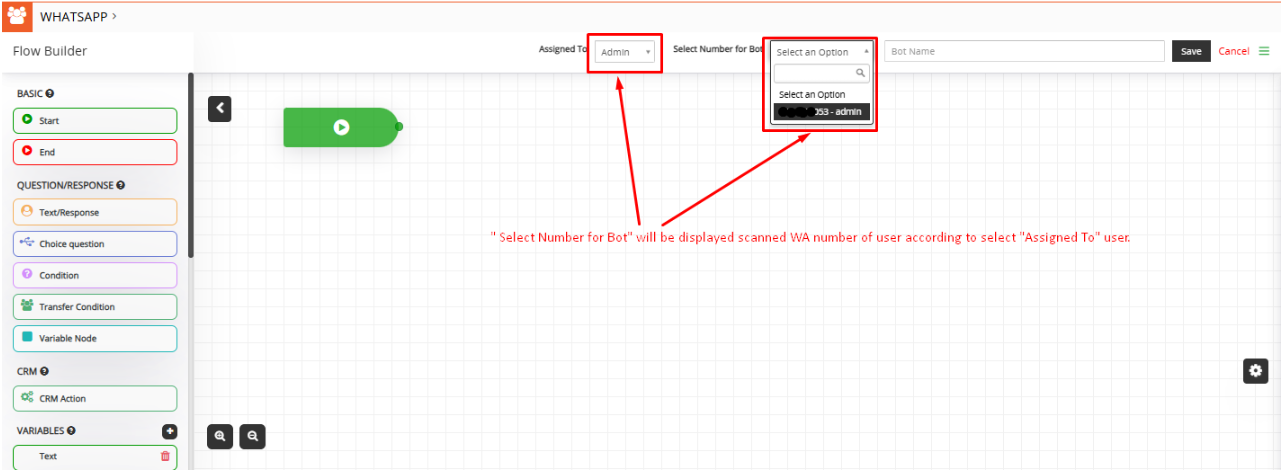
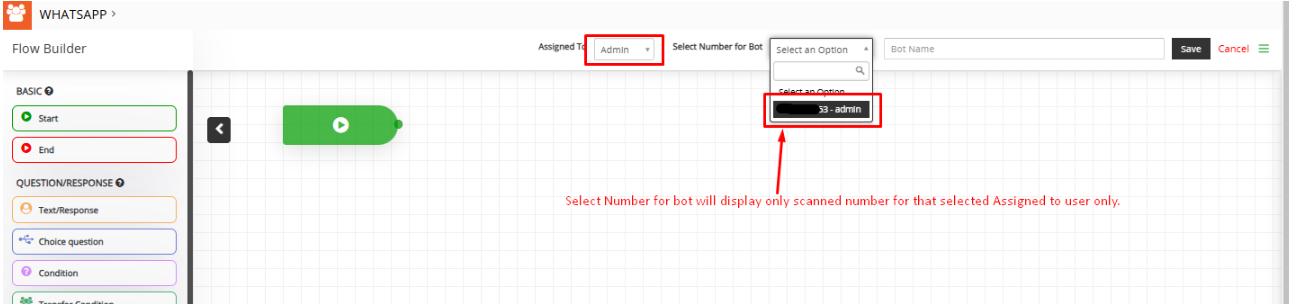
- “Select Number for Bot” drop list will show the scanned WhatsApp number of the user according to the “Assigned To” user.
- Select WhatsApp Number for bot from “Select Number for Bot”.
- “Select Number for Bot” drop list will show a scanned number which is accessible to the user.
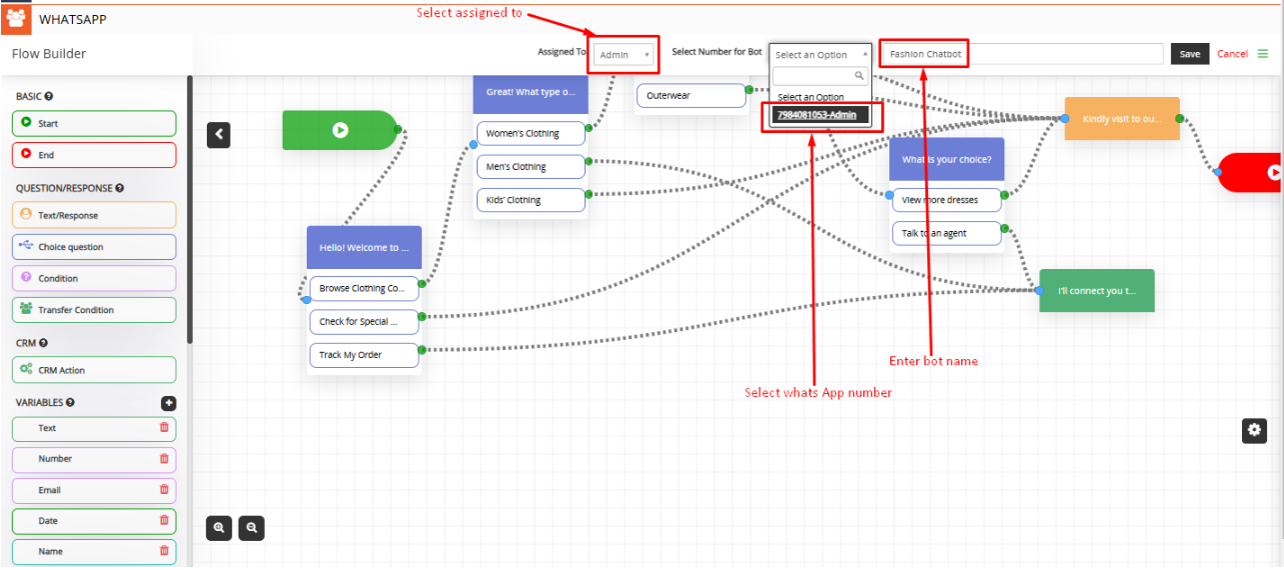
- Enter Bot Name.
- Add Start Node for designing bot flow
- Create Flow by using Question/Response, CRM Action, and Variables according to your business requirement.
- Connect End Node for designing bot flow
- Save Bot By clicking on the “Save” button.
- Enable Bot for connected WhatsApp number.

Note: WhatsApp Bot will enable only for those users who have rights to scan selected WhatsApp numbers from Setup WhatsApp > Gear Icon![]()
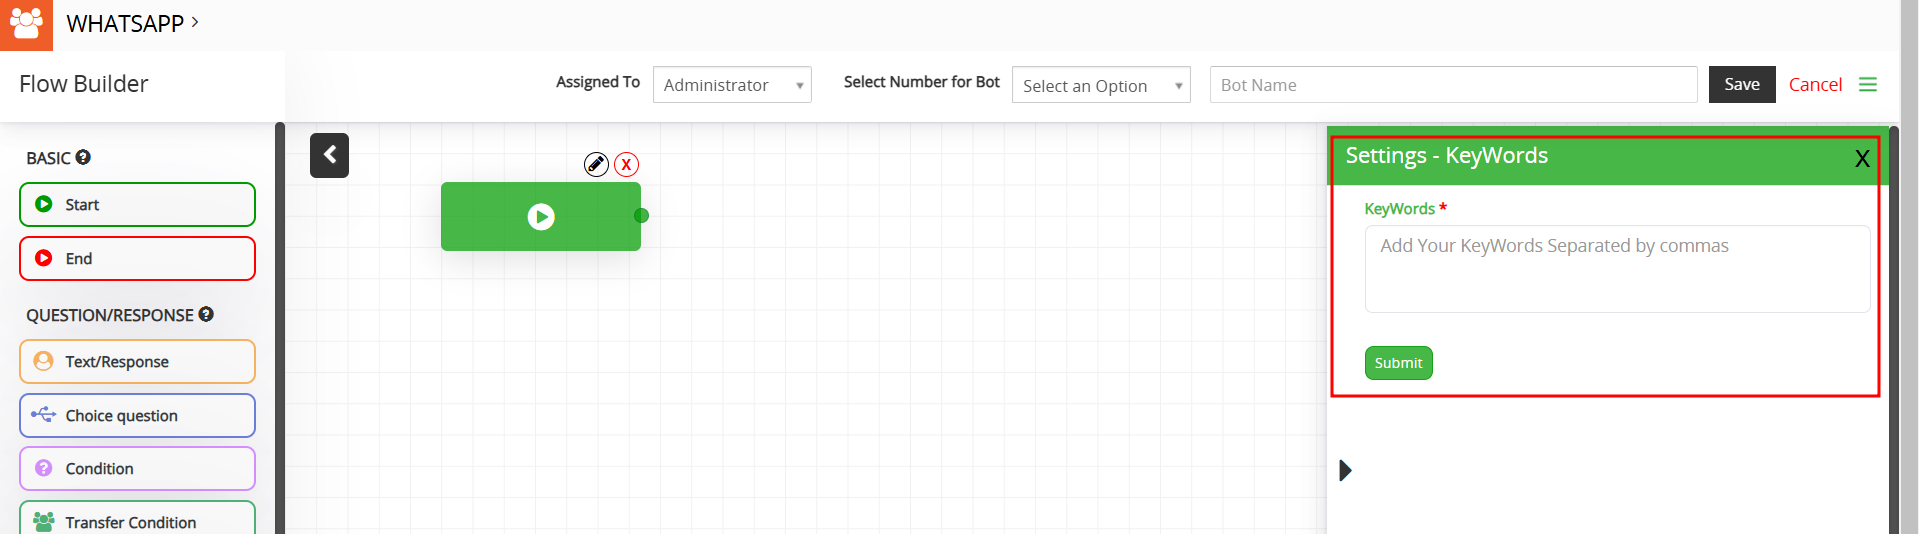
Keywords
Key words can be added to bot which can be used while users want to search any bot by the keyword.
How to Build/Design Flow for WhatsApp Chatbot?
- Users can set the flow according to the requirements for the Bot.
Basic:
- Start: Use this node when you start designing the Bot flow.
- End: Use this node when you end designing the Bot flow.
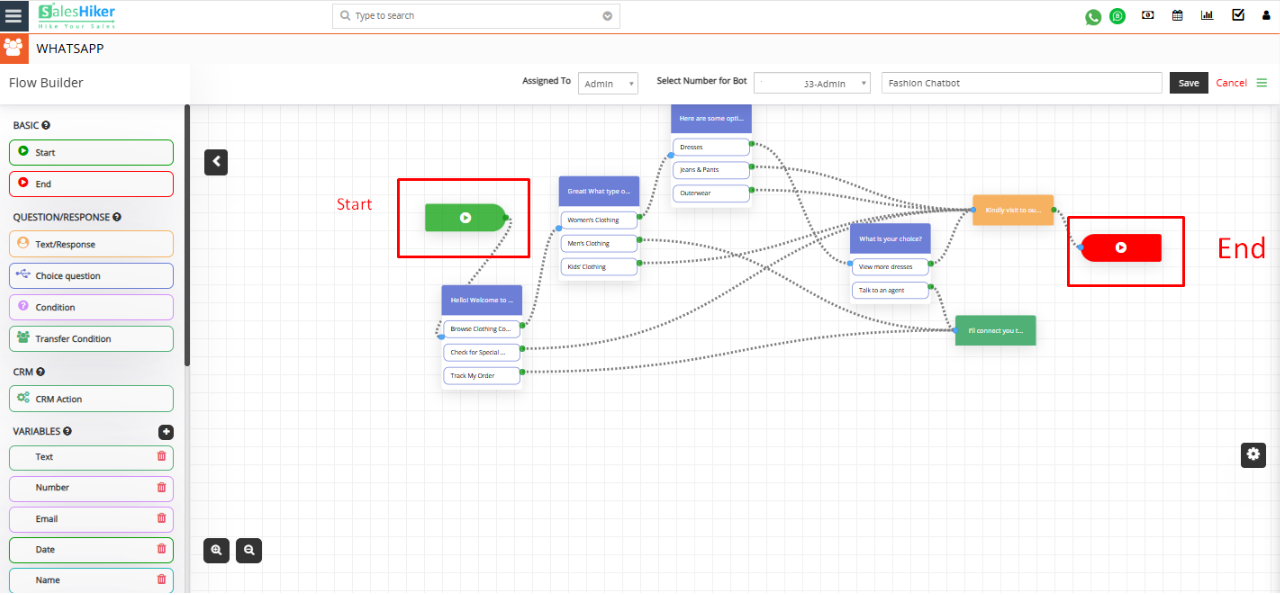
NOTE : Bot must start with a choice question.

Question/Response:
- With this feature, users can set various types of questions in flow to ask customers.
- Add a Condition to check it against a response from a customer in Bot.
Question/Response Action Settings:
- Quick Actions for Added Questions/Responses and CRM Actions:
- Users can edit, delete, and create duplicate questions/responses and CRM actions added to the bot by click on the icons shown below
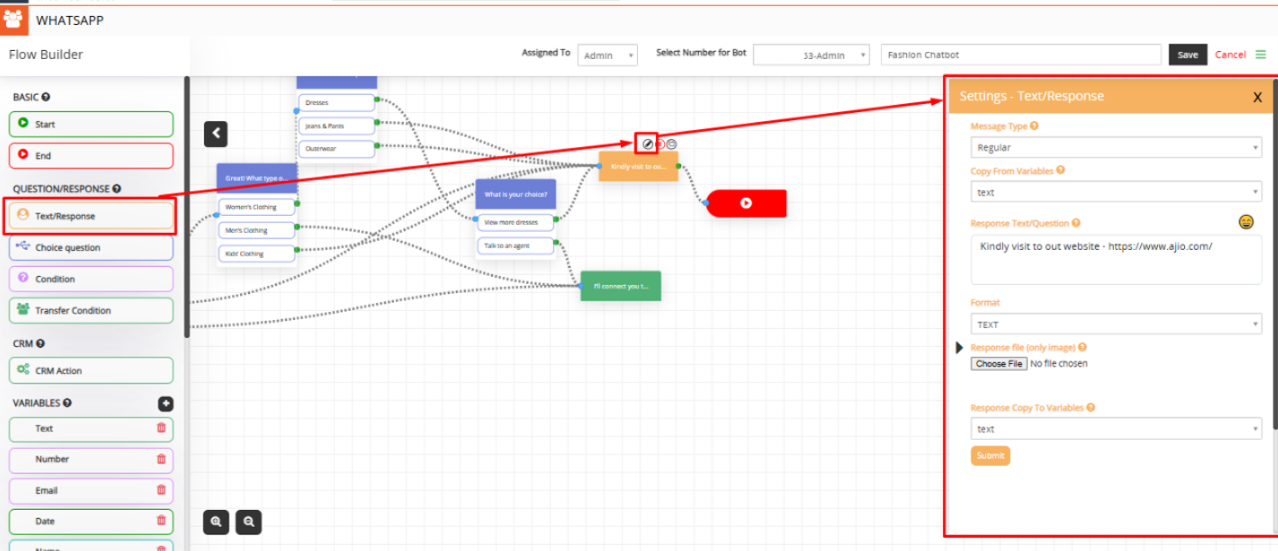
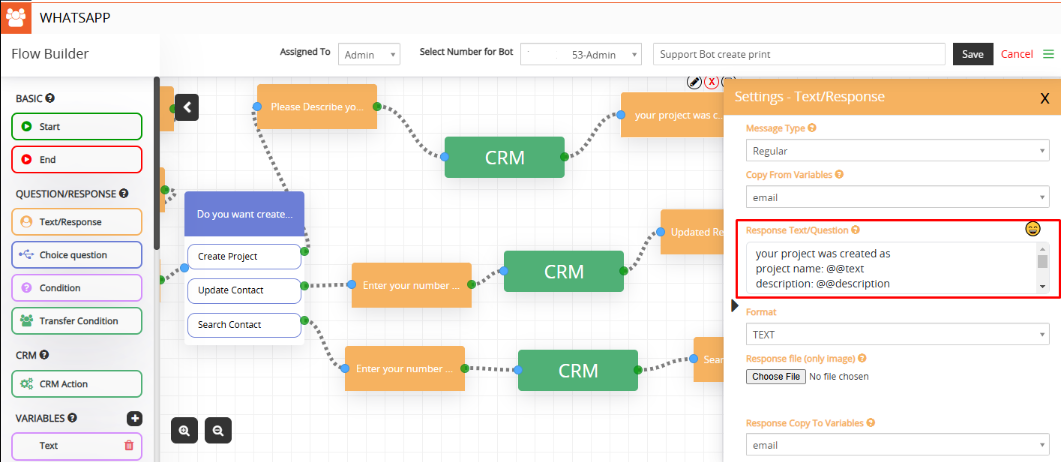
- Text/Response:
- Message Type:
- Regular message – This is a regular message type format sent to customers from the Bot.
- WhatsApp Response – This message type will display responses to customers in WhatsApp format.
- Copy from Variables: Select variable to add or copy to the message which converts to actual value when sent message to customer.
- Response Text/Question: Type a message as a response or ask a question to the customer.
- Format: Select any format like text, number, email and date for response.
- Note: To validate NUMBER, EMAIL, DATE format, you can use same name variable in English as “number”, “email”, “date”
- Response file: Send an Image as a response to the customer along with text.
- Response copy to variable: Copy the customer’s answer to the question from bot to variable, which can be used to store in CRM or reply to a customer on various stages of Bot flow.
- Message Type:
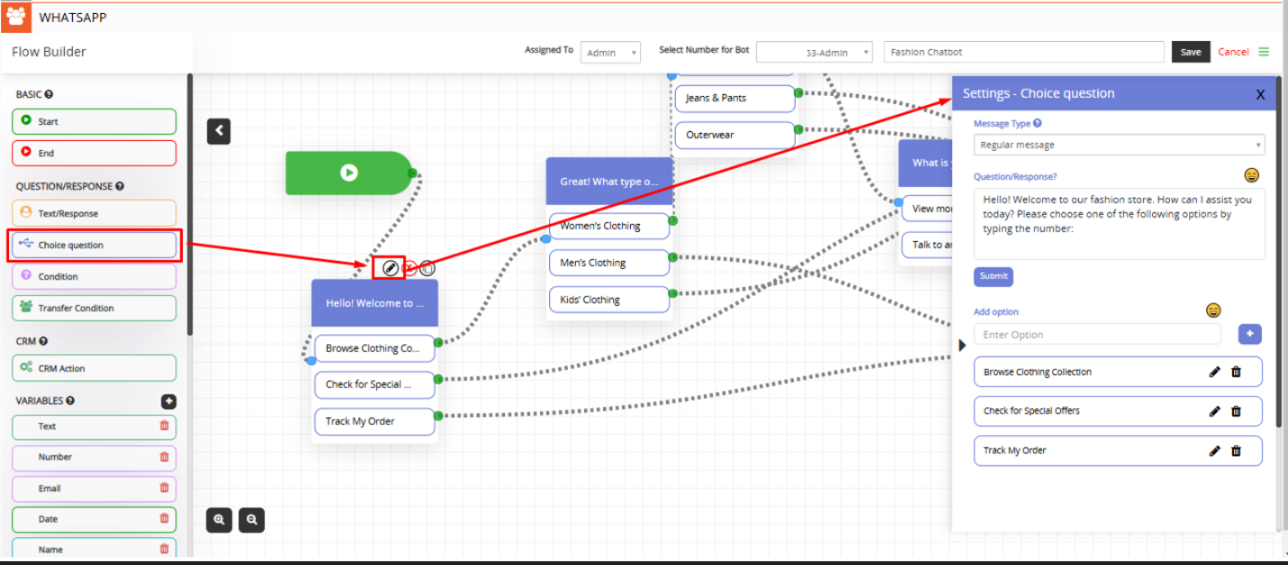
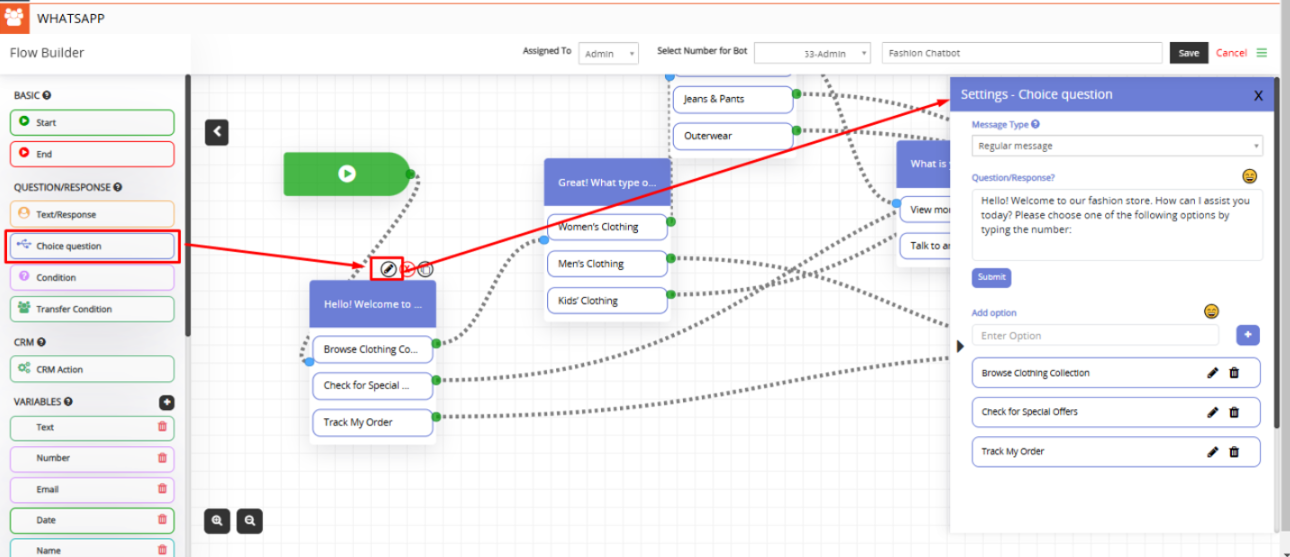
- Choice Question
- Message Type:
- Regular message – This message type will display responses to customers in WhatsApp Regular format.
- Question/Response: Add a question for the flow according to your choice.
- Add Option: Add an option for the question according to your choice.
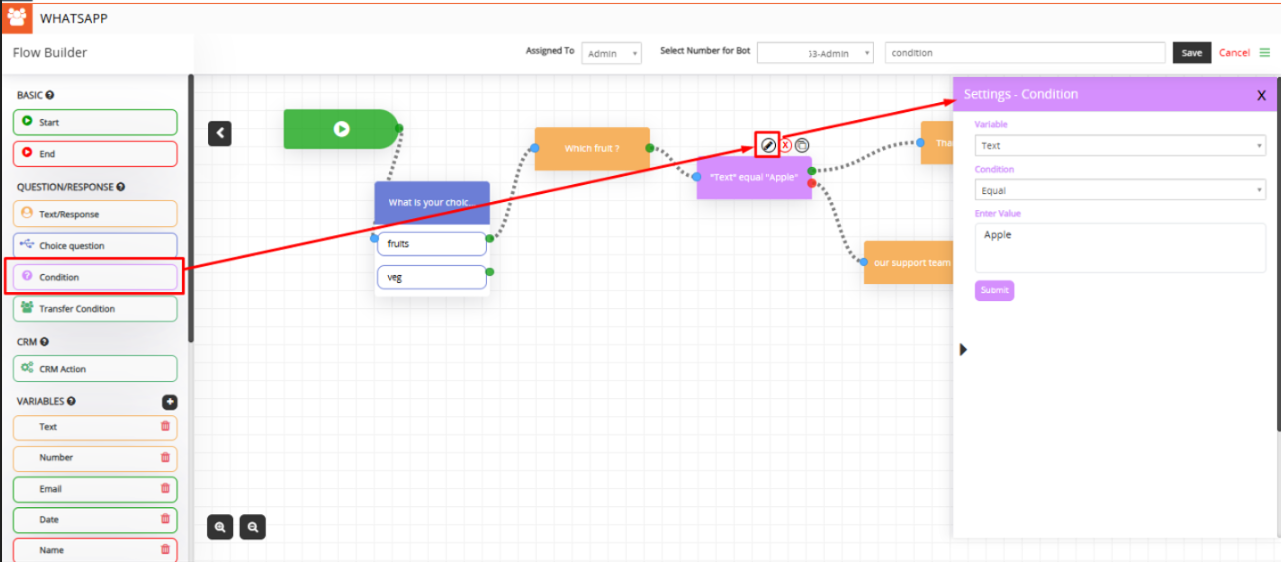
- Condition: User can add condition for the question if it’s true then it will fire the value which is set.
- Variable: Select a variable like number, email, date or description for the value.
- Condition: Select the condition for the question like a value equal to Apple etc.
- Enter Value: Enter value according to variable type selected.
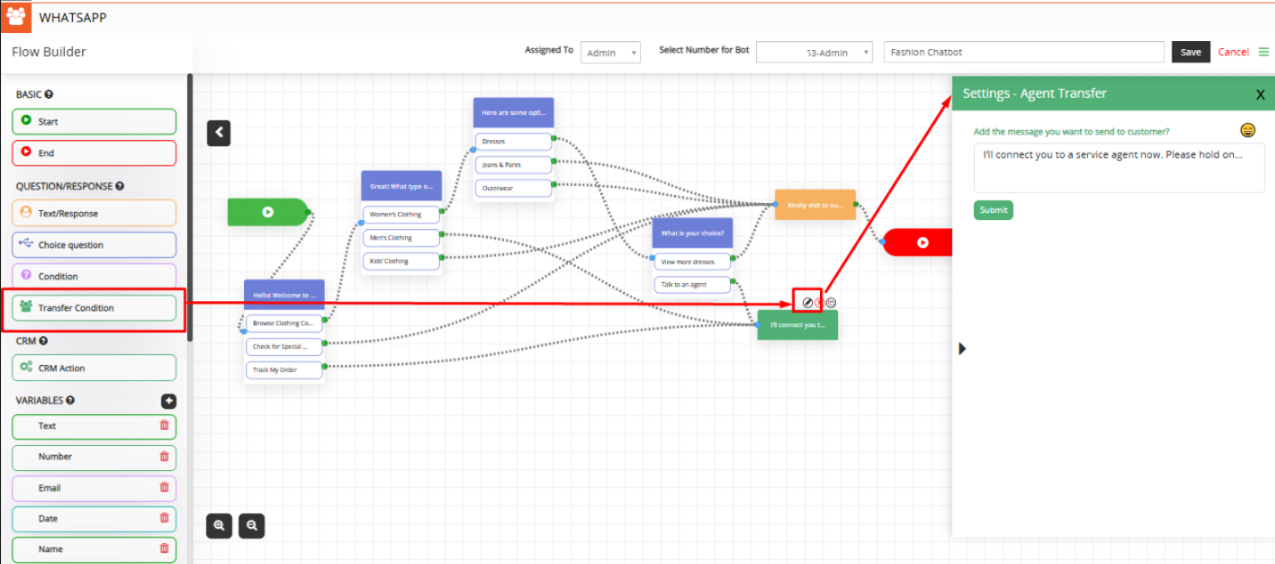
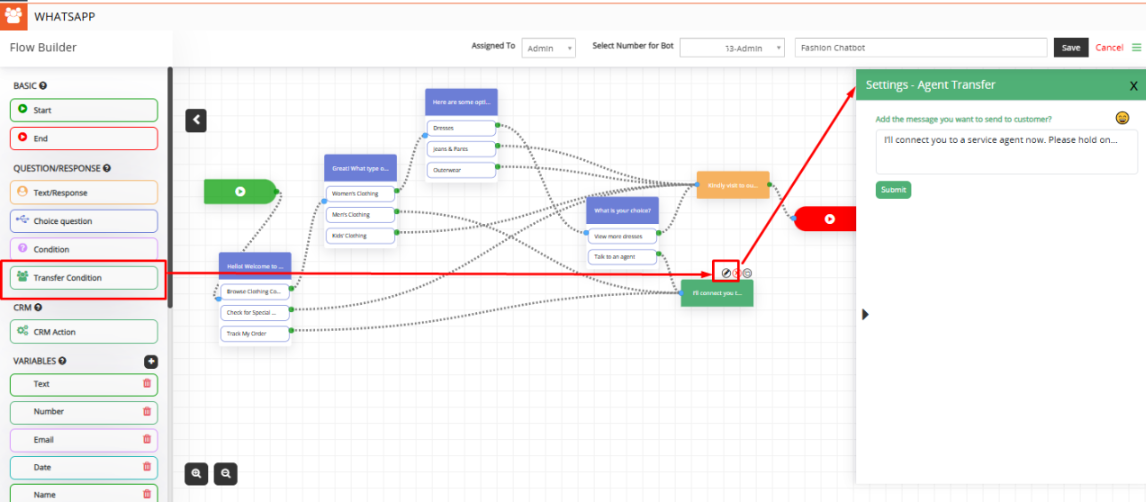
- Transfer condition:When the user selects the Transfer condition, the bot will transfer the chat to an agent and switch from robotic to manual mode.
CRM
- CRM Action: With CRM Action, you can create/search and update records to or from CRM.
- CRM Action Setting:
- Select an Action: Select an Action should allow the user to select various operations on CRM.
- Create a Record – It allows you to create records in CRM from responses from the customers.
- Search a Record – It allows you to search records from CRM from the value passed to the CRM field.
- Update a Record – It allows you to update an existing record in the CRM with the values the user has set to update in the bot.
- Modules: Select a module to search/create/update a record to or from CRM.
- Assign value to SalesHiker fields to create/search/update:
- SalesHiker field—Select SalesHiker fields to copy value to SalesHiker fields from available variables.
- Saved variables—Select available variables used to store the customer’s input from the chatbot’s questions.
- Save variable (Response) from the SalesHiker field: On create/search/update on CRM, it will return the selected field value to the customer to be displayed in the WhatsApp bot.
- Copy to variable—Select variable type as name, email, date, or description for copy variable.
- Copy from SalesHiker Field—Select fields for copying variables from the SalesHiker field.
- Select an Action: Select an Action should allow the user to select various operations on CRM.
- CRM Action Setting:
- Variables: Variables used to copy answers from customers using bot like their name,email, phone etc. This will be used to map with respected CRM fields to Add/Search To or From CRM.
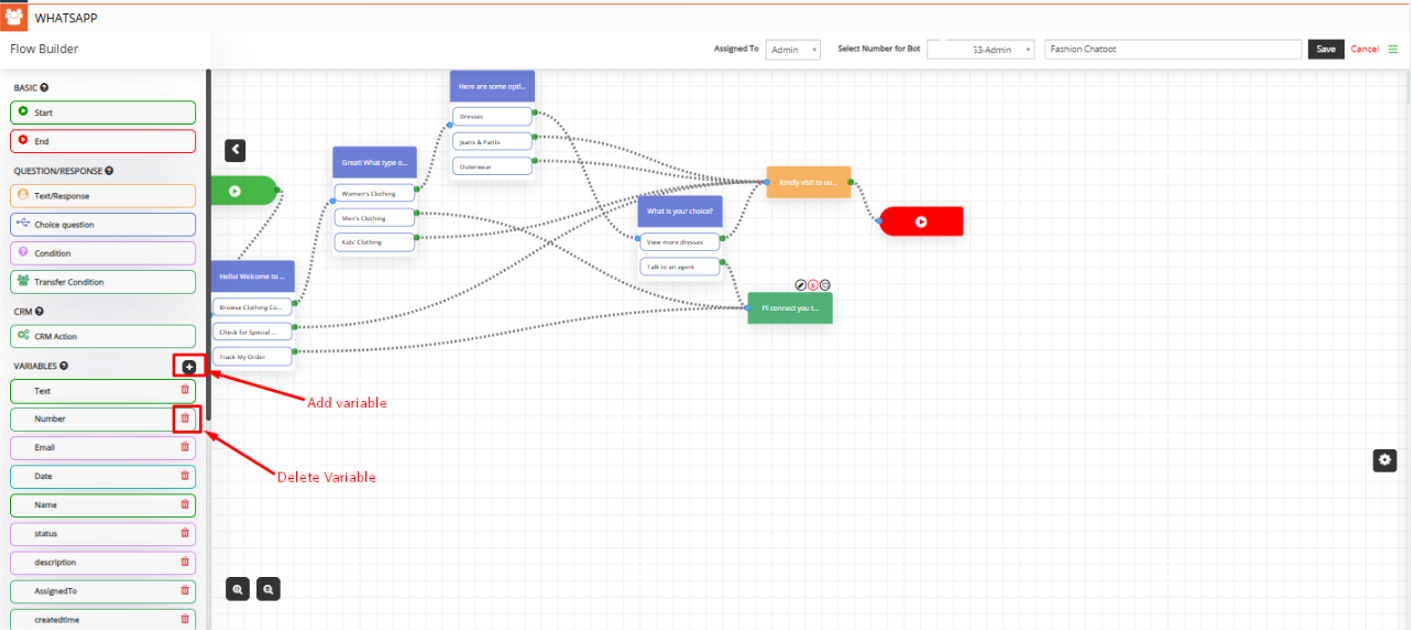
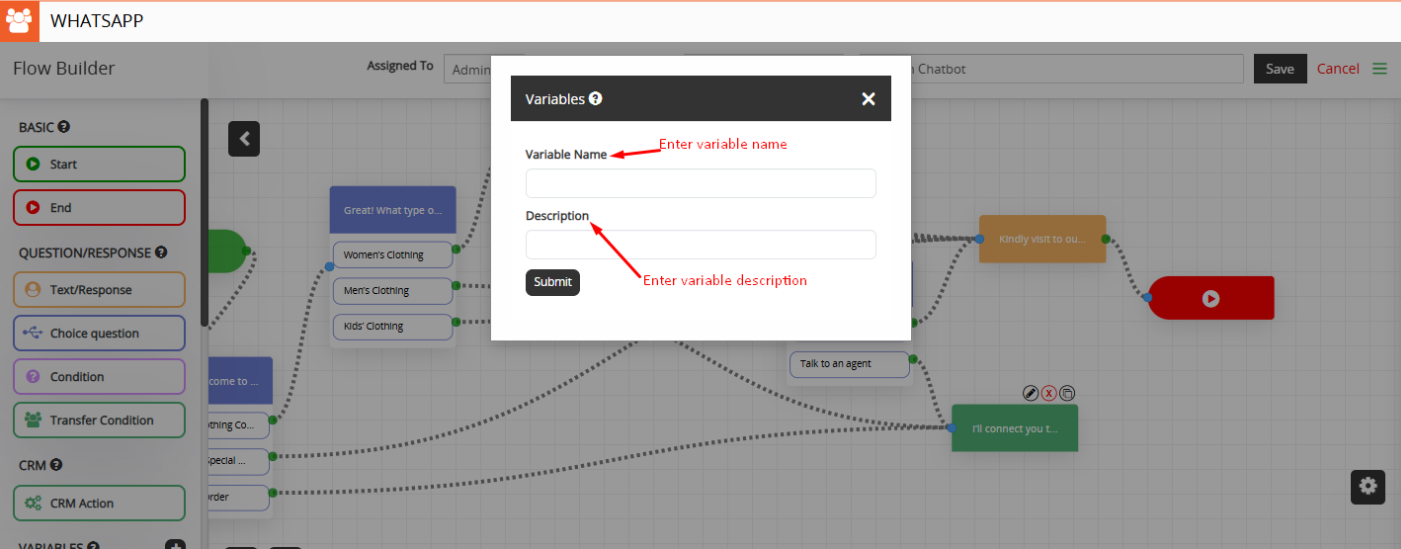
Add Variable Pop-up:
- Variable Name: Enter name for Variable
- Description: Enter Description for Variable
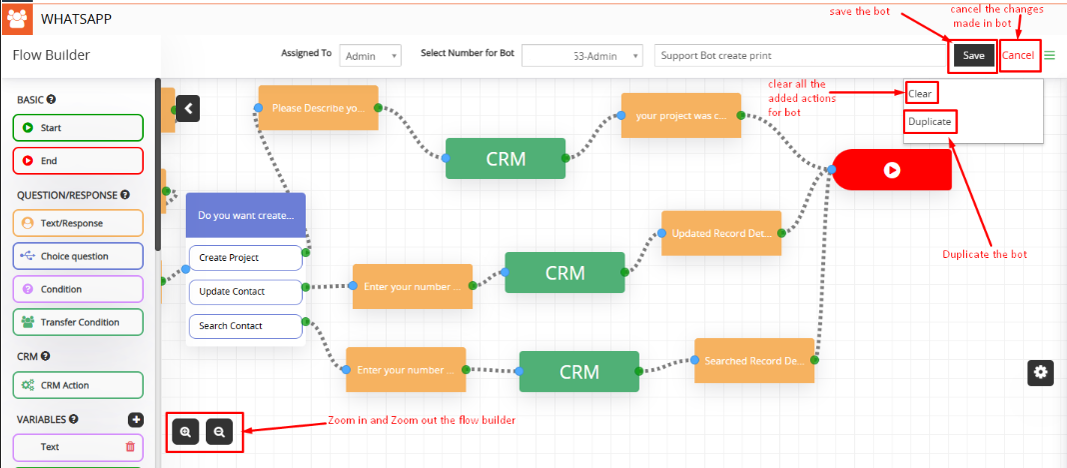
- In the final response, the user has the option to print a response for all UI types included.
- Users can Clear all the added actions by clicking on the Clear option and also duplicate the created Bot from the Flow Builder.
- Zoom In and Zoom Out buttons are also there for the flow builder.
- Save or Cancel the Created bot by clicking on the save or cancel button
 by
by