Important WhatsApp Features
WhatsApp Integration with SalesHiker comes with various nice features.
Multi Device support by WhatsApp
- With the new multi-device capability, each companion device will connect to your WhatsApp account independently. Companion devices will have to be linked by scanning a QR code, and on compatible devices, WhatsApp will also enforce biometric authentication as an extra layer of security. Users will be able to see all the companion devices linked to their WhatsApp account within the app. They can also see when they were last used, and they will be able to log out remotely.
- WhatsApp’s Multi-device feature allows you to use the instant messaging app on up to four non-smartphone devices i.e laptops, PCs, web browsers etc.
- In Addition, The multi-device can allow access to connect with CRM WhatsApp and Web WhatsApp.
- If you’re using the beta version of WhatsApp for Multi-device, then you can follow the below steps.
- You can use WhatsApp on up to four companion devices at one time, but you can only have one phone connected to your WhatsApp account at one time.
- You’ll still need to register your WhatsApp account and link new devices with your phone.
- WhatsApp CRM doesn’t allow you to scan multiple times from the same WhatsApp Account.
- If you don’t use your phone for over 14 days, your linked devices will become disconnected.
How to enable WhatsApp Multi-device?
(For those Who have the WhatsApp Multi-device beta version, you just need to follow the below steps to enable Multi-device beta)
For Android smartphone users, here’s what you need to do:
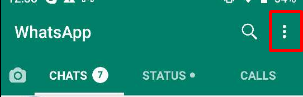
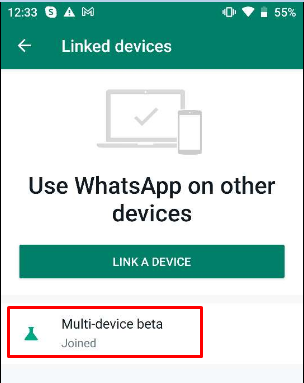
- Open WhatsApp > tap on More Options
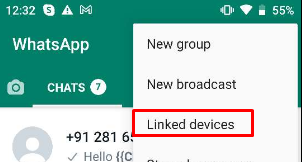
- Tap Linked Devices.
- Tap on multi-device beta
- Tap Join BETA.
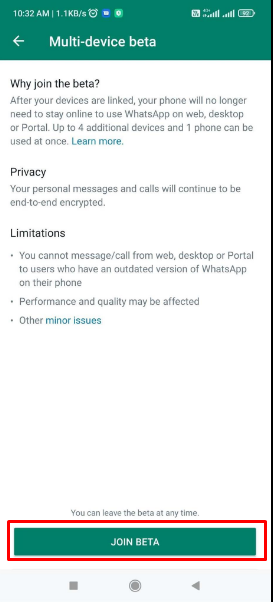
- Go back to the previous screen and tap on Link a device.
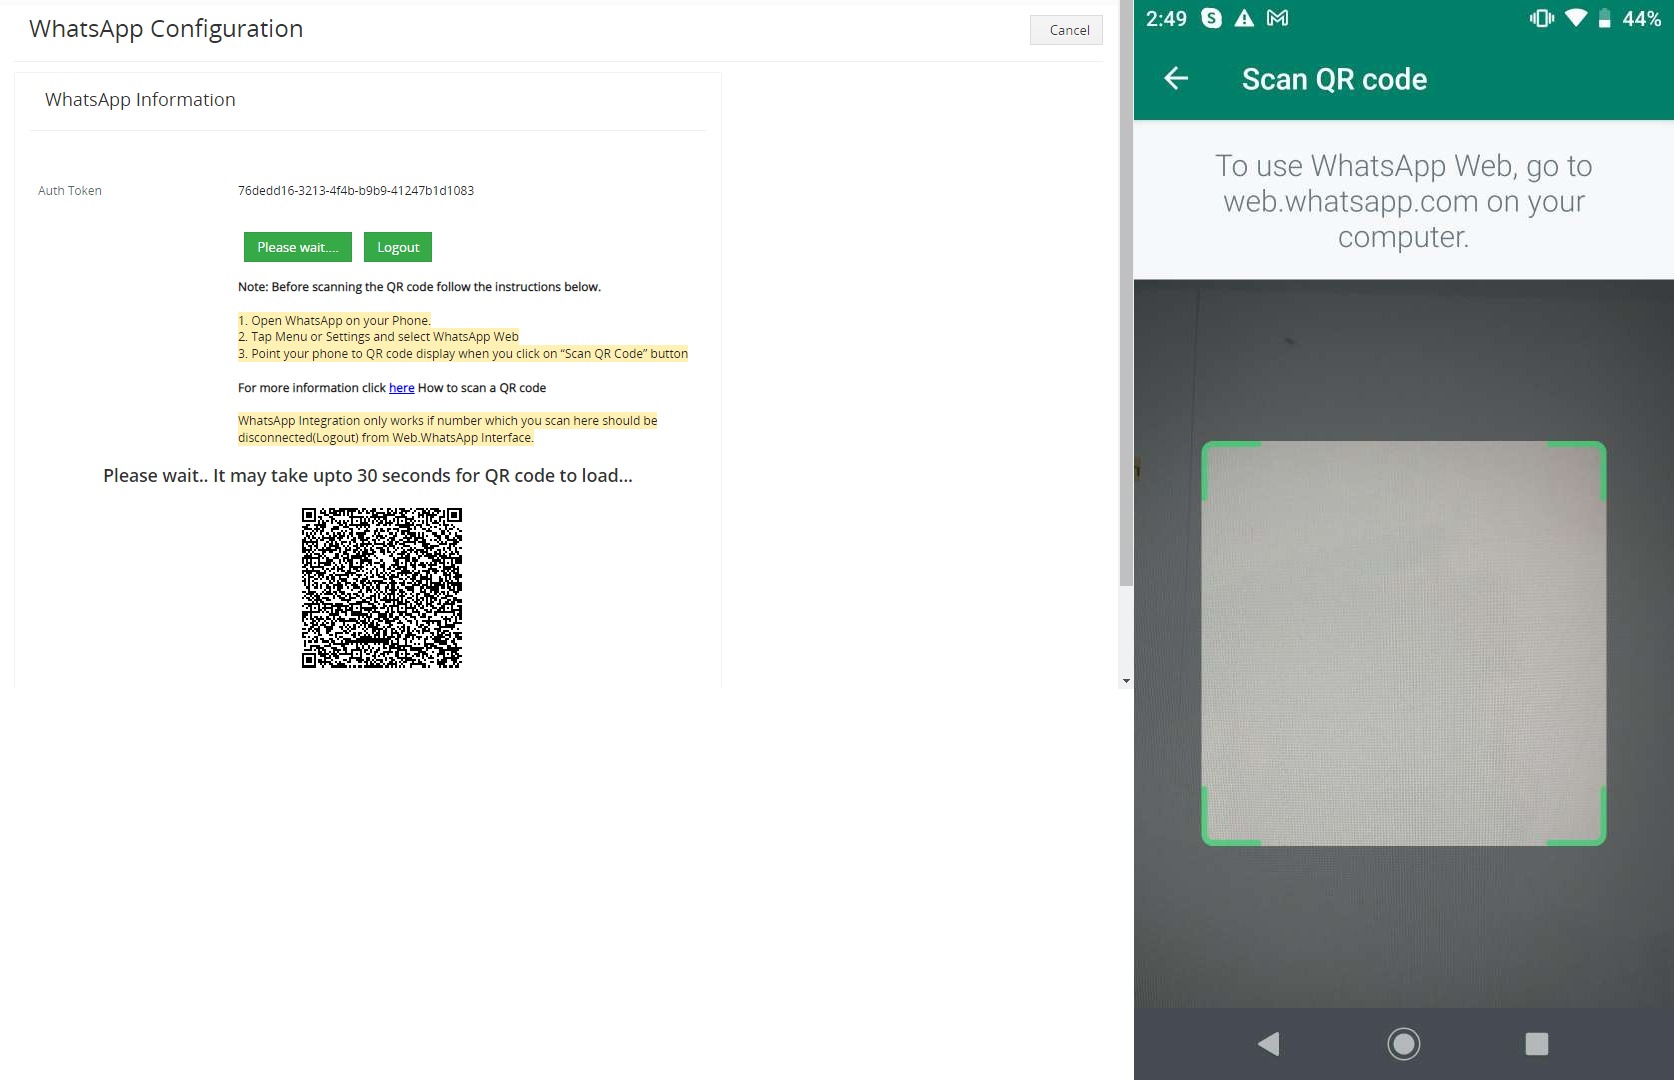
- Point your phone at the screen of the device you want to link to scan the QR code.
For iPhone users, here are the steps you need to follow:
- Go to WhatsApp Settings.
- Tap Linked Devices.
- Tap on multi-device beta.
- Tap Join BETA.
- Go back to the previous screen and tap on Link a device.
- Point your phone at the screen of the device you want to link to scan the QR code.
After joining the multi-device, you’ll need to relink your companion devices. you will need to scan a QR code that pops up on the Saleshiker WhatsApp Configuration page. After that it isn’t necessary that you must have your phone with you to use it on companion devices. Even if your smartphone is switched off, you can continue to use WhatsApp through WhatsApp Integration.
WhatsApp Integration Limitation for Multi-device WhatsApp:
- You can load only limited past history
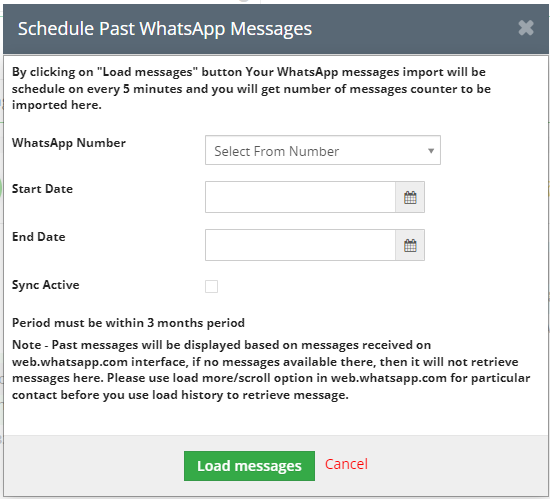
– WhatsApp Integration “Load Past Message History” feature can allow loading past message history for selected dates and selected WhatsApp number which only retrieves messages that don’t retrieve attachment files.
– So you can get limited past message history as per WhatsApp policy.
WhatsApp Configuration Management
Access “WhatsApp configuration” from Settings > Other Settings > WhatsApp configuration > Gear Icon![]()
This is the setting page to manage various activities of WhatsApp within SalesHiker.
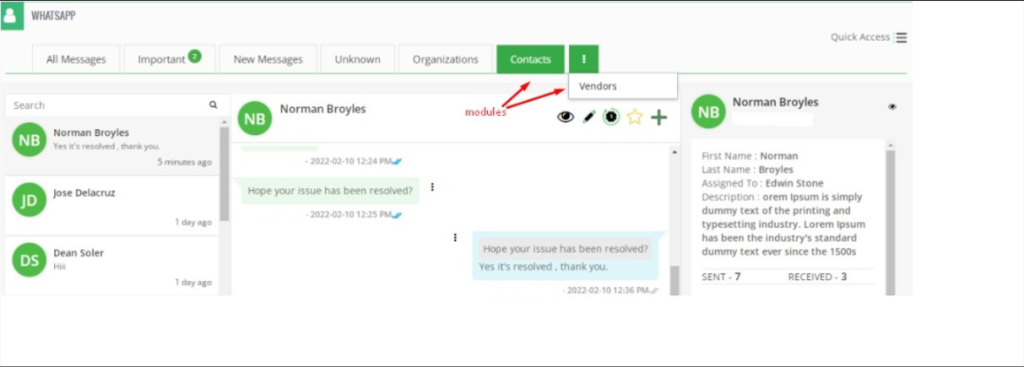
- Add/Remove modules for WhatsApp Integration
-
- Add/Remove modules to be integrated with WhatsApp to Send/Receive messages against any phone number of the module.
- In “Access modules to WhatsApp”click on
 to add modules to provide access to display WhatsApp icons to send/receive WhatsApp messages.
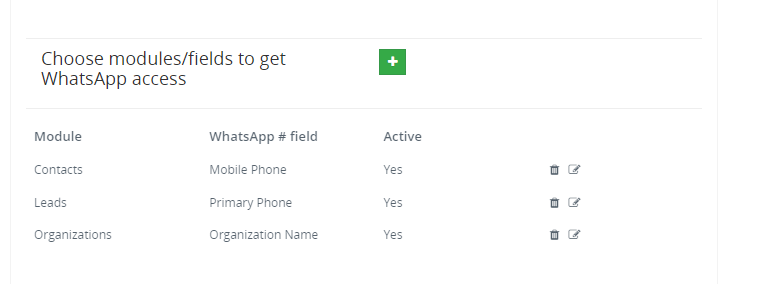
- Select“WhatsApp # field” field from“Access modules to WhatsApp” to allow which fields in selected modules to be considered as WhatsApp fields.
-
- WhatsApp module/number Access to user
- Multiple WhatsApp # for each user
- Saleshiker’s WhatsApp integration allows this option for those companies that rely on a Multiple WhatsApp number configurations for each user. As well as allocate a WhatsApp number to each single user.
- This option will be enabled from Other Settings > WhatsApp configuration > Gear Icon
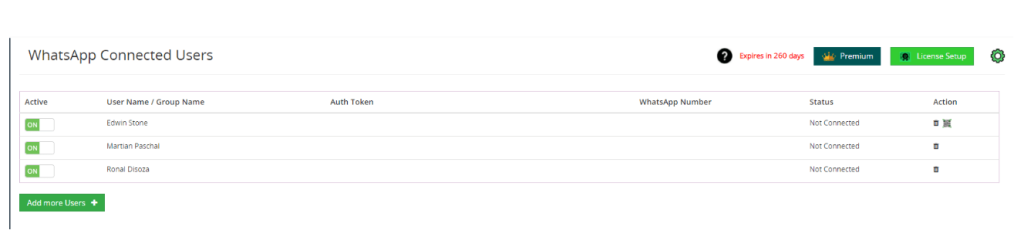
 > Find “WhatsApp # management”, it will display a multi-select list to select the list of users to get WhatsApp # access so users will get access to WhatsApp to scan.
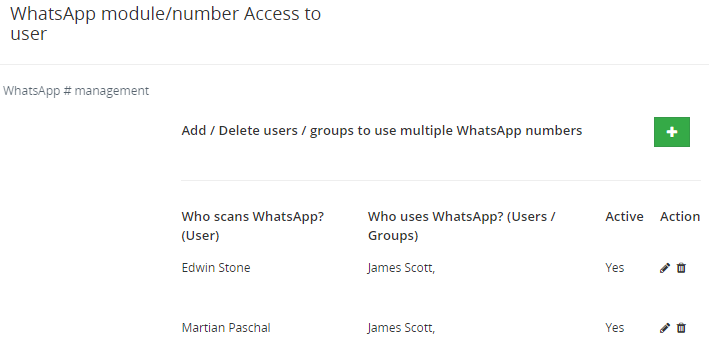
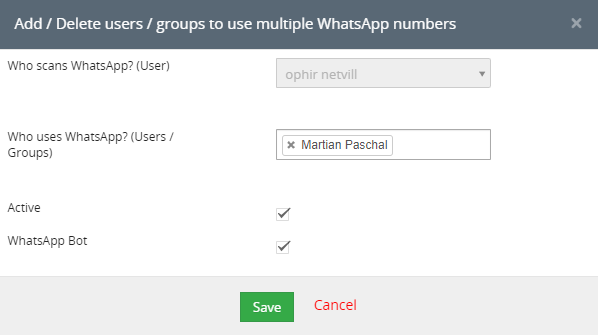
- Click on the Plus button will open the Pop-up for Add Users to use Multiple WhatsApp Number.

- Using Multiple WhatsApp # configuration any user who has rights given from Settings > WhatsApp configuration > Find “Allow access to users” and Select the list of the users to get WhatsApp module access.
- Users can only see all WhatsApp conversations and contacts based the on Roles & Rights set in CRM for the user.
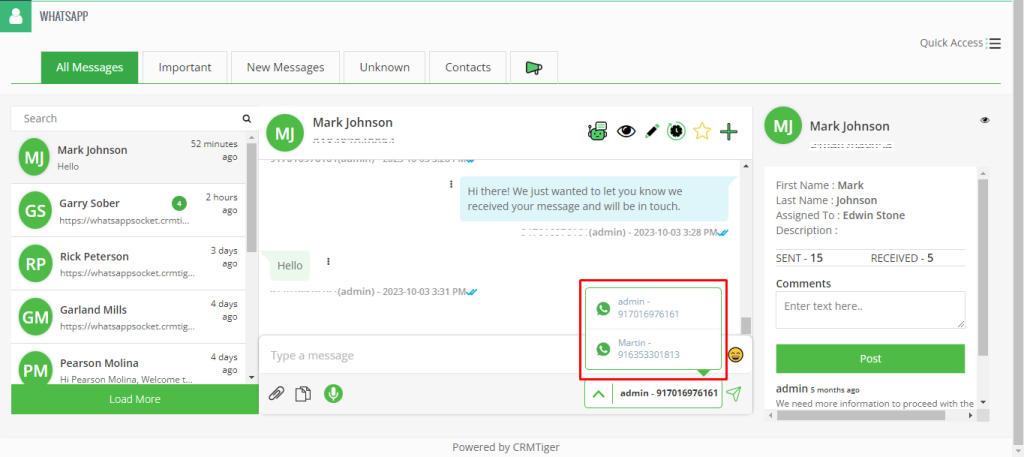
- As per the below screenshot, James Scott can use both the scanned numbers of Edwin and Martin.
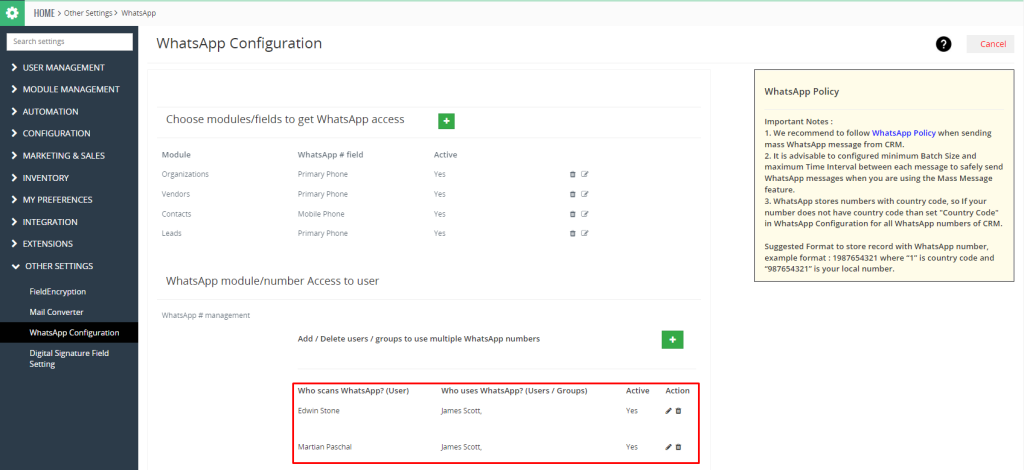
- Edwin and Martin are the users who have scanned numbers and they have given access to James to use their number. So James is able to message from both scanned numbers.
- Multiple WhatsApp # for each user
- General Settings
This option will be managed from Other Settings > WhatsApp configuration > Gear Icon > Find General Settings.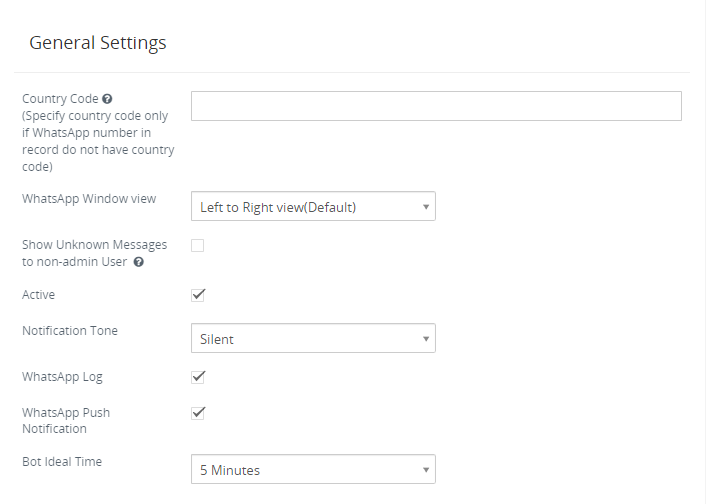
- In the General Settings we configure the Country code, WhatsApp Window View, Show Unknown Message and Show status to see if it is active or not.
- Country Code
This is an important setting before you start using WhatsApp integration. WhatsApp Store phone number with Country Code It means if your phone number is 6308618263 and Country code is +1 then the WhatsApp store number as “16308618263”. If you’ve got a record of having a phone number without a country code then follow the instructions below.
- WhatsApp phone number without country code in Records : In this scenario enter country code, if you want to apply country code as a prefix to all “Phone numbers” of all modules where you’ve enabled WhatsApp Integration. So whenever a WhatsApp message is sent out from the CRM it will add a Prefix because WhatsApp requires “Country Code” to send a message to a contact.
For example : If the connected phone number is “987654321” and the country code is “+1” then WhatsApp number becomes “1987654321” - Record with country code as a prefix : If you already saved a record/phone number with country code then In this scenario keep the country code field “Blank”.
- WhatsApp Window View
SalesHiker’s WhatsApp integration allows their users to configure the WhatsApp window in Right to Left view which is mostly preferable in the middle east countries. SalesHiker by default supports the Left to Right view. - Show an Unknown Message
If a WhatsApp message has been sent by a customer whose number is not in the CRM as a Record and if you want to allow all non-admin users to see those numbers then enable this feature. So all non-admin users can see those messages by clicking on the Global WhatsApp icon and seeing them under “Message from Unknown numbers. - Active Status
This option allows you to show WhatsApp status. If you select the checkbox then it will show your status as active when you are active on the WhatsApp otherwise it will not show anything. - Notification Tone
As per our requirements we change the WhatsApp notification tone and if we want then we can also mute the WhatsApp notification by selecting the silent option.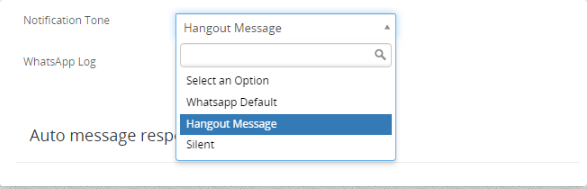
- WhatsApp Push Notification
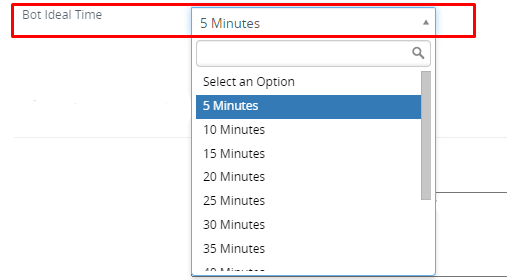
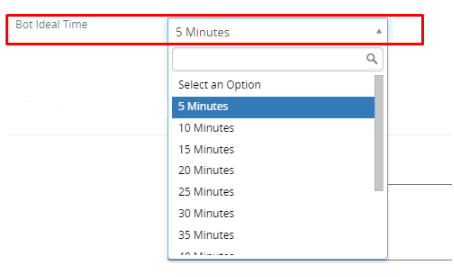
If this option is enabled then User will receive Push notification on the user’s device when a message is received from the contact. - Bot Ideal Time
This option will work if the user selects 5 minutes as Bot Ideal Time and Conversation mode is in Manual mode and if the user is not sending any new message within 5 minutes from last sent message then Conversation mode will change to Robotic mode automatically. (It will automatically enable Robotic mode if the difference b/w sending Message from CRM and receiving message is more than Bot Ideal Time).
- Auto Message Responder
- This option will be managed from Other Settings > WhatsApp configuration > Gear Icon > Auto Message Responder
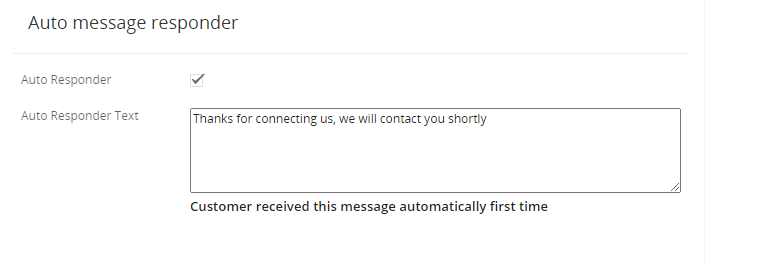 It is helpful to give answers to messages automatically. It means you have just written a message which will be sent automatically to the sender.
- This option will be managed from Other Settings > WhatsApp configuration > Gear Icon
Customers received messages from auto responder message text automatically the first time or after 14 days of no activity.
- Mass Message Configuration
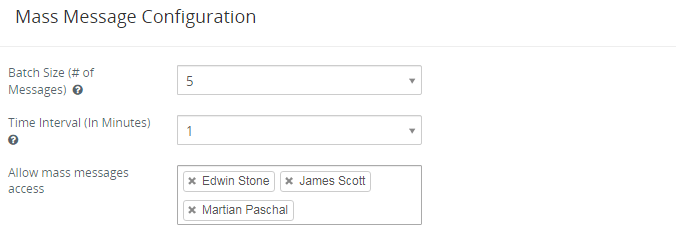
- This option will be managed from Other Settings > WhatsApp configuration > Gear Icon > find Mass Message Configuration
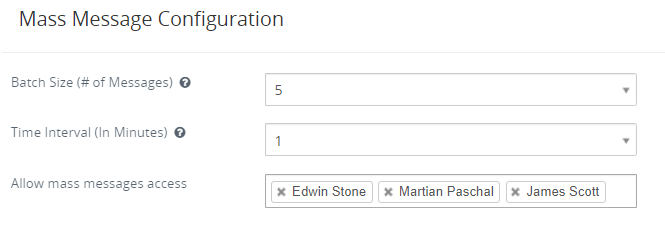
Batch size allows the user to send mass messages in a batch of messages to avoid Spamming. - Example : If you wish to send 500 messages and if you set a batch size of 15 and Time Interval of 15 minutes. Then it will send 15 messages in each batch based on the Time Interval calculated below.
- Time to send 500 messages = (500 messages / 15 Batch size) * 15 minutes = 500 minutes = 8 Hours Approximately.
- Random : Random selection dynamically select any number from 1 to 25 as a batch size when sending message to customer, It means if there are 500 messages to send and Batch Size – Random than it will send 5 messages in the first Batch, 8 messages in the second Batch and so on..
- Allow Mass Messages Access: User can allow to send mass message if users have accessed in selection of user list, and allow user can have access to send mass message button as “Send WhatsApp Mass Message”.
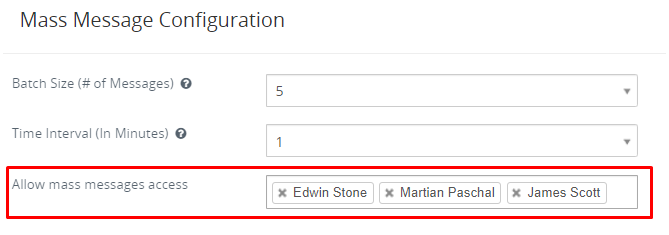
- This option will be managed from Other Settings > WhatsApp configuration > Gear Icon
WhatsApp user guide for SalesHiker 7.x
How to use WhatsApp for SalesHiker ?
- WhatsApp Integration with SalesHiker gives you the flexibility to send WhatsApp messages to your customers.
- You can send WhatsApp messages to multiple records in one shot(obviously you’ve to follow WhatsApp guidelines for the same).
- In addition to manually sending out messages, you can also forward automatic notifications triggered by workflows in SalesHiker CRM.
Recommendation on Sending WhatsApp Messages
- Since Watsapp is very skeptical about numbers that do bulk mailing, the following are recommendations:
- Send no more than 5-10 messages per minute, i.e. send messages in batches, not all at once.
- Take into account the reaction of users to the message. Usually, 10 clicks on the “Spam” button
- From the client side it is enough for the number to be blocked.
- The presence of links in messages increases the likelihood of a ban.
- WhatsApp has no physical limit on the number of messages, as per their policy but there is a recommendation not to exceed certain messages per day. Again this will be as per the WhatsApp Policy, if the number of incoming and outgoing messages is about the same, then you can send a little more than 6000.
- Use the device on which there were no earlier bans.
- Receive incoming messages. The more incoming messages, the better. Incoming messages are not counted in the recommendation not to exceed 6000 messages.
Important WhatsApp Features
WhatsApp Integration with SalesHiker comes with various nice features.
-
WhatsApp message management
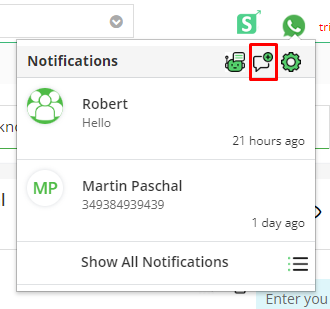
- Notification
- Here we can see the new arrival messages count when any new message comes.
- When we click on this icon it shows the latest 5 messages in the popup.
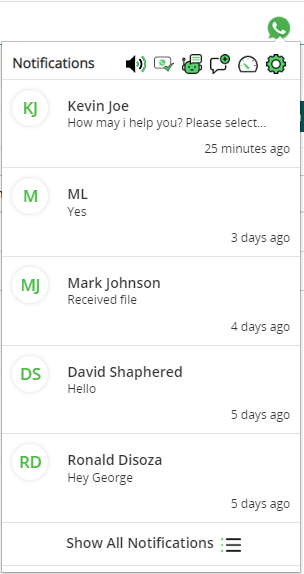
- When you click on “Beep” icon, then it will start the beep sound for received messages if it’s enabled / ON
 or if it’s disabled / OFF
  , it will stop the beep sound for received messages.
 - When you click on “Unread” message
 icon, it will read all WhatsApp unread messages.
 - When you click on “Chatbot”
 icon, it will redirect to the chatbot interface.
 - When you click on “New Message”
 icon, it will open a popup to send a new number message.
 - When you click on “Analytics”
 icon, it will redirect to the WhatsApp analytics interface.
 - When you click on “Setting” icon, it will redirect to the WhatsApp configuration page.
- If you want to go to timeline view click on Show All Notification
- Here we can see the new arrival messages count when any new message comes.
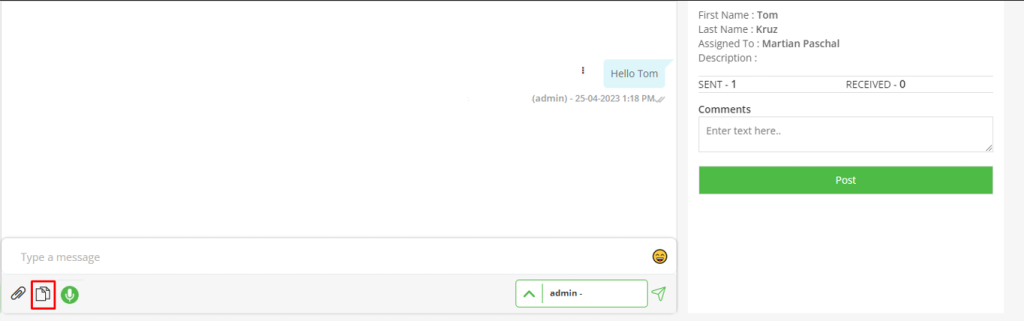
- Send/receive messages
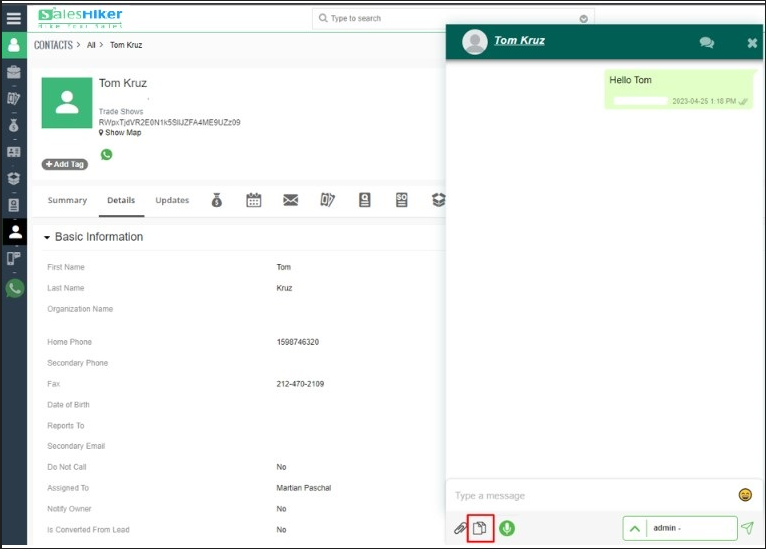
- Send/Receive message from a record
- Click on module > GoTo Record List > Open the record in view There is an option to view “WhatsApp” icon, click on the icon to open WhatsApp conversation with the contact
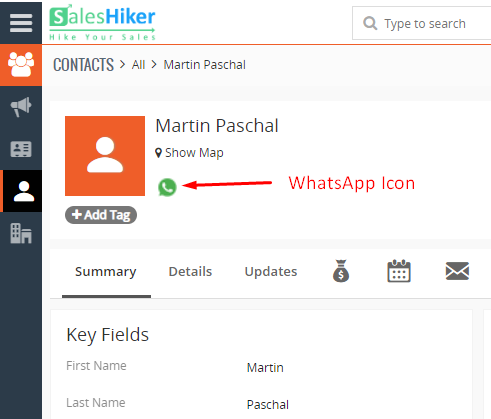
- Clicking on the WhatsApp icon will open the Chat window to communicate between the contact and user.
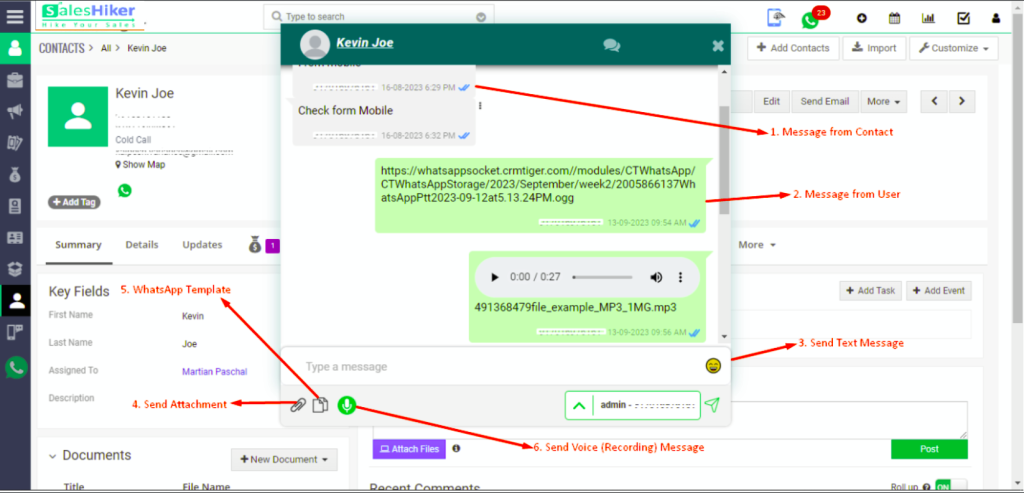
- Through WhatsApp integration you can send,
- Text messages
- Files, Images (Up to a limited Size based on our file upload limit)
- WhatsApp Template
- Voice (Recording) Message
- You can pause and delete the Voice (Recording) Message before it.
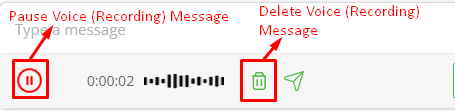
- You can pause and delete the Voice (Recording) Message before it.
- You can communicate with customers only if the phone number entered in the record is a WhatsApp number of the customer. Also , the “WhatsApp # field” specified correctly in “WhatsApp configuration” settings
- “WhatsApp” uses numbers with country code so please follow the instructions mentioned in the “WhatsApp configuration” section about country code.
- Click on module > GoTo Record List > Open the record in view There is an option to view “WhatsApp” icon, click on the icon to open WhatsApp conversation with the contact
- Send/Receive message from Timeline view
- General Feature
- New Messages
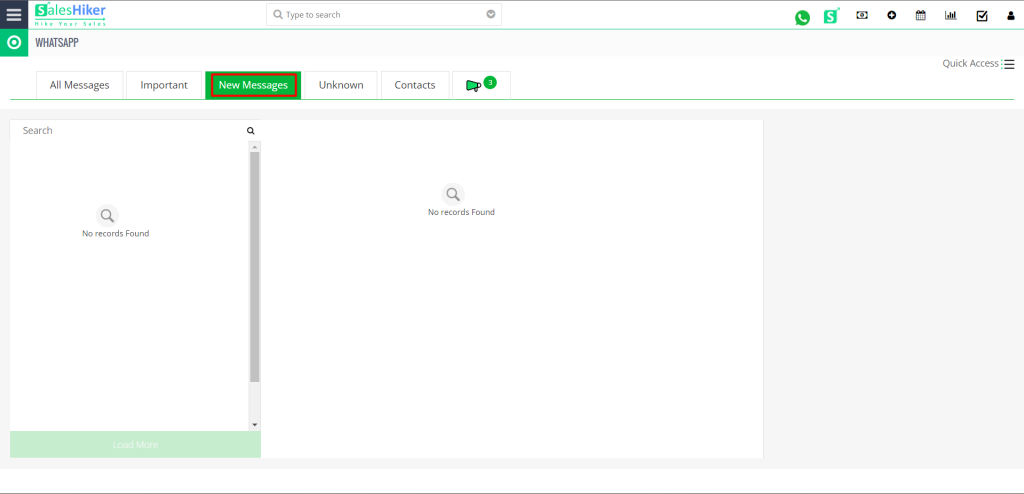 New messages in the WhatsApp Global messages area list all unread messages either from “unknown number” or “existing contact records”.
 - Global WhatsApp messaging has the same option as sending/receiving messages to individual records.
- New Messages
- Important messages
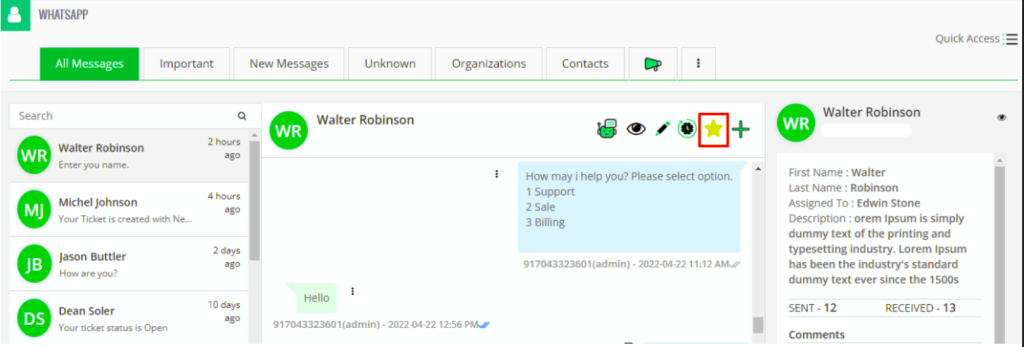
- Important feature helps you to quickly access your WhatsApp contact which is important.
- You can manage to move any contact under Important by simply clicking on
 icon to move the contact under Important contact.
 - Message from unknown number
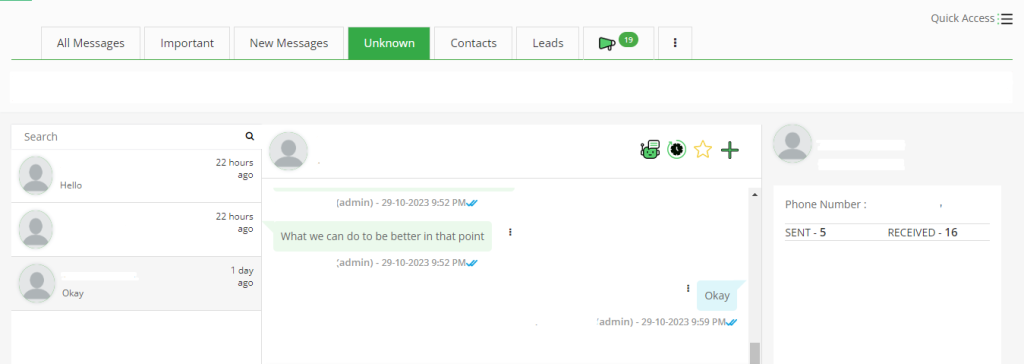
- “Unknown numbers” in the WhatsApp Global messages area list all messages from an “unknown number” not stored as a record in CRM.
- “Unknown numbers” messaging section has the same option as sending/receiving messages to individual records.
- From “Unknown numbers” there is an option to Create a new customer record or update “Unknown number” to the existing record in SalesHiker.
- Modules messaging
- Module list” in WhatsApp Timeline view are users can send/receive messages against records of modules, enabled from WhatsApp Configuration in CRM
- “Module based” messaging section has the same option as sending/receiving messages to individual records along with an option to manage records too.
- Group messages
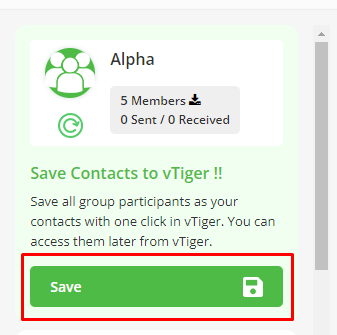
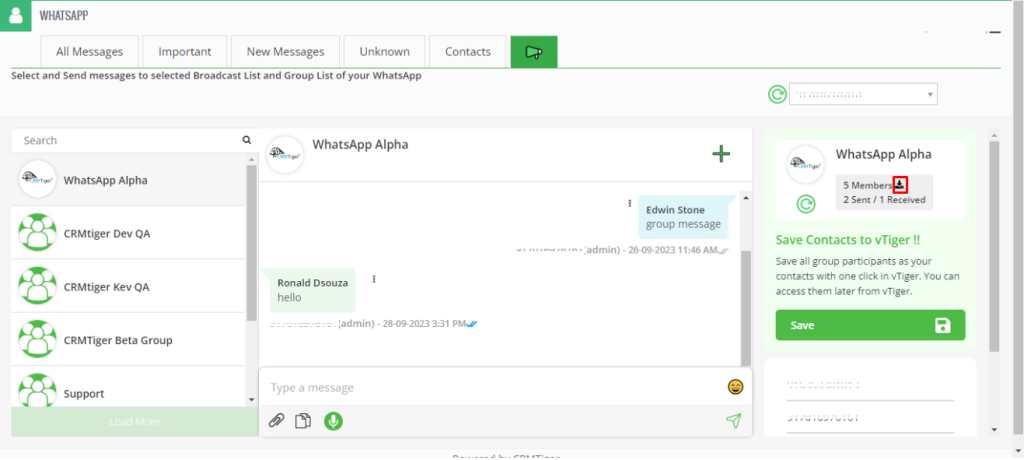
- WhatsApp Group inside Saleshiker Allows you to Copy all Group’s participants to CRM , download participants from the group.
- WhatsApp Messages (Per Subscriber) will store Group to WhatsApp Log Master –
- Display List of the member of a group and the total number of members in the group.
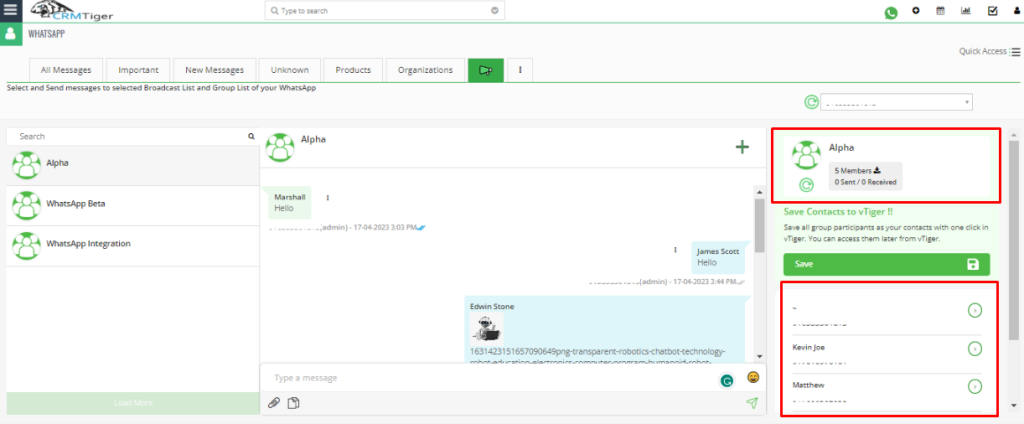
- Click on “Save” will create either leads or contacts from Group’s contact.
- Click on the Refresh button will retrieve the Latest Group for the Selected WhatsApp Number
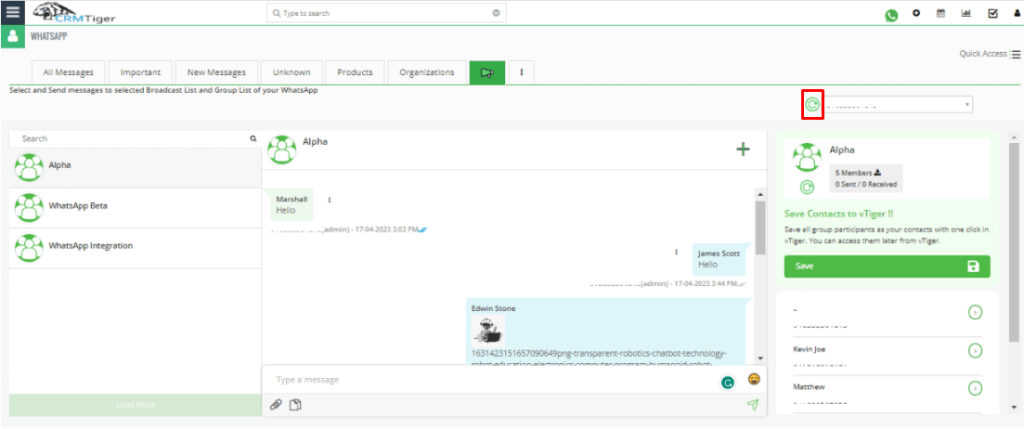
- Click on the Refresh icon will update the Latest Information of list of the member, and the name of the group member for the Selected WhatsApp Group
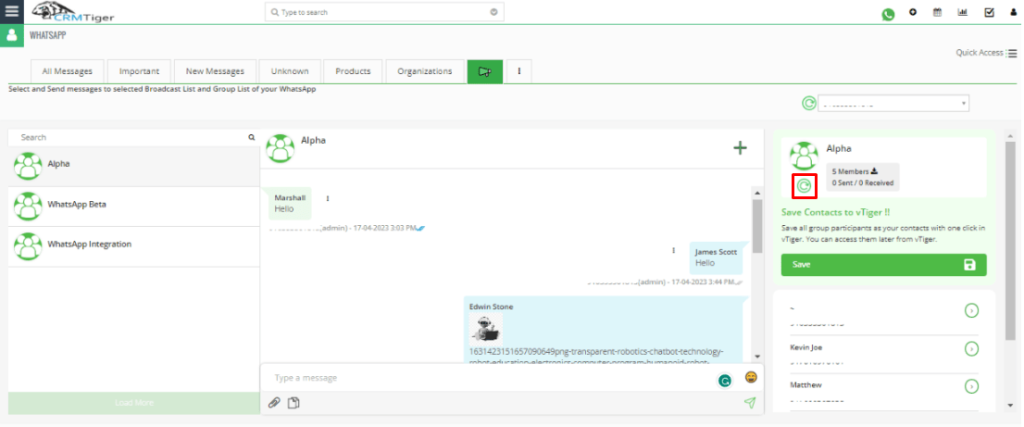
- Click on theDownload icon will download All group’s number in a CSV file including name and number
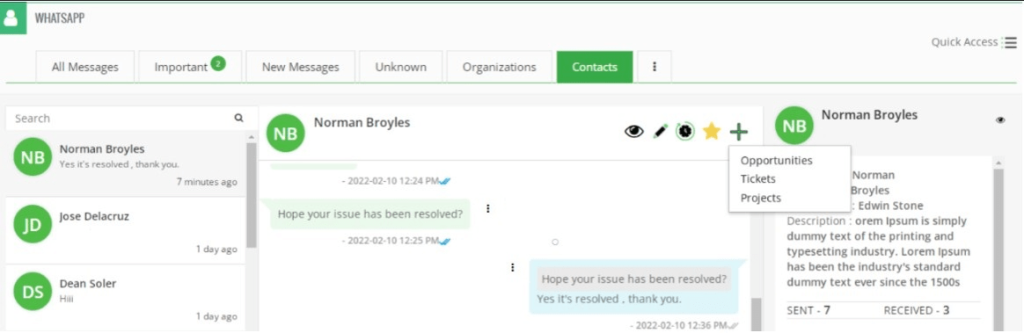
- Create Related record from WhatsApp messages
- Allow user to create Related record from the message window of WhatsApp
- Allow user to create Related record from the message window of WhatsApp
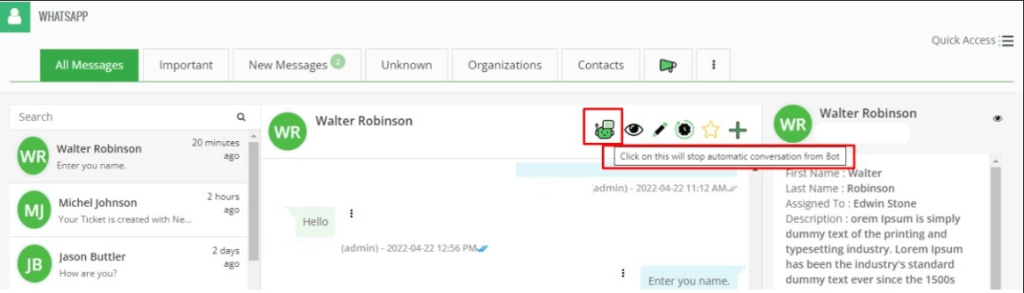
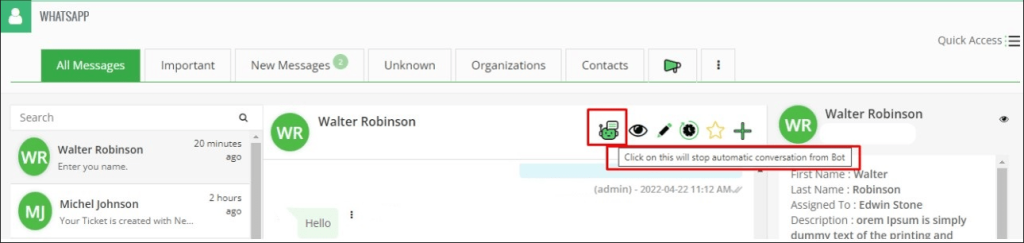
- Convert Chat to Manual / Robotic Mode.
- Click on this will stop automatic conversation from Bot.
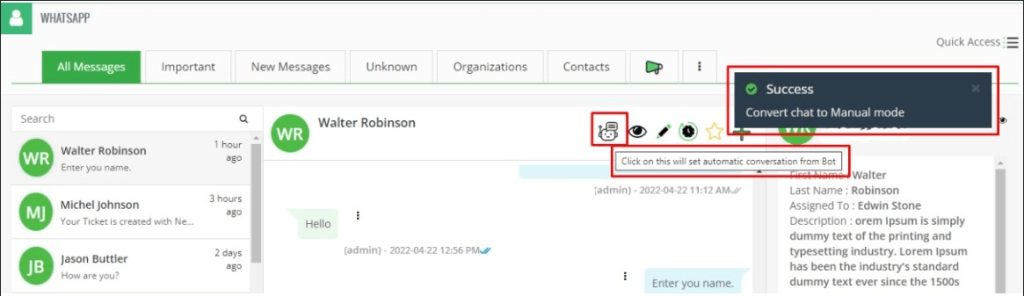
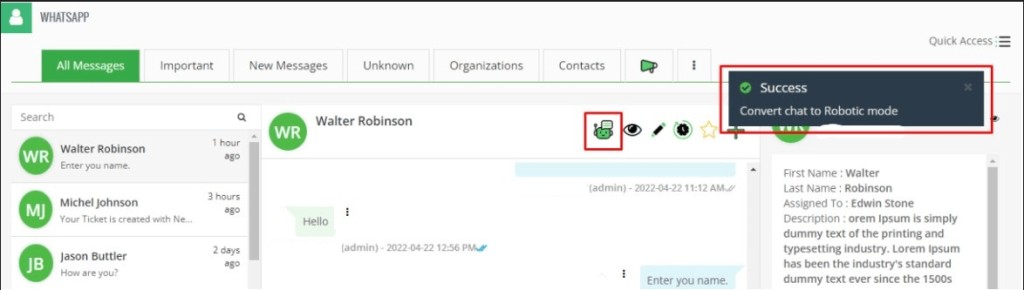
- Click on this will set automatic conversation from Bot.

- Click on this will stop automatic conversation from Bot.
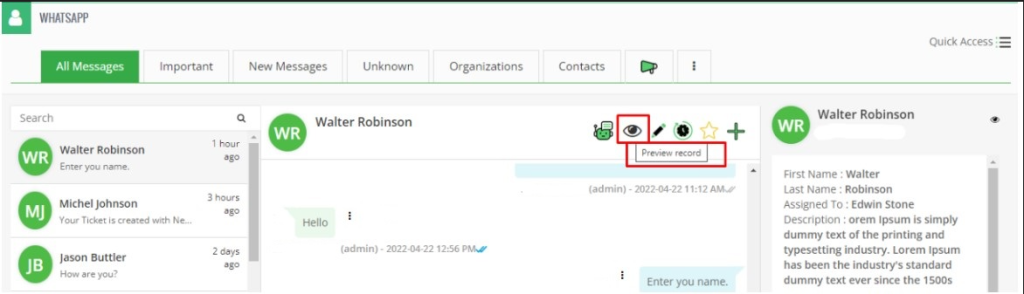
- Preview Record.
- Click on this will preview record detail.
- Click on this will preview record detail.
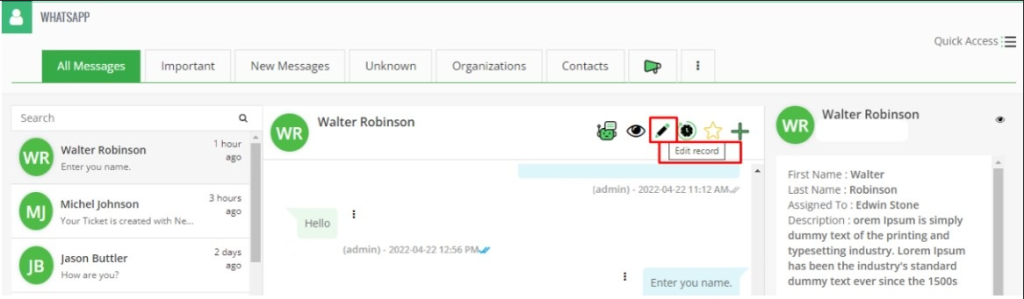
- Edit Record
- Users can edit contact from the Timeline View.
- Users can edit contact from the Timeline View.
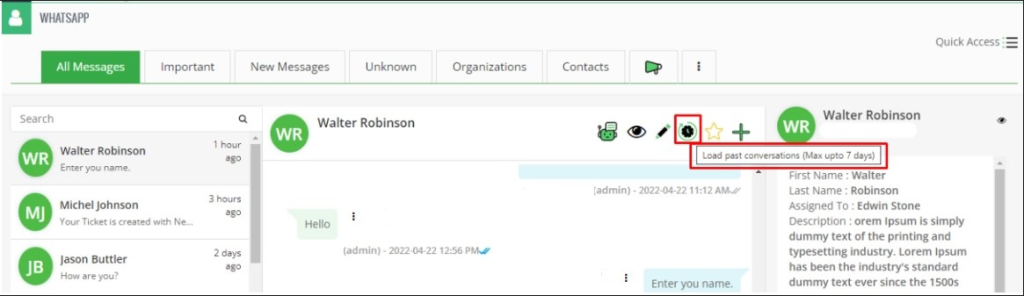
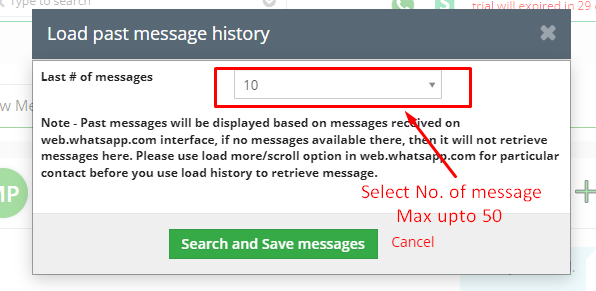
- Load past conversations (Max up to 7 days)
- Click on this button user can able to load past messages maximum upto 50 messages from the last 7 days.
- Past messages will be displayed based on messages received on the web.whatsapp.com interface, if no messages are available there, then it will not retrieve messages here. Please use the load more/scroll option in web.whatsapp.com for the particular contact before you use the load history to retrieve messages.
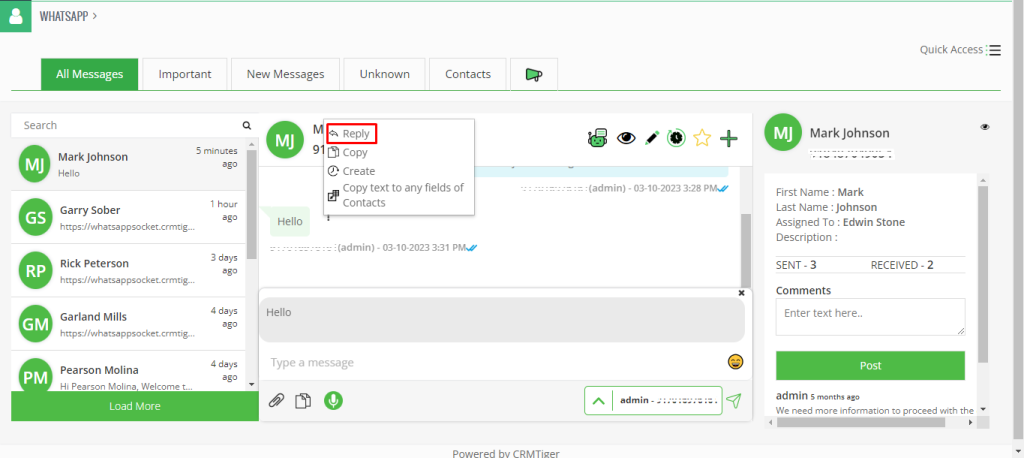
- Reply Message
- Users can reply to that message by clicking on the reply text.
- Users can reply to that message by clicking on the reply text.
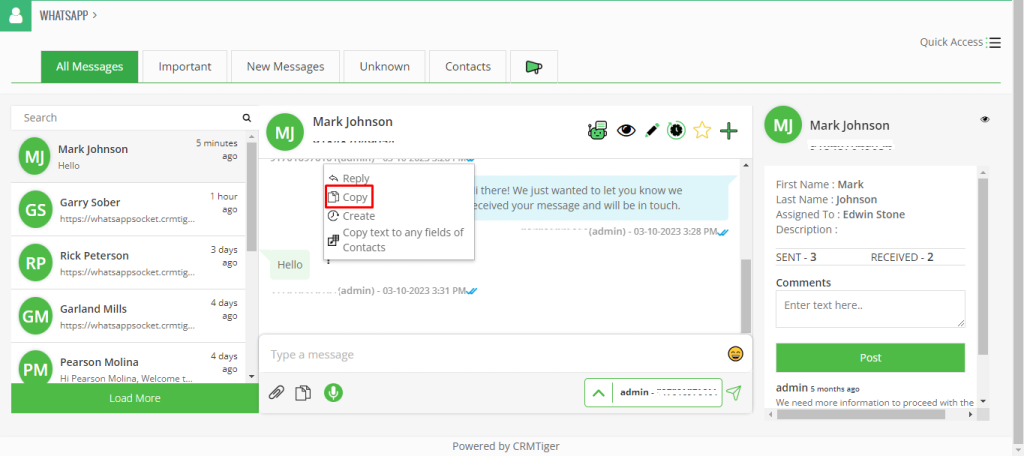
- Copy Message
- Users can copy that message by clicking on the copy text.
- Users can copy that message by clicking on the copy text.
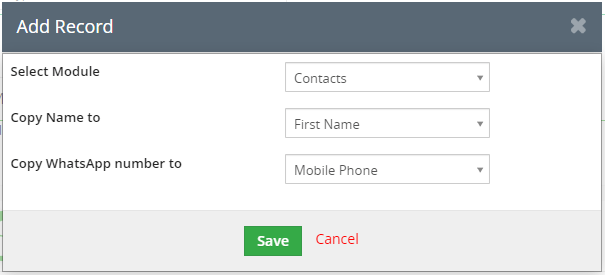
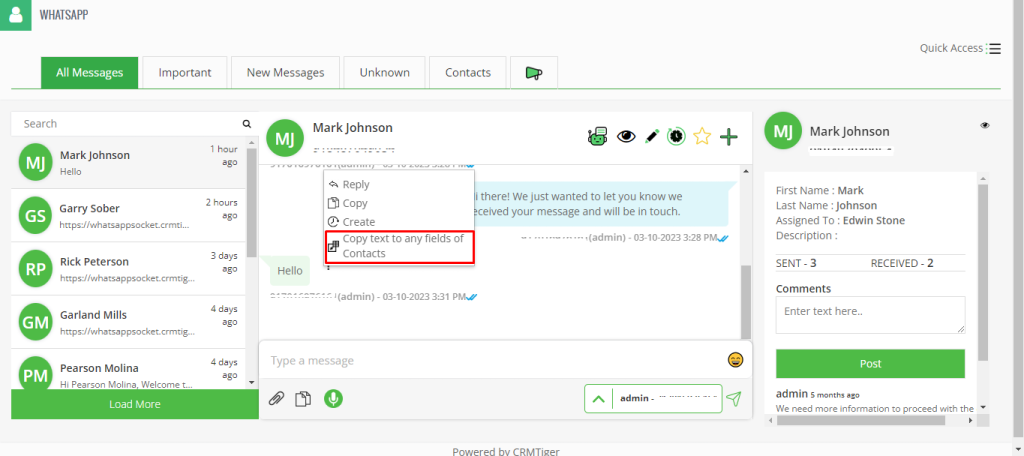
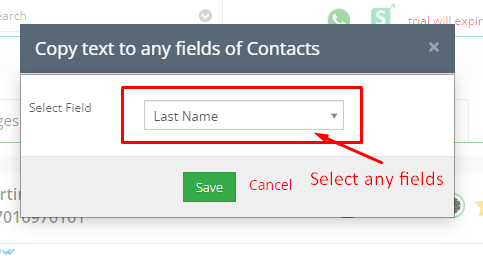
- Copy text to any fields of Contacts
- Click on this icon, user can Copy the message and save it to any fields of the record.
- Click on this icon, user can Copy the message and save it to any fields of the record.
- Create Task
- User can create task based on that message.

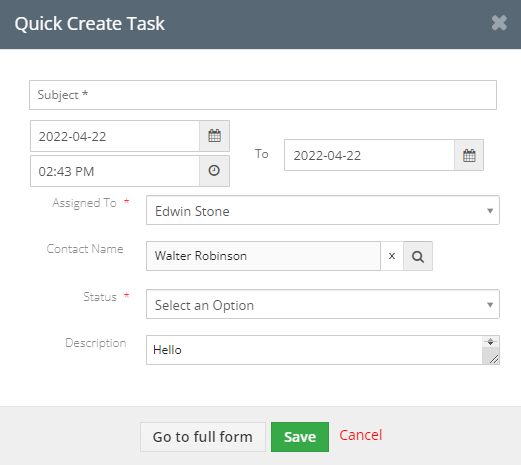
- User can create task based on that message.
- Search Contact in Timeline
- User can search contact by Number and Name of the Contact in Timeline View.
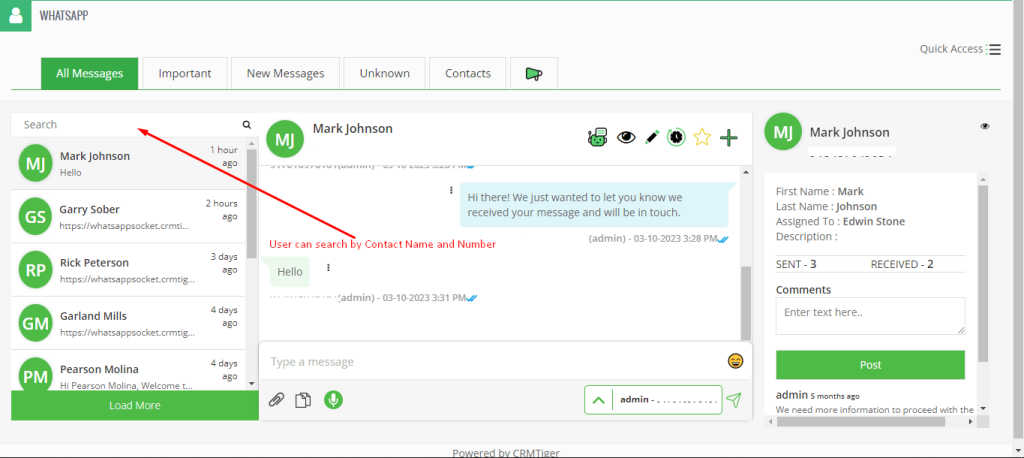
- User can search contact by Number and Name of the Contact in Timeline View.
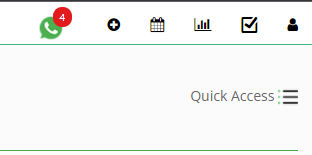
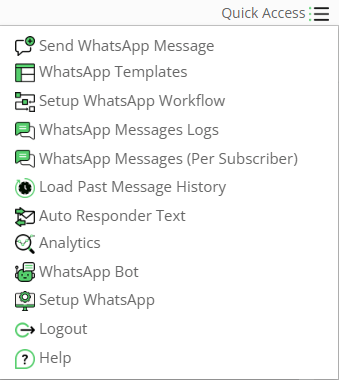
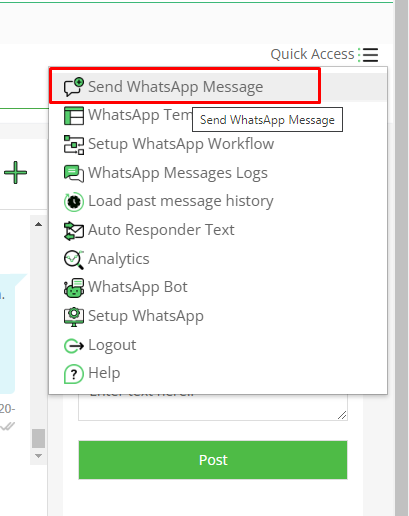
- QuickAccess
- Quick action in timeline view allows you to quickly access various options of WhatsApp Integration for SalesHiker
- Send a WhatsApp Message
- WhatsApp Template
- Setup WhatsApp Workflow
- WhatsApp Messages Logs
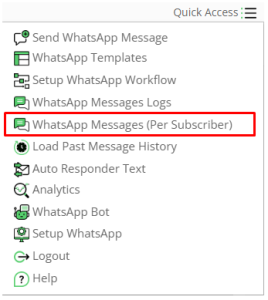
- WhatsApp Messages (Per Subscriber)
- Load Past Message History
- Auto Responder Text
- Analytics
- WhatsApp Bot
- Setup WhatsApp(Settings)
- Quick action in timeline view allows you to quickly access various options of WhatsApp Integration for SalesHiker
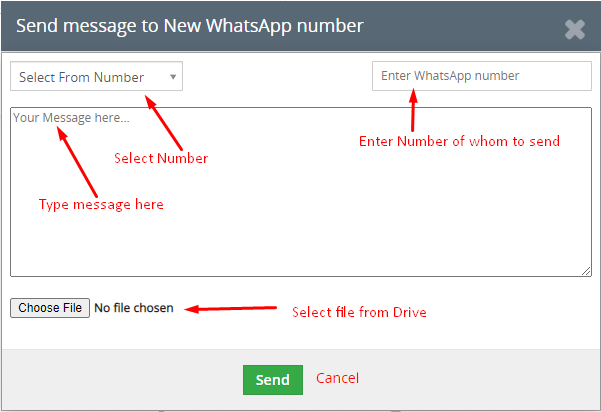
- Send a WhatsApp Message
- It provides a facility to send WhatsApp messages to unknown or unsaved contacts. And we can also send messages from any number that is connected with one QR code.
- Also we can attach files, photos, videos etc. using these features.
- General Feature
- Send/Receive message from a record
- Notification
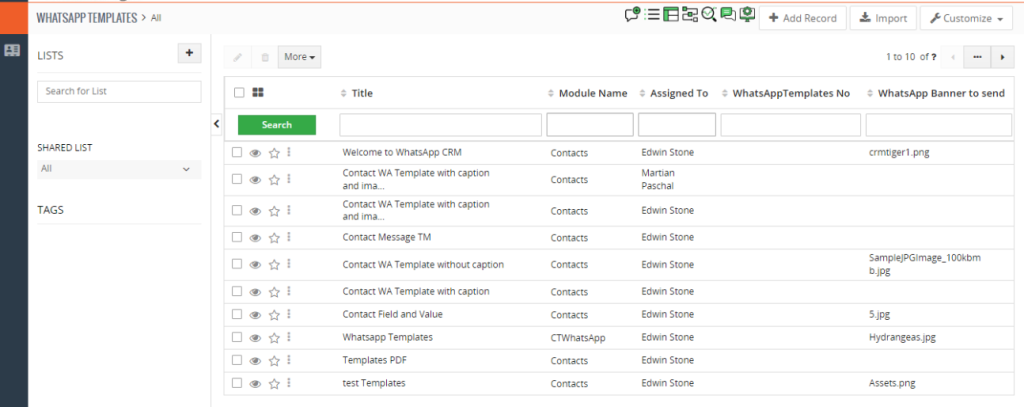
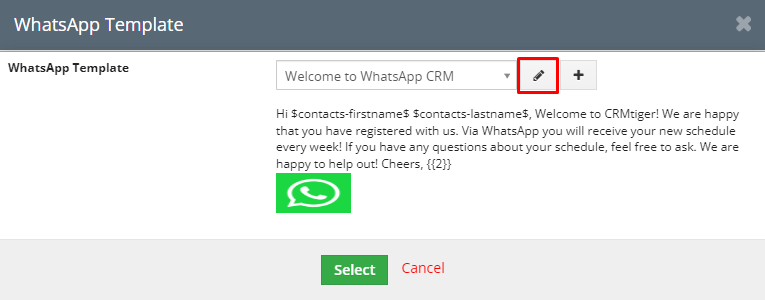
- WhatsApp Templates
- Create WhatsApp Template
- You can add emoji in WhatsApp template Message.
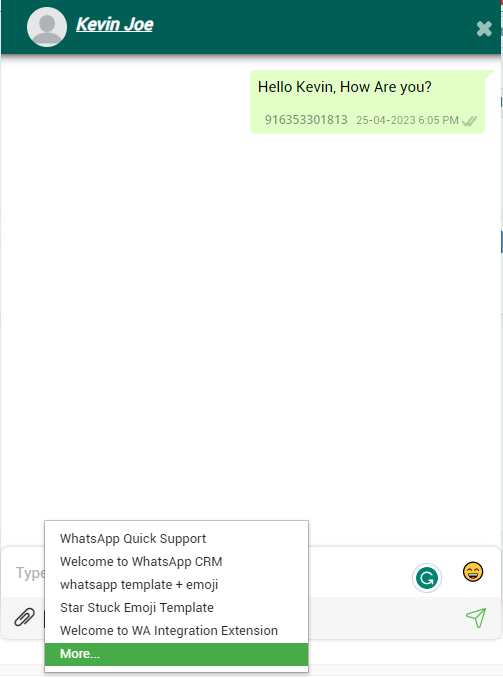
- If “Display quick access” is enabled on thecreate WhatsApp template, then it will show the last five quick access WhatsApp templates in the WhatsApp Timeline and Individual popup.
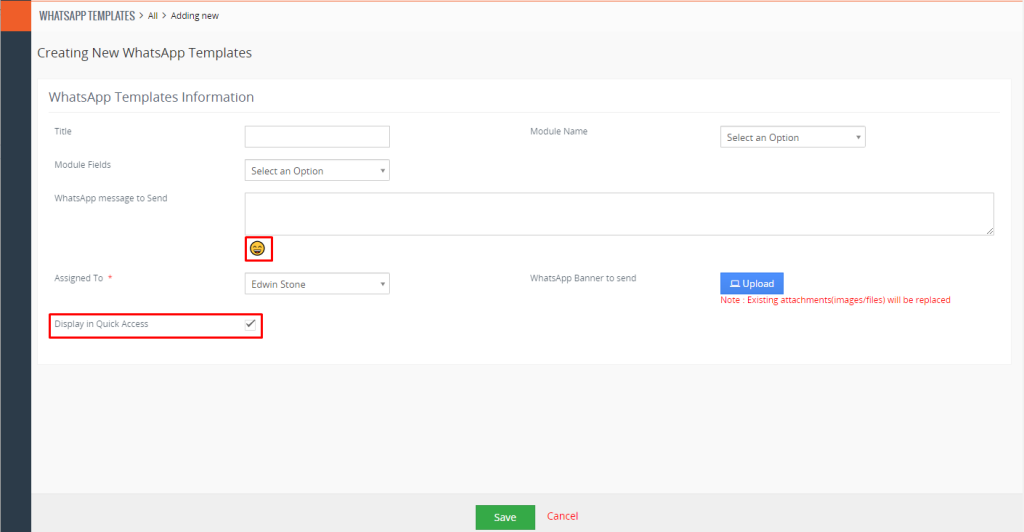
- Enabled WhatsApp Template for “Display in Quick Access” will be displayed as shown in the bellow screenshot.
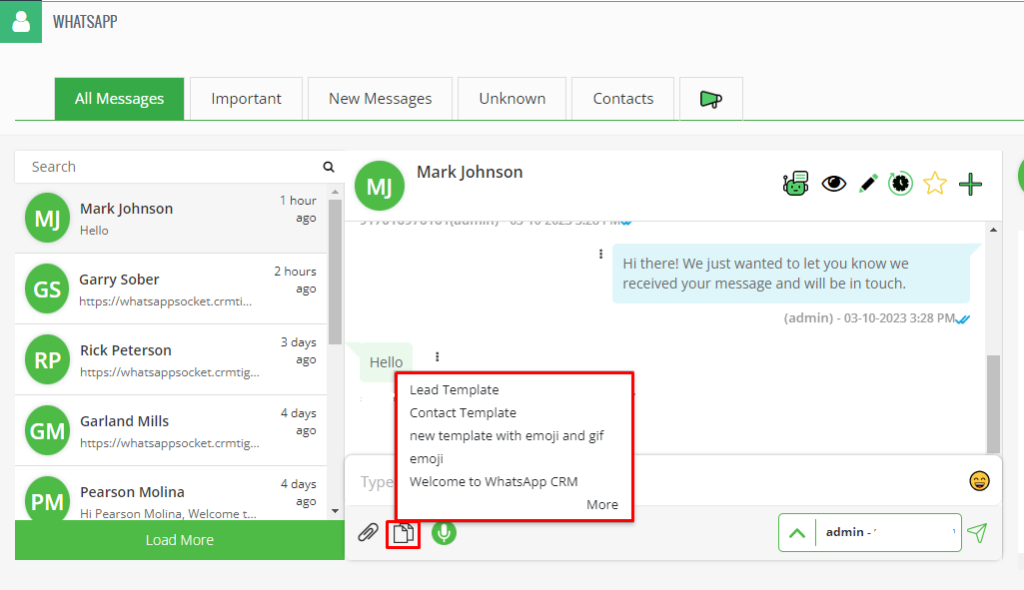
- If “Display quick access” is enabled on thecreate WhatsApp template, then it will show the last five quick access WhatsApp templates in the WhatsApp Timeline and Individual popup.
- You can add emoji in WhatsApp template Message.
- WhatsApp Template can be accessed from various places of the WhatsApp interface in Saleshiker CRM like,
- When sending a one to one message from Record
- When Sending Bulk messages from RecordList.
Note : If you wish to send bulk messages with attachments it’s advisable to use the WhatsApp template feature. - When sending a message from the Timeline view
- When sending Automated email from Workflow.
- Quick edit the WhatsApp Template from the popup.
- When sending a one to one message from Record
- Create WhatsApp Template
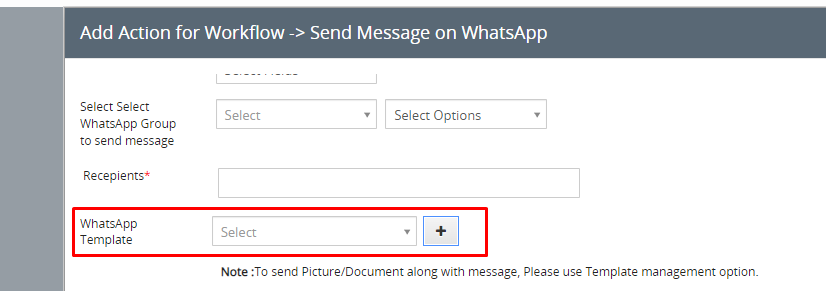
- Setup WhatsApp Workflow
- WhatsApp workflow allows sending Automated WhatsApp messages on the trigger event of any module link with the WhatsApp module.

- Automated WhatsApp messages sent to an Individual WhatsApp number associated with a selected WhatsApp number.
- Select “From number” to send WhatsApp from the selected WhatsApp number if more than one number is registered in the WhatsApp extension.
- Select “Send WhatsApp to Recipient” to send a WhatsApp message to record.
- The WhatsApp workflow can configure the WhatsApp messages to whom we want to send individual WhatsApp templates to share files or message formats, general fields, add fields and message.
- WhatsApp workflow allows sending Automated WhatsApp messages on the trigger event of any module link with the WhatsApp module.
- WhatsApp message Logs
- WhatsApp message Logs navigate to a list screen of sent WhatsApp messages which displays all sent message logs with API Requests and Responses.
- WhatsApp messages (Per Subscriber)
- WhatsApp Message (Per Subscriber) navigates to a list screen of WhatsApp Message (Per Subscriber) which displays one entry per subscriber for the last sent message or the last received message in the log with API Request and Response.
- Load past message history
- Using this feature we can get the past message logs which are done in particular WhatsApp numbers.
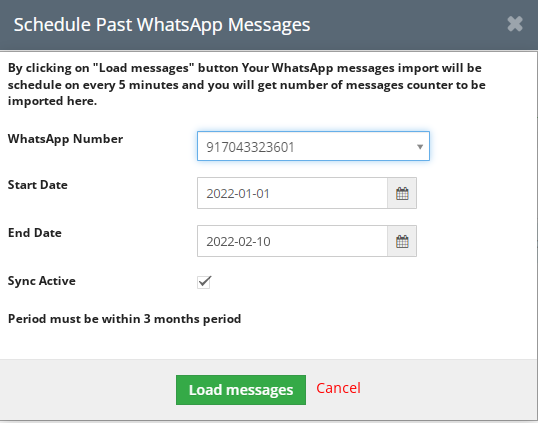
- Using this feature we can get the past message logs which are done in particular WhatsApp numbers.
- Auto Responder text
- This option will be enabled from Other Settings > WhatsApp configuration > Gear Icon > Auto Message Responder
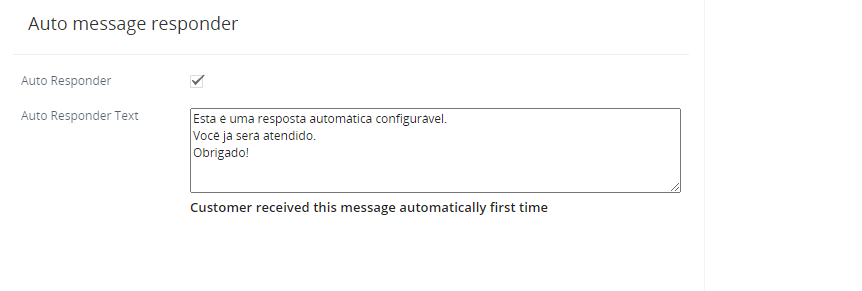
- It is helpful to give answers to messages Automatically. It means you have just written a message which will be sent automatically to the sender.
- This option will be enabled from Other Settings > WhatsApp configuration > Gear Icon
- Analytics
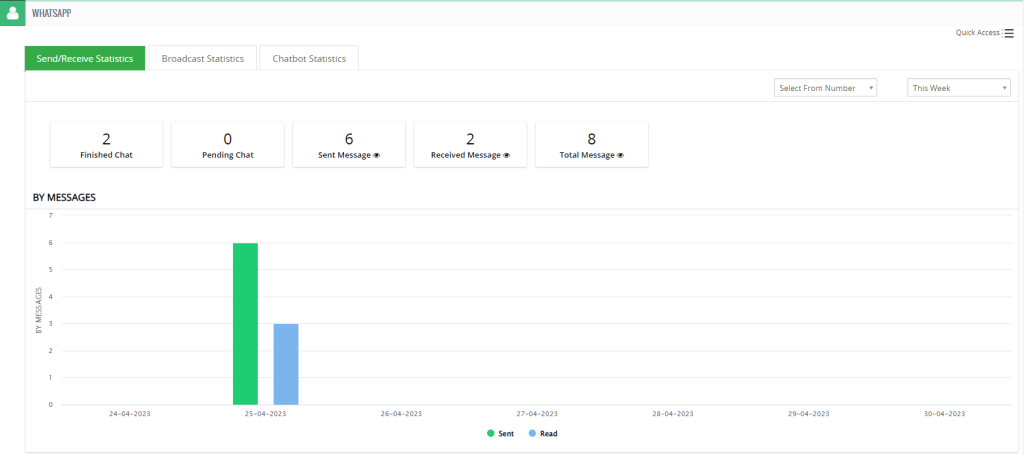
- Send / Receive statistics
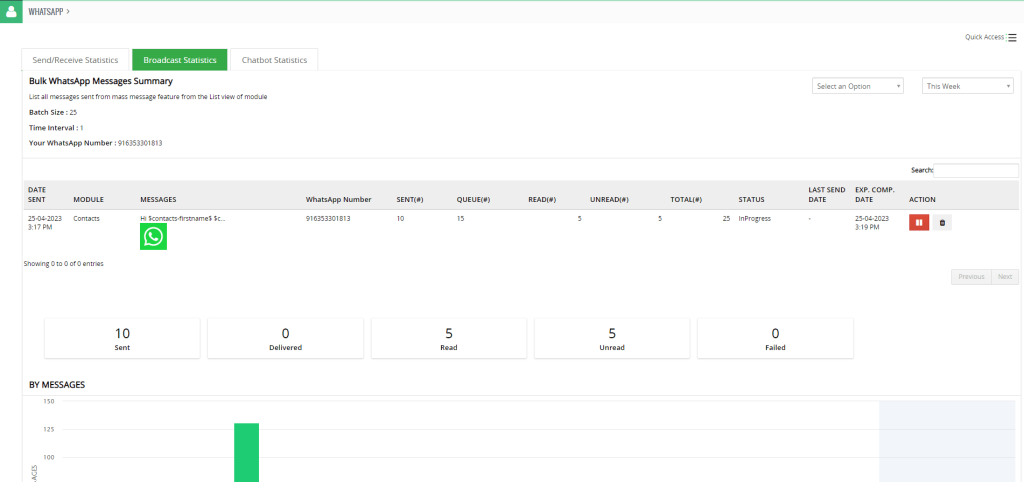
- Broadcast statistics
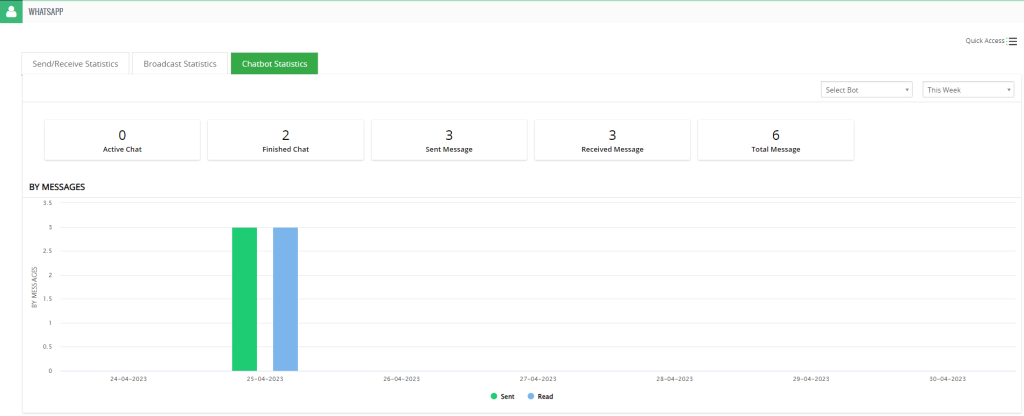
- Chatbot statistics
- Send / Receive Statistics – This Send/Receive Statistics will show you “Finished Chat” for the last sent message from CRM, “Pending Chat” for the last received message in CRM, the total “Sent Message” from CRM, the total “Received messages” in CRM and “Total Message” will shows the total of “Sent Messages” from CRM and “Received Messages” in CRM.
- The Total Sent Message eye icon link will redirect to the sent message list.
- The Total Received Message eye icon link will redirect to the received message list.
- Total Message eye icon link will redirect to the total sent and received message list.
- Broadcast statistics – This Broadcast Statistics will show the Total count of “Sent”, “Delivered” , “Read” , “Unread” and “Failed” Messages of all bulk message list.

- Chatbot statistic – This Chatbot Statistic option will show the total count of “Active Chat” for initiated chat of all the customers, “Finished Chat” of chatbot with the customer, “Sent Messages” from the chatbot, “Received Message” in chatbot And “Total Messages” of all sent/received message of the chatbot.
- WhatsApp Messages
- WhatsApp analytics accessible from the WhatsApp icon on the Top Right corner or click on
 (analytics).
 - WhatsApp analytics offer you detailed reports specifically on Bulk messages sent to your customers.
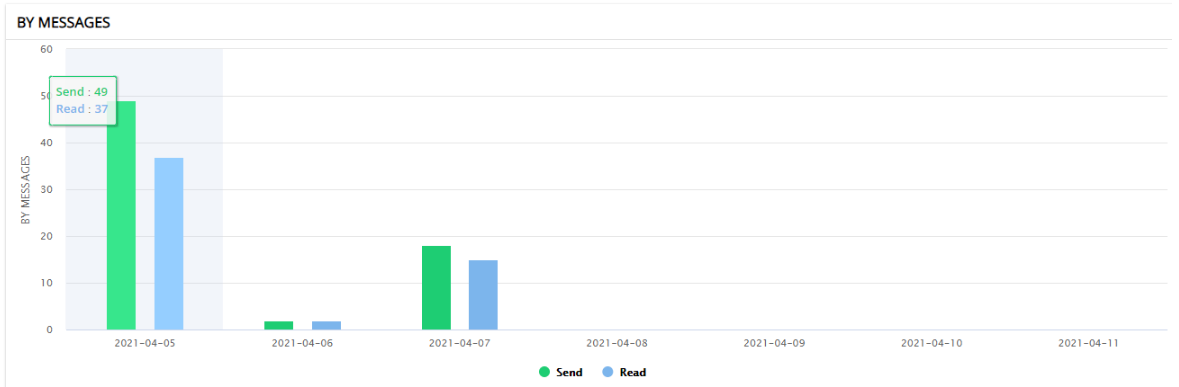
- Bulk Message Summary
- Message summary list all the messages with the status on # of message in Queue, sent , #messages read by your contacts etc..
- Users can Stop/Pause bulk message operation by simply click on the Start/Pause button to the messages those are in Queue
- Report by message
- By clicking on “Setting icon” WhatsApp we redirect to the WhatsApp configuration.
- WhatsApp analytics accessible from the WhatsApp icon on the Top Right corner or click on
- WhatsApp Bot
- By clicking on the WhatsApp Bot, User will move to the main screen of WhatsApp Bot.
- By clicking on the WhatsApp Bot, User will move to the main screen of WhatsApp Bot.
- Logout
- We can directly disconnect the whatsapp by using the Logout option from Quick Access.
- Help
- When we click on help we redirect to the Saleshiker website. (https://kb.Saleshiker.com/)
- Bulk / Mass message
- Bulk/Mass message manage from Other Settings > WhatsApp configuration > Gear Icon > find Mass Message Configuration
- Batch size allows the user to send mass messages in a batch of messages to avoid Spamming.
- Example : If you wish to send 500 messages and if you set a batch size 15 and Time Interval to 15 minutes. Then it will send 15 messages in each batch based on the Time Interval calculated below.
- Example : If you wish to send 500 messages and if you set a batch size 15 and Time Interval to 15 minutes. Then it will send 15 messages in each batch based on the Time Interval calculated below.
- Time to send 500 messages = (500 messages / 15 Batch size) * 15 minutes = 500 minutes = 8 Hours Approximately.
- Random : Random selection dynamically select any number from 1 to 25 as a batch size when sending message to customer, It means if there is 500 messages to send and Batch Size – Random than it will send 5 messages in first Batch, 8 messages in a second Batch and so on..
- Bulk/Mass message manage from Other Settings > WhatsApp configuration > Gear Icon
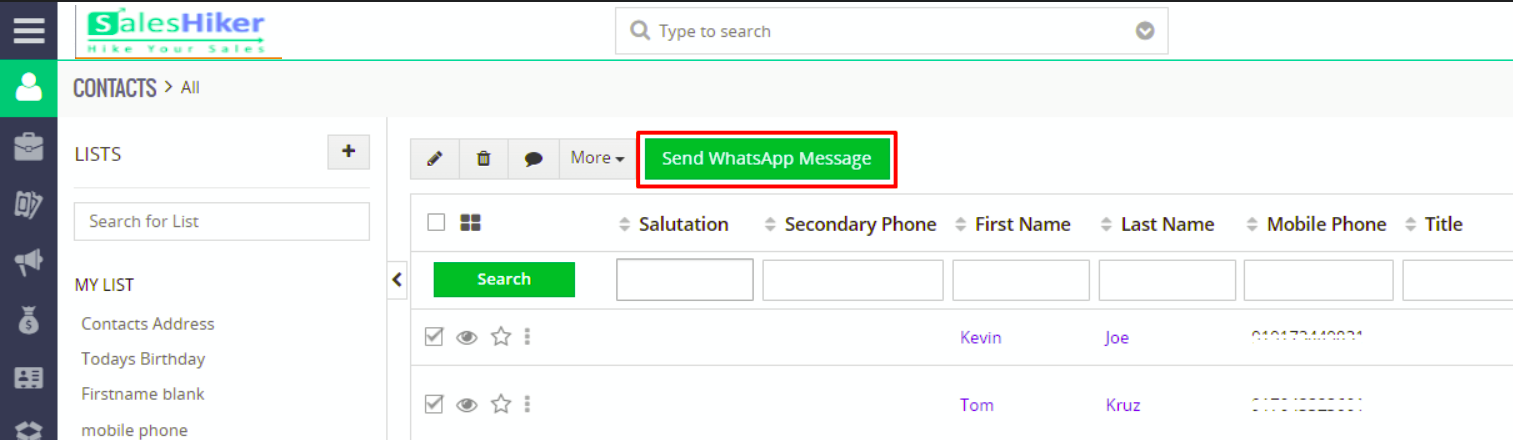
- Users can send Bulk/Mass message from RecordList of CRM for those modules which are enabled from “Allow module access” feature from WhatsApp configuration page
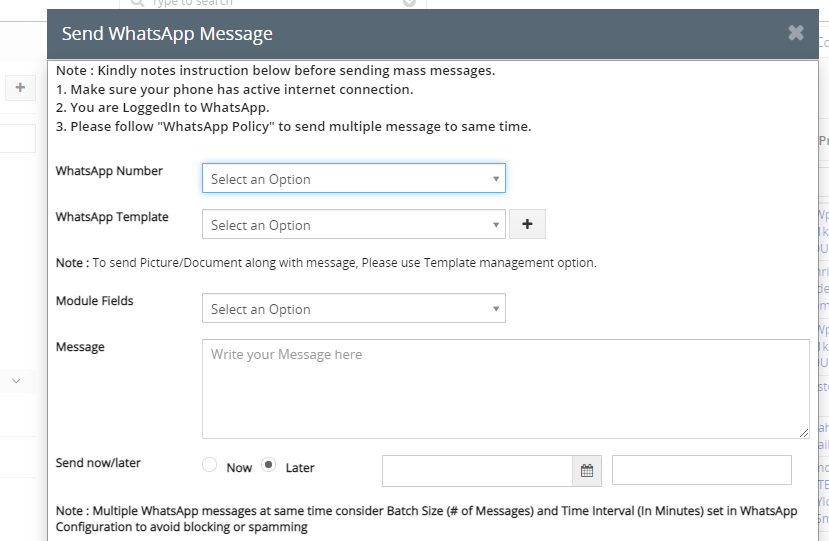
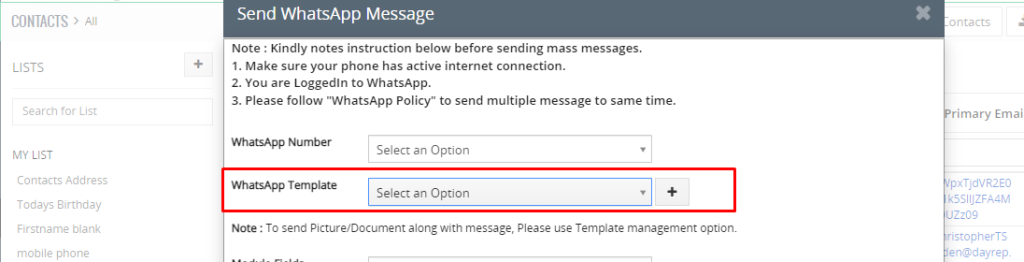
- From the Record List Select more than one record then Go To More > Send WhatsApp message to send Bulk WhatsApp messages to more than one contacts.
- Users can send Bulk messages now or any selected date to send messages according to the time set from the Send now/later option.
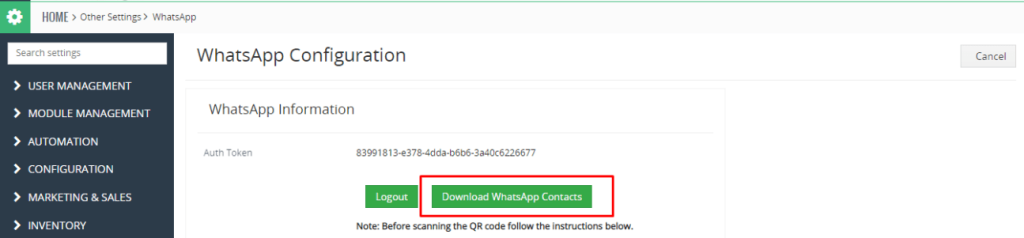
- Download WhatsApp Contact:
- Click Download Contacts button to Download contacts.csv file of all your WhatsApp contacts and Import to your respected module of Saleshiker CRM to Send/Receive WhatsApp messages.
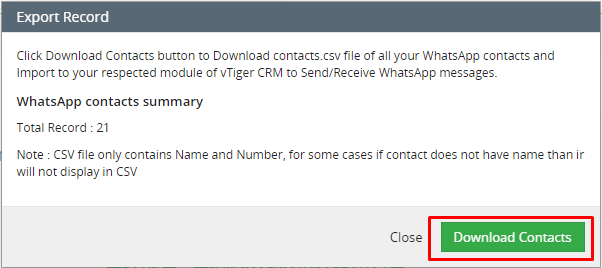
- Click Download Contacts button to Download contacts.csv file of all your WhatsApp contacts and Import to your respected module of Saleshiker CRM to Send/Receive WhatsApp messages.
WhatsApp Chatbot
How to Use WhatsApp Chatbot for Saleshiker?
WhatsApp chatbot for Saleshiker is Automated tools along with manual send/receive message to WhatsApp contact from Saleshiker.
Step by Step Guide
How to set up a WhatsApp Chatbot?
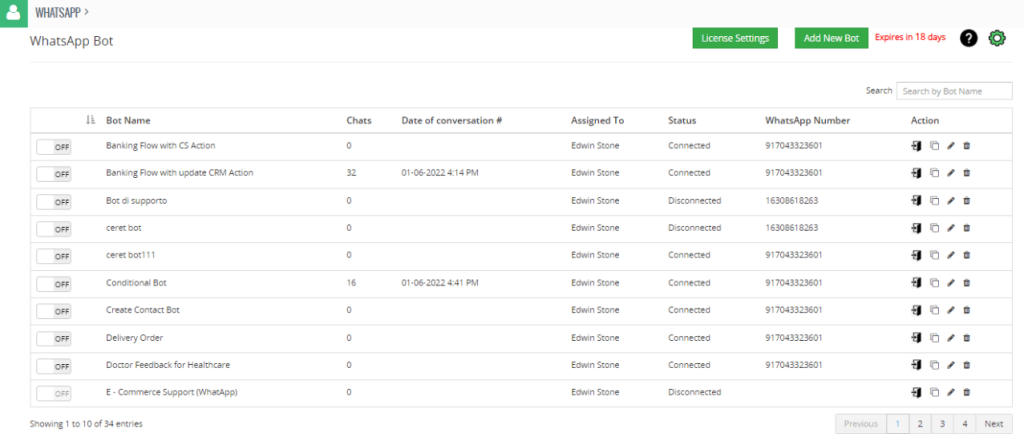
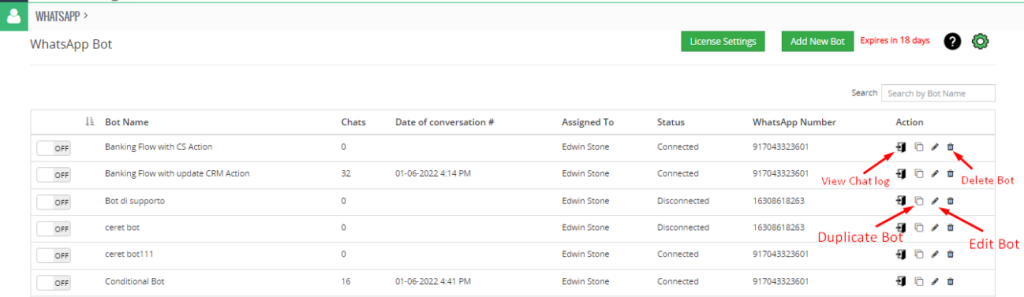
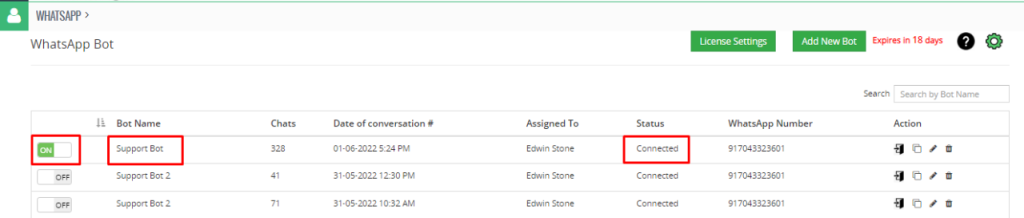
Go To WhatsApp Chatbot interface: by clicking on the “Chatbot” icon, Go To creates a new Chat bot by clicking on the “Add New Bot” button.
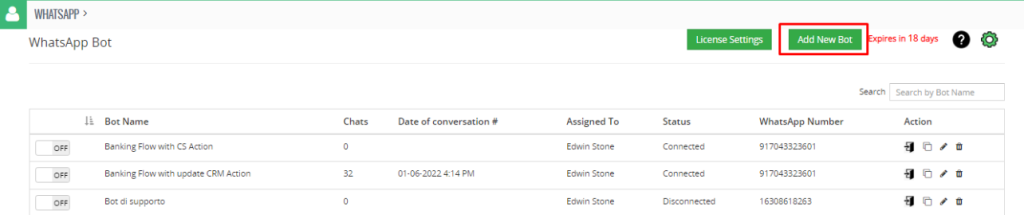
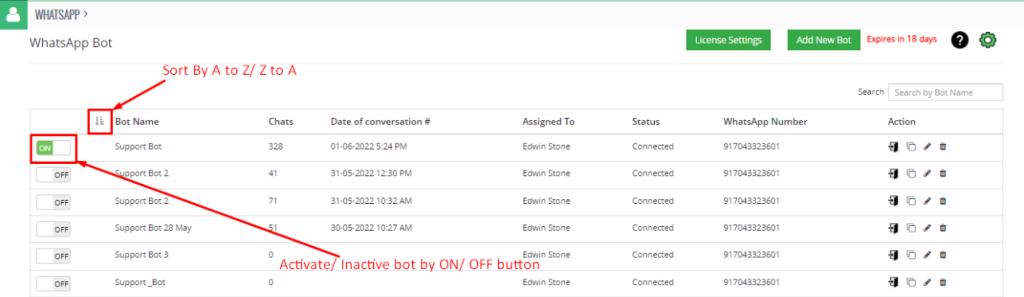
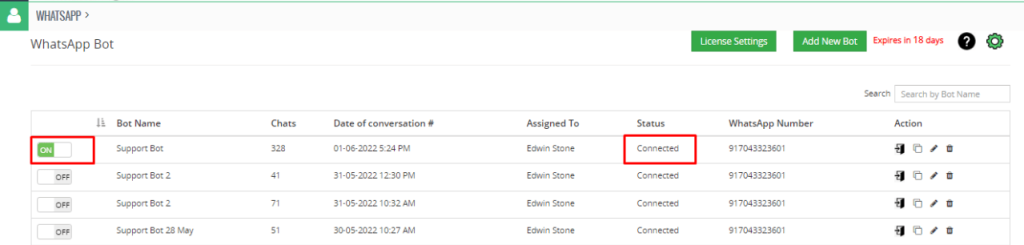
- Users can edit, duplicate and delete WhatsApp Bot by clicking on related icons.
- Users can view the chat for that flow by clicking on the Chat log according to Bot ID.
- Chats display the total numbers of the message conversations for that bot from different numbers.
- Users can see the modified date and time of the conversation for the flow which is displayed in the Date of conversation column.
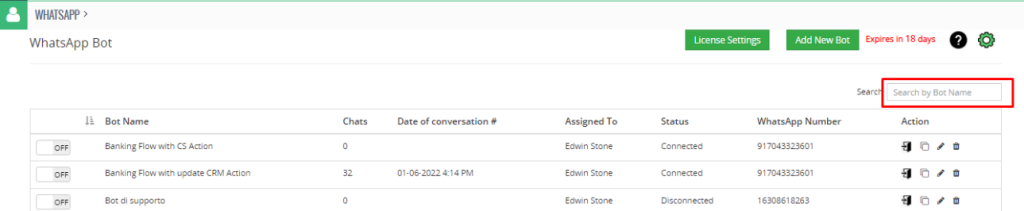
- Search in WhatsApp Bot Listing
- Users can search Bot from List of Bot by entering Bot name.
- Users can search Bot from List of Bot by entering Bot name.
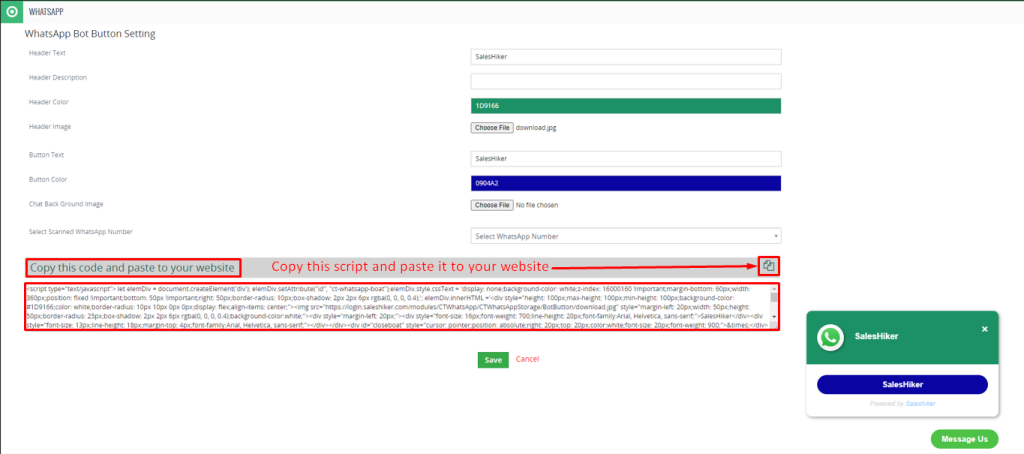
How to create a Chatbot button?
- Users can design a WhatsApp Chat button to place on your website integrated with the WhatsApp Chat Bot.
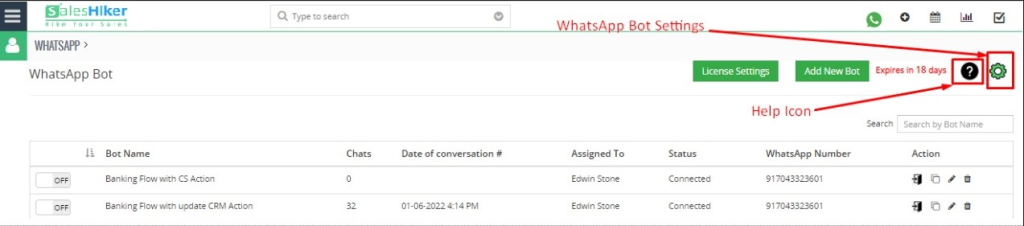
- Users can create a Chatbot button for their website by clicking on the WhatsApp Bot Settings icon > WhatsApp Chat Button > WhatsApp Bot Button Setting.
- Users have to fill in all the required details to design the Chatbot button and select the scanned number and save it.
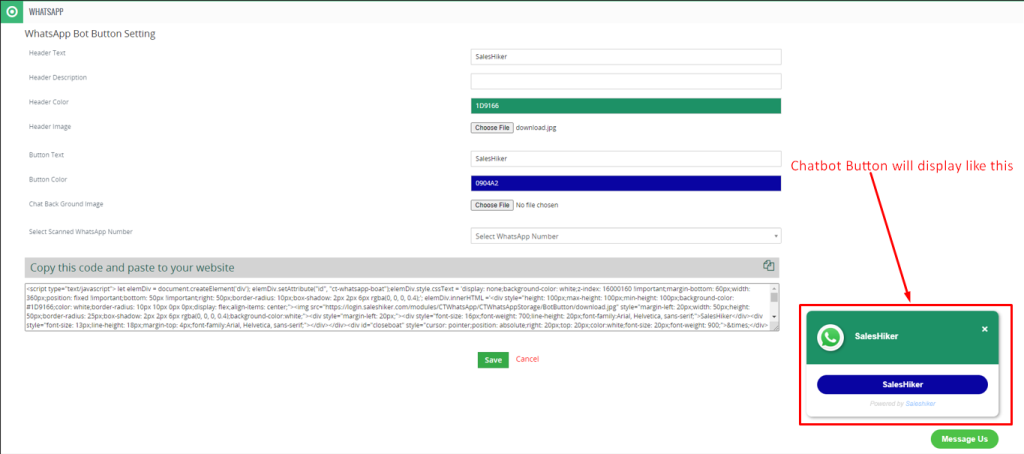
- After that users have to copy that script and paste it to their website where this Chatbot button is required to display.
- Users can activate or in-active WhatsApp Bot by clicking the ON/OFF button accordingly.
- Users can also sort Bot Names alphabetically.
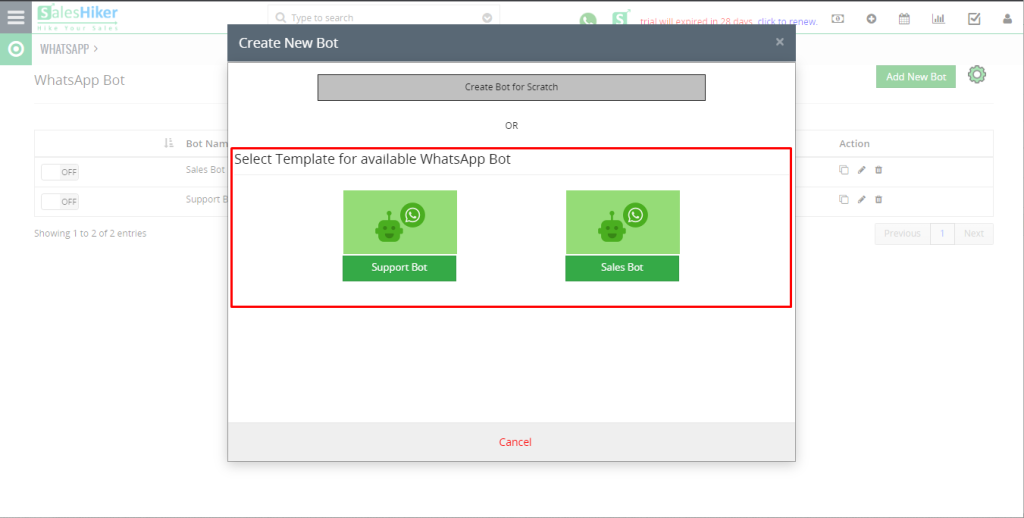
How to use WhatsApp bot template?
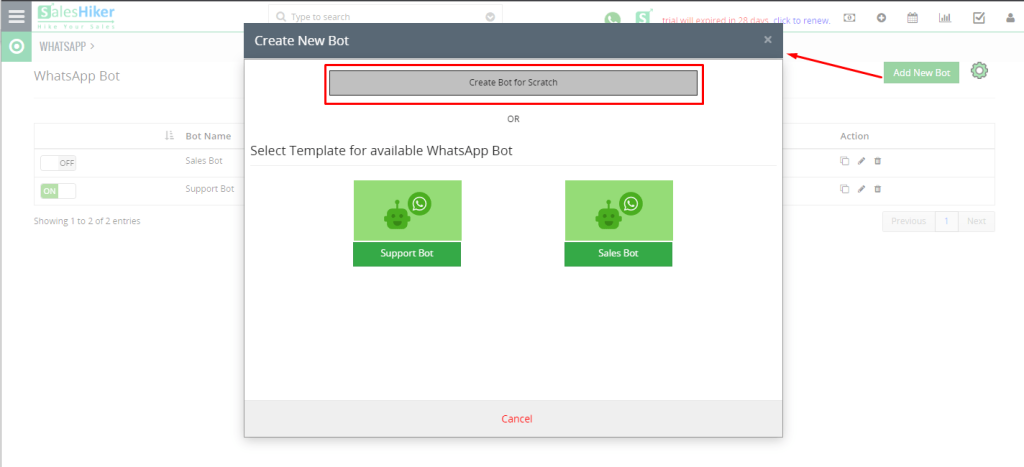
- Users can use template from the created bot by clicking on the “Add New Bot” button, and selecting available template.
- You can use predefined templates offered by the Saleshiker team for WhatsApp. You’ve 2 options: either Create Bot from Scratch or Select template for available WhatsApp Bot
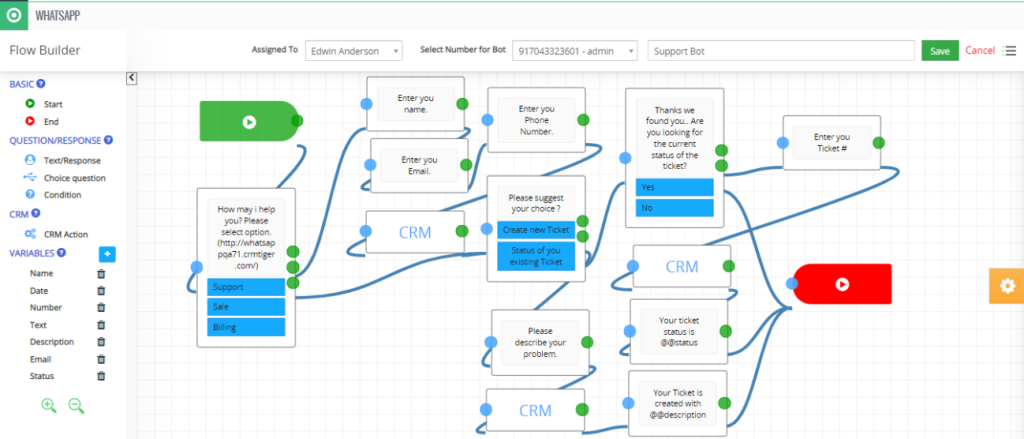
How to Build/Design Flow for WhatsApp Chatbot?
- Users can set the flow according to the requirement for the Bot.
- Basic:
- Start: Use this node when you start designing the Bot flow.
- End: Use this node when you end designing the Bot flow.
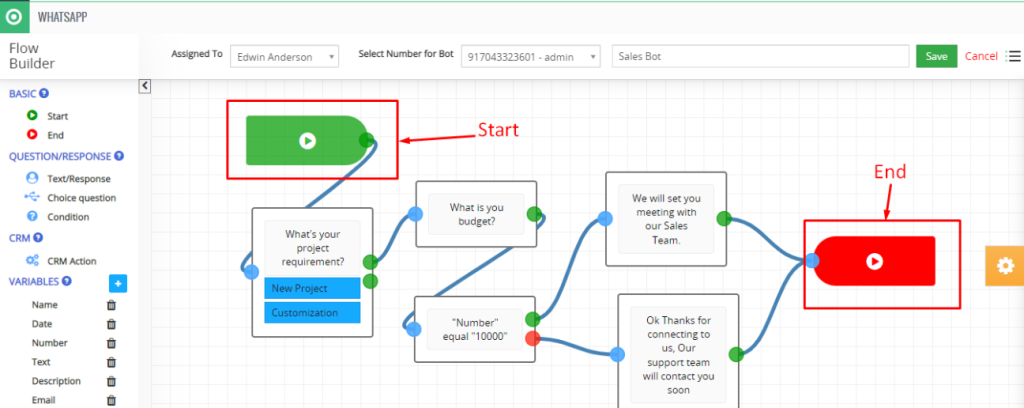
- NOTE : Bot must start with a choice question.
- Question/Response:
- With this feature, users can set various types of questions in flow to Ask customers.
- Add Condition to check it against a response from a customer in Bot.
- Question/Response Action Settings:
- Text/Response:
- Message Type:
- Regular message – This is a regular message type format sent to customers from Bot.
- WhatsApp Response – This message type will display responses to customers in WhatsApp format.
- Copy from Variables: Select variable to add or copy to the message which converts to actual value when sent message to customer.
- Response Text/Question: Type a message as a response or ask a question to the customer.
- Format: Select any format like text, number, email and date for response.
- Response file: Send Image as response to the customer along with text.
- Response copy to variable: Copy customer answer of question from bot to variable which can be used to store in CRM or reply to customer on various stages of Bot flow.
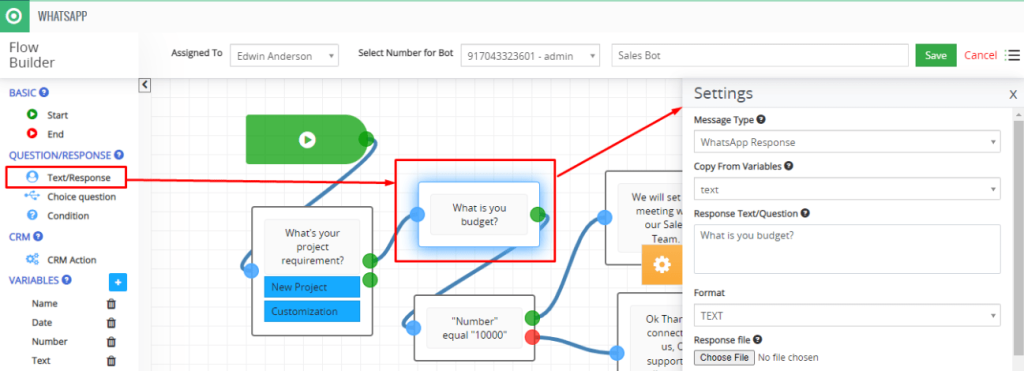
- NOTE: After Text/Response question node, Choice question will not work to show option.
- Message Type:
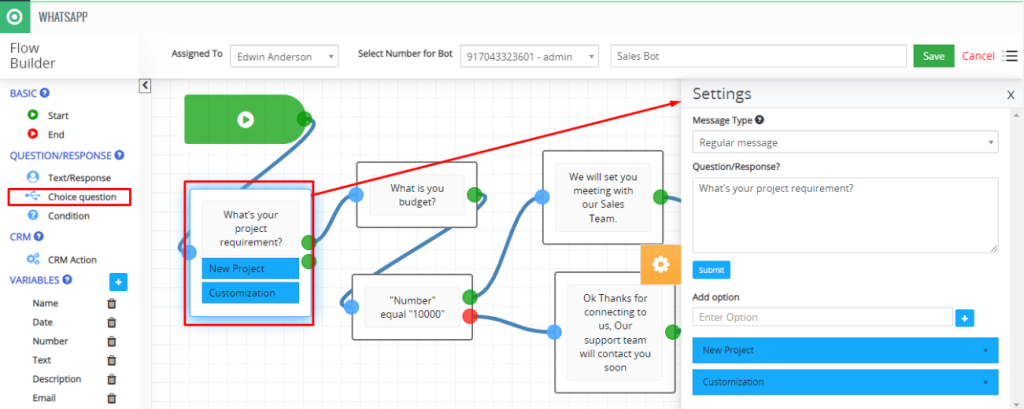
- Choice Question
- Message Type:
- Regular message – This message type will display responses to customers in WhatsApp Regular format.
- WhatsApp List message – This message type will display a response to customers as a WhatsApp list.
- WhatsApp Button message – This message type will display a response to the customer in WhatsApp button format.
- Question/Response: Add a question for the flow according to your choice.
- Add Option: Add an option for the question according to your choice.
- Message Type:
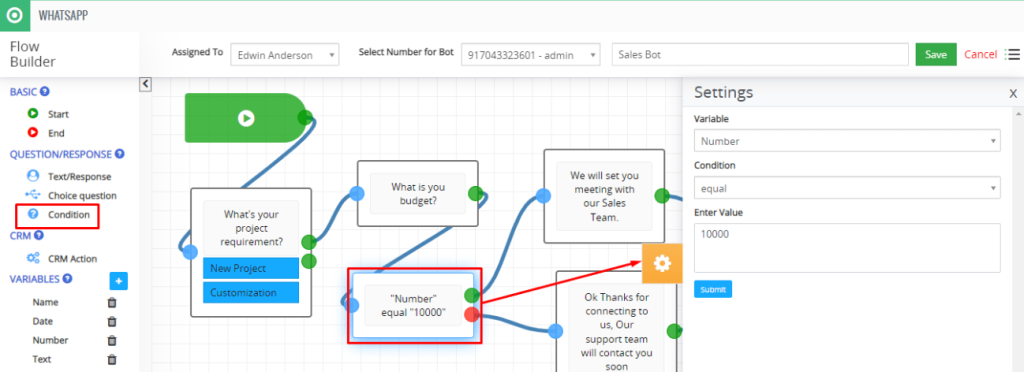
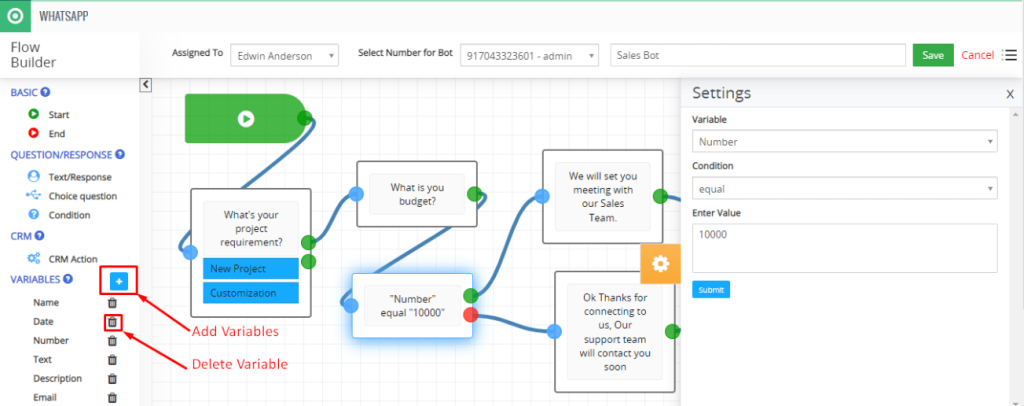
- Condition: User can add condition for the question if it’s true then it will fire the value which is set.
- Variable: Select a variable like number, email, date or description for the value.
- Condition: Select the condition for the question like a value equal to 10000 etc.
- Enter Value: Enter value according to variable type selected.
- Text/Response:
- CRM
- CRM Action: With CRM Action You can Insert/Update/Search record To or From CRM.
- CRM Action Setting:
- Select an Action: Select an Action should allow to select various operation on CRM
- Create a Record – It allows you to Create record in CRM from response from the customers
- Search a Record – It allows you search record from CRM from the value pass to CRM field
- Modules: Select module to search/create/update record to or from CRM
- Assign value to SalesHiker fields to Create/Update/Search:
- SalesHiker field – Select SalesHiker fields to copy value to SalesHiker fields from available variables
- Saved variables – Select available variables used to store customer’s input from chatbot’s questions.
- Save variable(Response) from SalesHiker field: On create/update/search on CRM it will return selected field value to customer to be displayed in WhatsApp bot.
- Copy to variable – Select variable type as name, email, date or description for copy variable.
- Copy from SalesHiker Field – Select fields for copying variables from SalesHiker field.
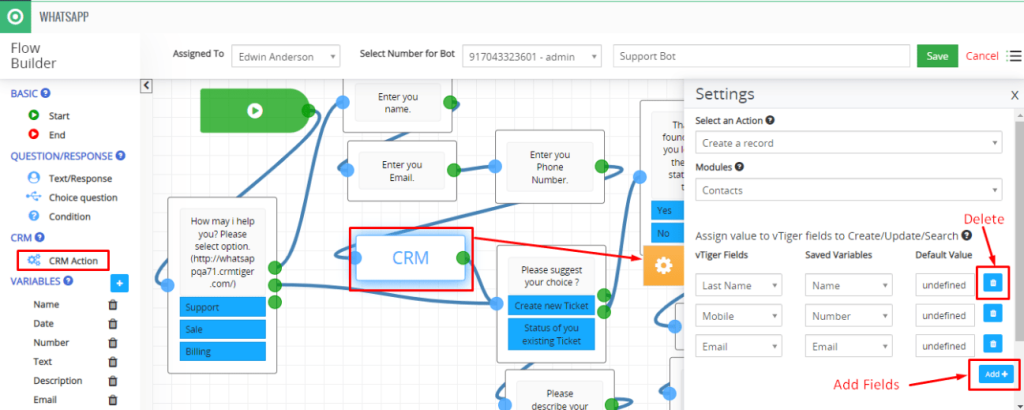
- CRM Action: With CRM Action You can Insert/Update/Search record To or From CRM.
- Variables: Variables used to copy answers from customers using bot like their name, email, phone etc. This will be used to map with respected CRM fields to Add/Search/Update To or From CRM.
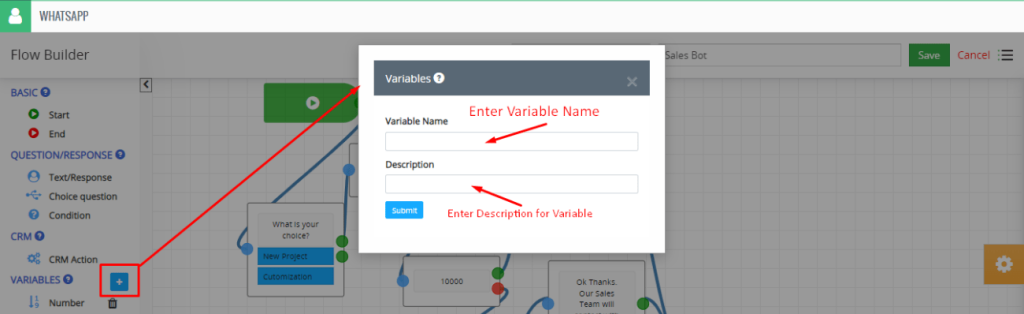
- Add Variable Pop-up:
- Variable Name: Enter name for Variable
- Description: Enter Description for Variable.
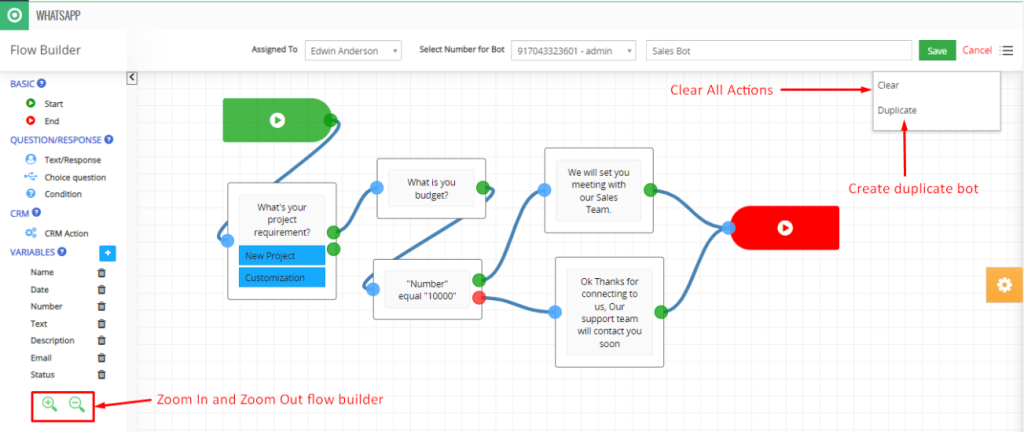
- Users can Clear all the added actions by clicking on the Clear option and also duplicate the created Bot from the Flow Builder.
- Zoom In and Zoom Out buttons are also there for the flow builder.
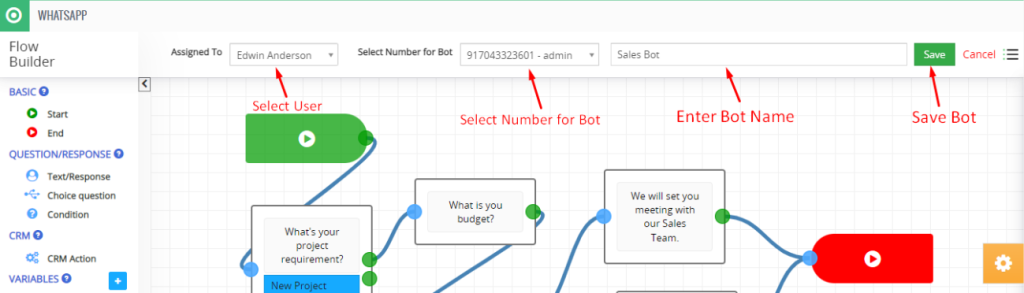
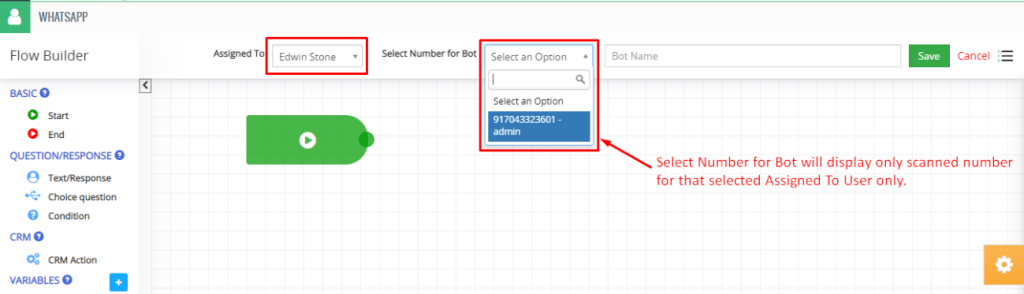
- Select the “Assigned To” user and that user scans the WhatsApp number.

- “Select Number for Bot” drop list will show the scanned WhatsApp number of the user according to the “Assigned To” user.
- Select WhatsApp Number for bot from “Select Number for Bot”.
- “Select Number for Bot” drop list will show a scanned number which is accessible to the user.
- Enter Bot Name.
- Add Start Node for designing bot flow
- Create Flow by using Question/Reponse, CRM Action, and Variables according to your business requirement.
- Connect End Node for designing bot flow
- Save Bot By clicking on the “Save” button.
- Enable Bot for connected WhatsApp number.
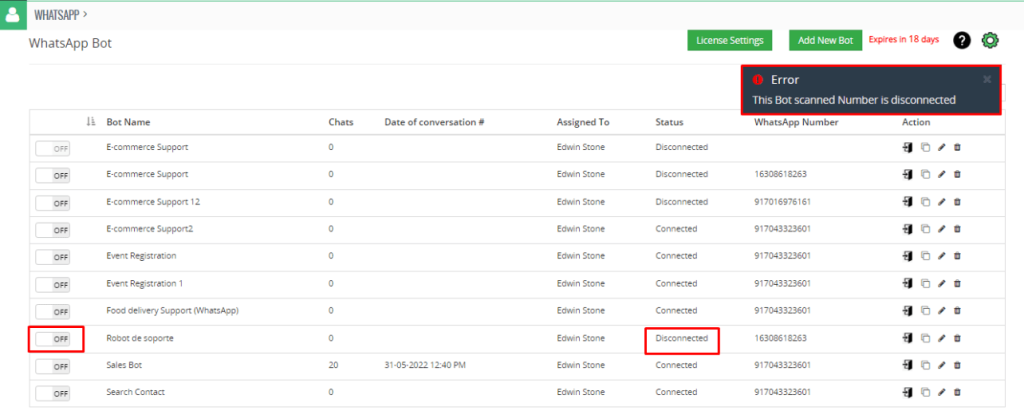
- Note: WhatsApp Bot will enable only for those user who has rights to scan selected WhatsApp number from Settings > WhatsApp configuration > Select Multiple WhatsApp number configuration.
How to Convert Chat to Manual / Robotic Mode ?
- Clicking on this will stop automatic conversation from the Bot to the selected customer number.
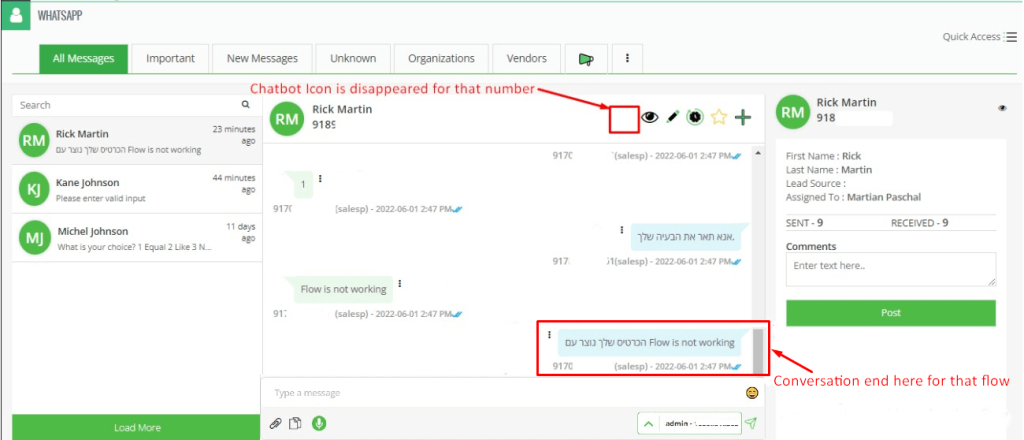
- If Chat is initiated for any number, then only the Chatbot icon will be displayed on the Chat timeline screen. Otherwise, the Chatbot icon will not be displayed.
- If the initiated Chatbot flow ends with the conversation for the number, then the Chatbot icon will disappear for that number from the Chat timeline screen. And again if the user starts a conversation via Chatbot flow then the Chatbot icon will appear again for that number.
- Bot Ideal Time
- This option will work if the user selects 5 minutes as Bot Ideal Time and Conversation mode is in Manual mode and if the user is not sending any new message within 5 minutes from last sent message then Conversation mode will change to Robotic mode automatically.
- User can set Bot ideal time from Click on WhatsApp Gear Icon > Click on WhatsApp Settings > Click on WhatsApp Configuration > Move to General Settings
- Note: It will automatically enable Robotic mode if the difference b/w Send Message from CRM and receive message is more than Bot Ideal Time.
How does WhatsApp Chatbot work?
Note: User must be activated for Multiple WhatsApp Number for users:
- How does the WhatsApp Chatbot for the Support team work ?
- Activate “Support Bot” to connect your WhatsApp Number.
- When you start messaging as “Any message”, Bot will auto-respond according to the flow.
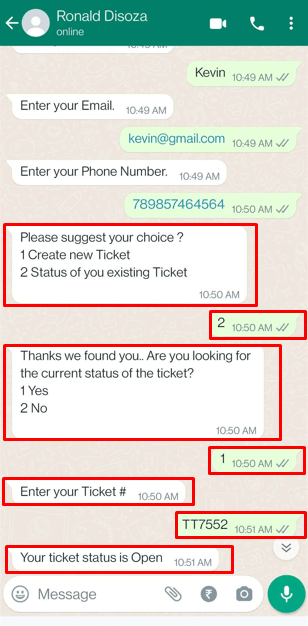
- Select the “Support” choice as its set flow for that.
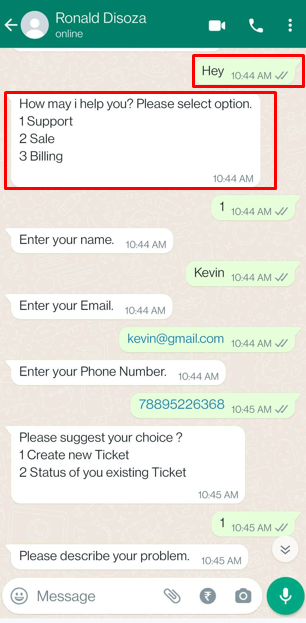
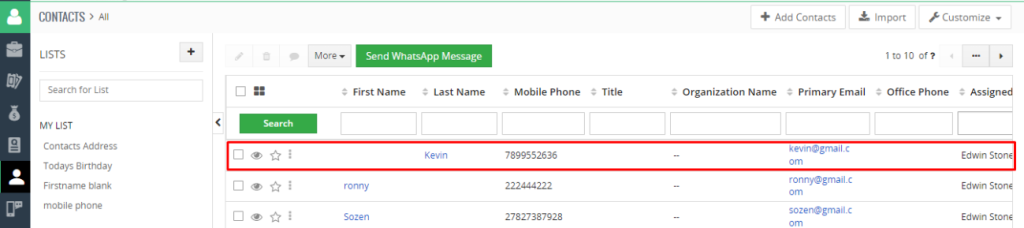
- Enter Name, Email and Phone Number, that will create contact according to the details you entered detail as its set CRM Action in flow.
- Enter your choice “To create a new ticket” or “Status of existing ticket”.

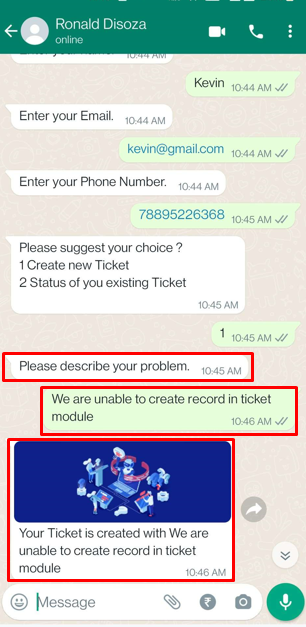
- If you select “Create New Ticket” by entering number as 1 will ask to describe your concern.
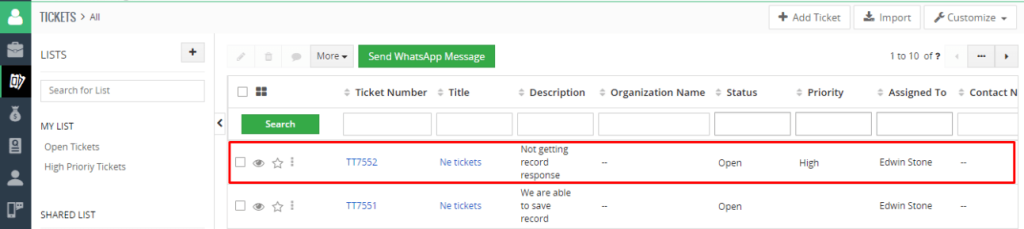
- It will create a ticket in CRM against your concern.

- OR If you select “Status of your existing Ticket” by enter number as 2 will ask you to enter the ticket number to show ticket status.
- Activate “Support Bot” to connect your WhatsApp Number.
- How does the WhatsApp Chatbot for Sales team work ?
- Activate “Sales bot” to connect your WhatsApp Number.
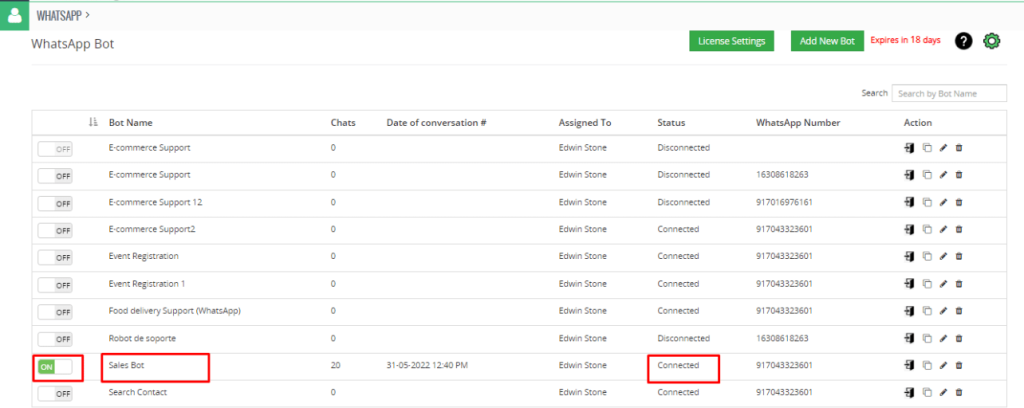
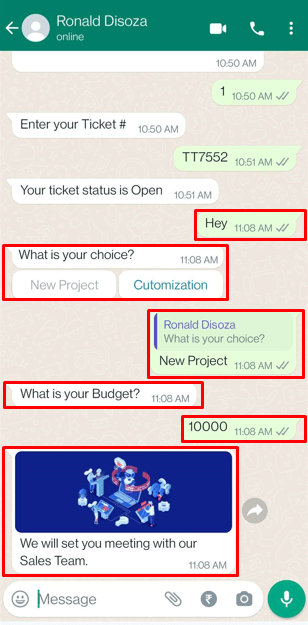
- When you start messaging as “Any message”, Bot will auto-respond according to the flow.
- Select the “New Project” choice as its set flow for that.
- Enter your amount in response to the message “What is your budget?”
- If you enter “10000” according to the set condition as “Number equal to 10000”, then the condition will be true so it will respond with a message as “We will set up a meeting with our Sales Team.”
- OR If you enter “not equal to “10000 according to the set condition as “Number equal to 10000”, then the condition will be false so it will respond with a message as “Ok Thanks. Our Sales Team will contact you soon….”

- Activate “Sales bot” to connect your WhatsApp Number.