


Getting Here
This module can be accessed from the header.
![]()
By clicking on this highlighted icon WhatsApp and WhatsApp business both will be
accessible.

By clicking on this ‘Show Notification’ below the screen will be visible.
Here the first screen of the inbox is visible.

Here all the options for WhatsApp and WhatsApp business are available.

Create Contact
- To create a contact from WhatsApp chat screen .
- Click on ‘Create Contact’.

- After clicking on it below screen will appear.

- Add data to save this contact.
- To send a WhatsApp Message Click on ‘Send WhatsApp
Message’

- By clicking on that button below the screen will be open.

- Users have to select from which WhatsApp number or WhatsApp Business Number they want to send
a WhatsApp message. - After selecting the number for WhatsApp, users have to type a message in the below screen.

- If users want to attach an image or any file they can attach from here.
- If the user selects WhatsApp business number to send a message then the first message will be
any pre approved WhatsApp template to initiate conversation.

Top Navigation Bar
- Here the top navigation bar is available with all menus.

New Message
- By clicking on ‘New Message’ below the screen will be open.

- After Selecting the number for WhatsApp message send the further process will be the same as
sending a message from Send WhatsApp Message .
WhatsApp Template
- In WhatsApp templates there are two options.
- WhatsApp Business

- To see WhatsApp template click on WhatsApp .
- After clicking on it below screen will appear.In which List of WhatsApp template will visible.

WhatsApp Business Template

- To see WhatsApp Business template click on WhatsApp .
- After clicking on it below screen will appear.In which List of WhatsApp business template will
visible.

WhatsApp Log
- To access WhatsApp log module click on WhatsApp log in top navigation bar.

- After clicking on it below screen will be visible in which WhatsApp and WhatsApp business both
logs will be visible.

WhatsApp Bot
- To access WhatsApp bot click on WhatsApp Bot in the top navigation bar.

- Clicking on this WhatsApp icon from the bot pop up below screen will appear.
- In this WhatsApp bot screen the list of WhatsApp bot will be visible.

WhatsApp Business Bot

- After clicking on this icon below the screen will be open.
- List screen of WhatsApp business bot will be visible.

- Another header navigation is available with different options .

All Messages
- In the ‘All Messages’ section, all conversations will be displayed, including
important, saved, unsaved, new messages, and WhatsApp chats from different modules.

Important Messages
- An important feature helps you to quickly access your WhatsApp Business contact which is
important. - You can manage to move any contact under Important by simply click on
 icon to move contact under Important contact.
 - Marked as important chat will be visible with

New Message
- In the WhatsApp Business messages, New messages area list display all unread messages either
from “unknown number” or “existing contact records” - WhatsApp Business messaging has the same option as sending/receiving message to individual
records

Transfer To Agent
- When the bot is transferred to an agent (Manual mode), it shows the contact from which the bot
conversation was held in the ‘Transfer to Agent’ section for the manual conversation.

Unknown
- “Unknown numbers” in the WhatsApp Business Global messages area list all messages from
an “unknown number” not stored as a record in CRM. - “Unknown numbers” messaging section has the same option as sending/receiving messages
to individual records. - From Unknown number there is an option to Create new customer record or update “Unknown
number” to existing record in SalesHiker.

Contacts
- Here in the contacts section the WhatsApp chats which are saved as record in contact module
will appear here.

Leads
- Here in the Leads section the WhatsApp chats which are saved as records in the Leads module
will appear here.

Groups
- WhatsApp Group inside SalesHiker allows you to copy all the Group’s participants to CRM and
download participants of the group. - WhatsApp Logs will store Group to WhatsApp Log Master.

- Displays the List of members of a group and the total number of members in the group.

- Clicking on “Save” will create either leads or contacts from the Group’s contact .

- After clicking on save button the record can be saved in contact ,Lead or any other connected
module. - That module should be selected by the user and also that number can be saved in the selected
field. - Name and WhatsApp number both can be saved in the user selected field.


- Click on the Refresh button to retrieve the Latest Group for Selected WhatsApp Number.
Conversation Selection
- The Conversation Selection Form is used to choose specific conversations from WhatsApp
or WhatsApp Business. This form helps users manage and organize their chats efficiently by selecting relevant
messages for processing, follow-ups, or integration with external systems.

Search By Numbers
- Allows users to find specific conversations by entering a phone number.
- Useful for quickly locating messages exchanged with a particular contact.
- To use this functionality select the search by numbers option from the dropdown.


Search By Keyword
- Enables users to search for specific words or phrases within chats.
- Helps in quickly locating important messages, links, or details without scrolling through the
entire conversation. - In WhatsApp Business, businesses can use keyword searches to track customer queries,
complaints, or orders.

- To use this functionality select the search by keyword option from the dropdown.

Search By Chat
- Lets users filter and search within a specific conversation instead of across all chats.
- This is useful when looking for past messages from a particular contact or group.
- In WhatsApp Business, businesses can use this to find past conversations with a customer for
better context in support or sales interactions.

- To use this functionality select the search by Chats option from the dropdown.

Filter
- A filter is available here to search all chats assigned to any specific user and also labels
can be applied to that filter of the user’s chat list .

- The Filter Conversation feature allows users to refine their chat searches based on two
key fields:- Agent Selection Field
- Enables users to choose a specific Agent.
- Displays conversations only with the selected Agent.
- Label Selection Field
- Allows users to filter chats based on assigned labels (e.g., “Deal
Stage,” “Lead Source,” “Order Alert”). - Helps in categorizing and organizing conversations for efficient
follow-ups. - In WhatsApp Business, labels can be used to prioritize messages and
streamline customer management.
- Allows users to filter chats based on assigned labels (e.g., “Deal
- Agent Selection Field


Profile
- Profile of the selected chat user can be accessed from here.

- After clicking on this icon below the screen will be open Where details of the selected user
can be found.

Chat Summary
- This section presents the number of sent and received messages.

Attachment , WhatsApp Template and Voice message
Attachment
- The Attachment feature allows users to send and receive different types of files within
a conversation. This is useful for sharing important documents, media, and other resources efficiently.
Types of Attachments Supported:
- Images & Videos – Share photos and videos directly from the gallery or camera.
- Documents – Send PDFs, Word files, Excel sheets, and other documents.
WhatsApp Template
- Here one pop up will be open for users to select a WhatsApp template.
Voice Message
- Voice Message option allows the user to send any voice note or voice message .
Number selection for sending WhatsApp Messages
This option is available in the chat of all users at the bottom right corner.
- If multiple numbers are registered, they will be displayed here.
- If only one number is registered, only that number will be visible.
- If only one number is registered, only that number will be visible.

Close Conversation
- The highlighted icon in the image below is for closing a conversation.

- By clicking on this icon one pop up will be visible like the below screen.

- After clicking on yes the icon will turn blue .
 like this.
 - To open the conversation again click on the same icon again one pop up will appear.

- After clicking on yes again the icon will turn to green color .
Sync Message
- Ensures that the latest messages are updated and synchronized across devices or platforms

Preview Record
- Allows users to view a record before making any changes or taking further action

Edit Record
- – Enables users to modify existing records, such as contact details, notes, or
labels.

Mark As Important
- – Allows users to highlight or prioritize specific messages or records.

Add Related Records
- – The ‘+’ icon is used to add related records for the user whose chat is currently
open. - – By selecting any option from the dropdown record, the additional form for the
selected option will be open.

Side Menu
- – In the top menu, the last option is for the side menu bar, which contains
various options related to WhatsApp.

Send WhatsApp Message
- – This process is same as Send WhatsApp
Message

Setup WhatsApp Workflow
- – This option will redirect a user to the workflow module where the user can create
and manage workflows.


- – WhatsApp workflow allows sending Automated WhatsApp messages on the trigger event
of any module link with the WhatsApp module.


- – The WhatsApp workflow can configure the WhatsApp messages to whom we want to send
individually WhatsApp templates to share files or message format, general field, add fields and message. - – In the above workflow whenever conditions will be matched and the contact get
updated the user will get a message on WhatsApp/WhatsApp business.
WhatsApp Messages

- – This option will direct the user to the WhatsApp Log screen.

Load Past Message History
- – To access this feature click on the highlighted menu.

- – The Load Past Message History feature allows users to retrieve and view
previous conversations that are not currently visible in the chat window. - – Users can select WhatsApp number from which the messages were sent , Start and End
date. - – After selecting those details click on load message to load past messages.

Auto Responder Text

- – The Auto Responder Text feature allows users to set predefined messages that
are automatically sent in response to incoming messages. This is especially useful in WhatsApp Business for
customer service and engagement. - – This message will be sent to the receiver when he/she sends a message for the first
time.

Manage Labels

- – Labels can be managed and added from this menu.
- – By clicking on this menu below the screen will be open.
- – Where users can add the name of label and also it can be assigned to a particular
role with specific color.

Setup WhatsApp

- – Users can add users and grant access to the WhatsApp integration from the Setup
WhatsApp menu. - – By clicking on it below the screen will be visible .
- – In this screen click on ‘Add more user ‘ to add a new user .

Setup WhatsApp Business

- – From this screen the connected WhatsApp business number details will be visible
here.

Logout

- – The Logout option allows users to sign out of their CRM account, ensuring
security and preventing unauthorized access.
Help

- When the user clicks on ‘Help,’ they will be redirected to the user guide of SalesHiker WhatsApp & WhatsApp
Business Integration.

How to Connect WhatsApp?
Multi-device support by WhatsApp
- With the new multi-device capability, each companion device will connect to your WhatsApp account independently.
Companion devices will have to be linked by scanning a QR code, and on compatible devices, WhatsApp will also
enforce biometric authentication as an extra layer of security. Users will be able to see all the companion
devices linked to their WhatsApp account within the app. They can also see when they were last used, and they
will be able to log out remotely. - WhatsApp’s Multi-device feature allows you to use the instant messaging app on up to four non-smartphone
devices, i.e laptops, PCs, web browsers, etc. - In addition, the multi-device can allow access to connect with CRM WhatsApp and Web WhatsApp.
- If you’re using the beta version of WhatsApp for Multi-device, then you can follow the below steps.
- You can use WhatsApp on up to four companion devices at one time, but you can only have one phone connected to
your WhatsApp account at one time. - You’ll still need to register your WhatsApp account and link new devices with your phone.
- WhatsApp CRM doesn’t allow you to scan multiple times from the same WhatsApp Account.
- If you don’t use your phone for over 14 days, your linked devices will become disconnected.
How to enable WhatsApp Multi-device?
- For Android smartphone users, here’s what you need to do:
- Open WhatsApp > tap on More Options

- Tap Linked Devices.

- Tap on Link Device

- Point your phone at the screen of the device you want to link to scan the QR code.

- Open WhatsApp > tap on More Options
- For Android smartphone users, here’s what you need to do:
- Go to WhatsApp Settings.
- Tap Linked Devices
- Point your phone at the screen of the device you want to link to scan the QR code.
- For iPhone users, here are the steps you need to follow:
- Go to WhatsApp Settings.
- Tap Linked Devices
- Point your phone at the screen of the device you want to link to scan the QR code.
- After joining the multi-device, you’ll need to relink your companion devices. You will
need to scan a QR code that pops up on the SalesHiker WhatsApp Configuration page. After that, it isn’t
necessary that you must have your phone with you to use it on companion devices. Even if your smartphone is
switched off, you can continue to use WhatsApp on WhatsApp Integration
Step-by-Step Guide to Meta Business Verification
Facebook Business Manager Verification
Before starting the process, you need to fill out the Business Info section of your
Facebook Business Manager. Here, you have to provide details such as business legal name, address, phone number,
email address and website.
Make sure the information you provide aligns with the details registered with local
authorities. As long as Facebook can verify your business from the info given, there is no need to provide
supporting documents for verification.
If Facebook cannot identify your business, you need to provide evidence of the following
legal details with the right documents:
- Business legal name: Business license, Certificate of Incorporation or tax or VAT registration
certificate - Business address and phone number: Utility bill, bank statement or business license with your address and
phone number on it
Here’s a list of the documents that are mandatory for Facebook Business Verification for Indian Business (in
order of recommendation).
For India
- Certification of Incorporation/Formation
- Articles of Incorporation
- Business Bank Account Statements
- Udyog Aadhar UID
- Business Credit Reports
- Business Licence and Permits
- Utility Bills
- Permanent Account Number Card (PAN)
- Shop Establishment Certificate
For Other Countries
- Utility bill like a phone or electricity bill
- Bank statement
- Business Tax or VAT registration certificate
- Certificate of formation or incorporation
- EIN confirmation letter from the IRS (U.S. only)
- Federal tax returns to the IRS by company (U.S. only)
- Business credit report from one of the reporting agencies
- Business bank account statements
- Business licenses and permits from any level of government
Documents not accepted for Business Verification
- Any kind of Invoices or tax filed by the company
- Purchase Orders
- Self-filled applications for the company
- Website print
- Other documents like company flyers,letterhead, etc.
Now that you have your business information filled and supporting documents ready, let’s
start the business verification process.
- Go to Facebook Business Settings and navigate to the Security Centre. You can
see the business verification option once you’ve signed up for WhatsApp Business API. Click on the Start Verification. If you’re unable to
see the business verification option, please contact us.

Navigate to the Security Centre of your Facebook Business Manager and click on
Start Verification - Add your organization’s details. If you’ve filled in your company details in the Business Info section, this
section will be auto-filled. Double-check the information to ensure that they are accurate.

Add your organization’s details - Add supporting documents to prove your business’ legal details and submit.

- Select your preferred contact method to receive a confirmation code to confirm your connection to the business.
If you have a website, you can submit your application right away, without having to receive a confirmation
code.

Select your preferred contact method - Enter and confirm your phone number and click Text Me Now to get a confirmation code. This step depends
on the contact method you’ve selected in the previous step.

Confirm your phone number and click Text Me
Now - Input the confirmation code and click Next. If you did not receive a verification code, click on Resend Code.
You can also change your preferred contact method if your chosen method isn’t working

Insert the confirmation code and click
Next
How Long Does Business Verification Take
After completing the verification, you’ll get an email and a notification in your
Facebook Business Manager and Page within 1-3 days. You can also check your status in the Business Info or
Security Centre sections.If Facebook doesn’t verify your business, you can
appeal by sending more documents. Facebook may ask for your Government ID and
two other documents.When submitting your ID, show all its information and
corners. Place it on a dark, flat surface for the photo. Facebook won’t accept digitally altered images. If you
have problems with verification, it might be because your application is incomplete, documents are unclear, or
the details don’t match.If you need more help, visit the Meta Business Help Centre or contact us about verifying your ID and business details.
Display Name Review
After you finish verifying your business, Facebook will review the display
names for all your phone numbers. The display name is what customers see as your business name on
WhatsApp.Make sure your display names are clearly linked to your business,
follow Meta’s
guidelines, and don’t break WhatsApp’s rules for Commerce and Business. Once your business is verified and your display names are
approved, you can send more messages and use more phone numbersGetting your
business verified on Facebook is key to growing your reach on WhatsApp. With verification, you’ll be able to
send more messages and use more phone numbers, which means better engagement with your customers.Once you’ve verified your business, you can take your messaging game to new heights with
an AI-powered customer conversation management platform and badge Meta Business Partner with SalesHiker.com
.
Select Users Who Can Access the WhatsApp Business Account
- User Selection:
- In this section, you will see a list of users who are part
of your CRM. - Select Users:
- Choose the users who will have access to the WhatsApp Business
Account. - These users will be able to send and receive messages via WhatsApp,
manage templates, and handle conversations.
- Choose the users who will have access to the WhatsApp Business
- In this section, you will see a list of users who are part
- User Groups:
- In the next field, you’ll need to select user groups
that will have access to the WhatsApp Business Account. - What are User Groups?
- These groups represent different teams or departments within your
organization (e.g., Sales, Customer Support). - Select the groups that need access to manage WhatsApp communication.
- These groups represent different teams or departments within your
- In the next field, you’ll need to select user groups
Activate the WhatsApp Business Channel
- Select Active Checkbox:
- To make the WhatsApp Business Channel active, ensure the
Active checkbox is selected. - This will enable the channel and allow users within the
selected groups to begin using it.
- To make the WhatsApp Business Channel active, ensure the
- Save Settings:
- After selecting users and user groups, and ensuring the
Active checkbox is ticked, click the Save button to finalize the settings.

- After selecting users and user groups, and ensuring the
- Click Save Button:
- After selecting users and user groups, and ensuring the
Active checkbox is selected, click the Save button to finalize and activate the WhatsApp
Business channel.
- After selecting users and user groups, and ensuring the
How to Add or Connect WhatsApp Business API to Meta Business in SalesHiker?
Log in to your CRM platform with admin credentials or an account that has
permission to manage settings.
Look for the Main Menu—this is typically located on the left-hand side or as a top
navigation bar, depending on your CRM.
Navigate to WhatsApp Business Configuration
- Go to top menu bar look for this
 icon .Click on Setup WhatsApp Business > Gear Icon
  .
.

After navigating to Setup WhatsApp > Gear Icon![]() the WhatsApp Business Configuration Screen will appear.
the WhatsApp Business Configuration Screen will appear.

Add a WhatsApp Business Account
- Locate the Button:
- On the WhatsApp Business Configuration screen, look for the Add WhatsApp
Business Account button. - This button is usually prominently displayed, often at the top or center of
the page.
- On the WhatsApp Business Configuration screen, look for the Add WhatsApp
- Click on the Button:
- Click Add WhatsApp Business Account to begin the integration process.

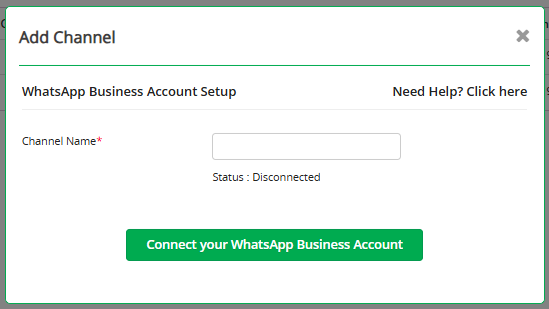
Pop-Up Screen Appears:
- After clicking the Add WhatsApp Business Account button, a pop-up window will appear on the screen.
Enter Channel Name:
- Once the channel name is entered, click the button labeled Connect Your WhatsApp Business Account to
proceed.

Facebook Login Pop-Up Appears:
- After clicking the Connect Your WhatsApp Business Account button, a pop-up window from Facebook will
appear. - This is required to authenticate and link your Meta Business account with the CRM.

Confirmation to Continue with the Same User
Prompt for User Confirmation:
- After clicking the Continue button on the Facebook pop-up, the system will
ask, “Do you want to continue with the same user?” - This step is to ensure that you are connecting the correct Facebook account linked
to your WhatsApp Business Account.

Permissions Displayed:
- After clicking Continue, a screen will appear showing the permissions that are granted to the
user. - These permissions typically include access to:
- Manage your WhatsApp Business Account.
- Access Meta Business tools and settings.
- View and respond to messages on behalf of your WhatsApp Business Account.

- Once you click on your SalesHiker application, you will find your App Id.

WhatsApp Business Account Detail Form
Click “Next”:
- After filling out and submitting the Business Information Form, click the
Next button to proceed. - This action will open the WhatsApp Business Account Detail Form.
- Form Overview:
- The WhatsApp Business Account Detail Form is designed to capture
specific information related to your WhatsApp Business Account for setup.
- The WhatsApp Business Account Detail Form is designed to capture
- Fields to Fill:
- The form will typically require the following details:
- WhatsApp Business Account:
- Enter the name of your WhatsApp Business Account. Ensure it
aligns with your brand name to avoid confusion.
- Enter the name of your WhatsApp Business Account. Ensure it
- Create or select WhatsApp Business Profile.
- WhatsApp Business Account:
- The form will typically require the following details:

Reviewing Permissions
Click “Next”:
- After completing and submitting the WhatsApp Business Account Detail Form,
click the Next button.
The following permissions will typically be displayed:
- Manage Your Business
- Manage Your WhatsApp Accounts
- Manage and Access Conversations in WhatsApp

Access Details Pop-Up
- Click “Continue”:
- After reviewing and granting the permissions, click the Continue
button to proceed. - A new pop-up window will appear, showing a summary of what you can
now access through your WhatsApp Business Account integration.
- After reviewing and granting the permissions, click the Continue
- Details in the Pop-Up:
- – The pop-up will outline the types of access and limits available to your
business through WhatsApp Business:- – At Least 1,000 Business-Initiated Conversations:
- Your business can initiate up to 1,000 conversations with
customers within a 24-hour rolling window. - Business-initiated conversations require pre-approved
message templates and count toward your conversation limit.
- Your business can initiate up to 1,000 conversations with
- – Unlimited Customer-Initiated Conversations:
- Customers can initiate conversations with your business
without any limits. - These include replies to your messages or any inbound
communication from customers.
- Customers can initiate conversations with your business
- – At Least 1,000 Business-Initiated Conversations:
- – The pop-up will outline the types of access and limits available to your

Click “Finish”:
- After reviewing the access details and confirming the permissions, click the
Finish button to complete the integration process.
Automatic Redirection:
- You will be automatically redirected to a new screen where you can manage user
access for the WhatsApp Business Account within the CRM.

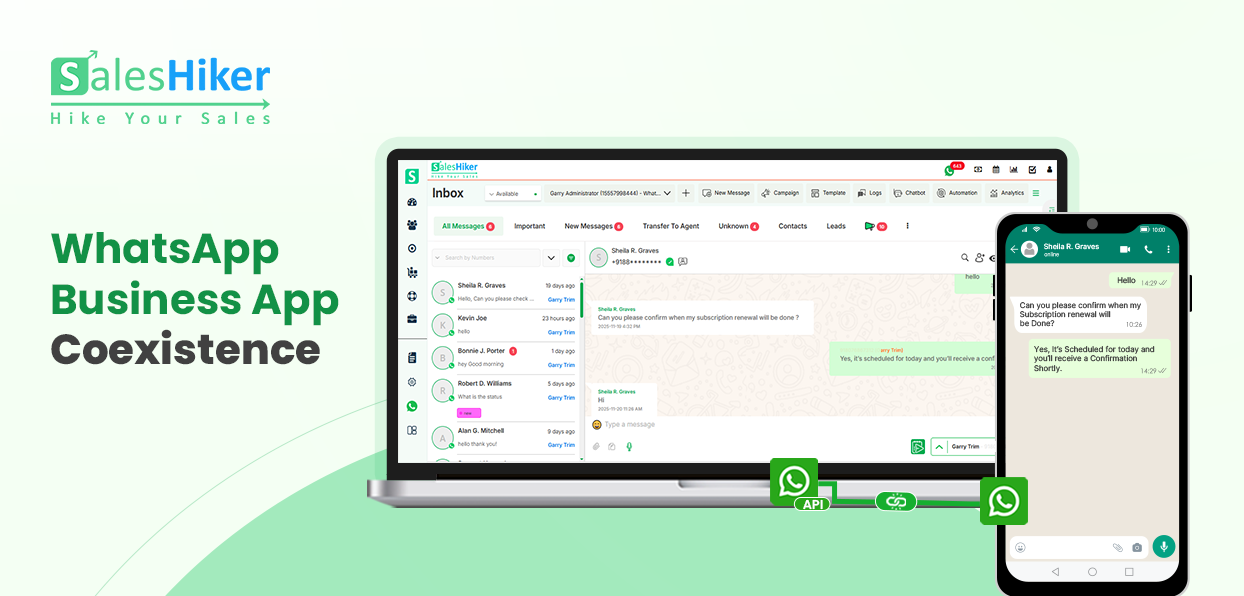
WhatsApp Coexistence – Connect WhatsApp Business Apps to WhatsApp API
What is Co-Existence in WhatsApp ?
Coexistence in WhatsApp refers to the ability for a business to use multiple WhatsApp solutions at the same
time—most commonly the WhatsApp Business App (mobile or desktop) coexisting with the WhatsApp Business API /
Cloud API on the same phone number or within the same business environment.
Because WhatsApp normally enforces one number = one product, coexistence solutions focus on enabling:
- A WhatsApp number already in use on the Business App to be migrated or connected to the API
- Seamless transition between app-based usage and API-based automation
- Parallel operations during migration without losing chat history or disrupting service
- Ensuring agent interfaces, automation tools, and mobile app usage can work together (where permitted)
Types of WhatsApp Apps in Mobile support Coexistence
| WhatsApp Type | Icon | Coexistence Support |
|---|---|---|
| WhatsApp Messenger (personal app) | No Support To Personal WhatsApp | |
| WhatsApp Business App (mobile app for small businesses) | Yes Support WhatsApp Business |
For years, businesses who wanted access to automation, broadcast messaging, CRMs, and AI tools through the
WhatsApp
API faced a frustrating limitation:
New number required
Existing chat history lost
Contacts, groups, conversations — gone
What Does Coexistence Actually Mean?
Coexistence allows:
| Before Coexistence (Old Rules) | After Coexistence (New Update) |
|---|---|
| Create a new number for API | Use your existing WhatsApp number (Only WhatsApp Business App number) |
| Lose contacts + chat history | Contacts + chats stay safe |
| No access to API automation | Unlock automation, AI, CRM |
| WhatsApp OR API | WhatsApp AND API |
You don’t need to choose anymore.
You don’t start over anymore.
You don’t lose data anymore.
The Game-Changer: WhatsApp Coexistence
WhatsApp Coexistence is a new Meta update that finally solves this problem.
You can now enable WhatsApp Business API on your existing WhatsApp Business number — without deleting the app or losing chats.
Both systems can run together, side by side.
- WhatsApp Business App
- WhatsApp Business API / CRM / Automation tools
Both work simultaneously on the same number.
How to Connect WhatsApp Business with SalesHiker CRM
To connect your WhatsApp Business Account with SalesHiker, begin by opening the WhatsApp Business Settings page in
your CRM. On this page, you will find an option labeled Add WhatsApp Business Account. Click this button to start
the connection process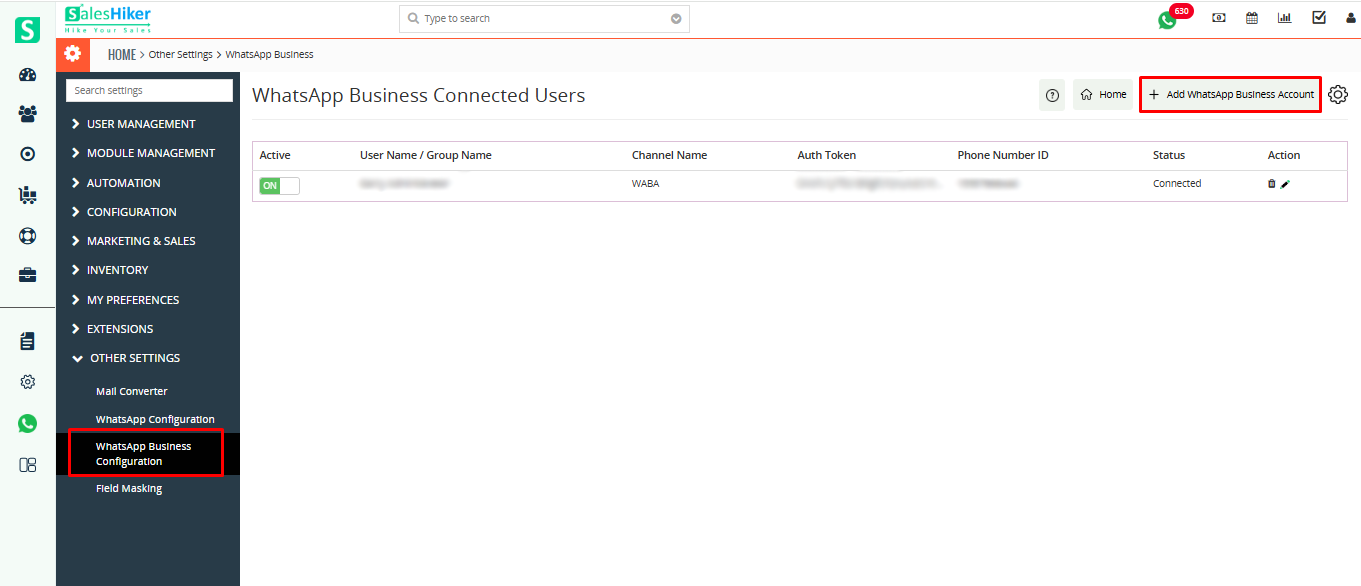
You will be prompted to provide a Channel Name for your WhatsApp connection. After entering the name, select the
option Connect Your WhatsApp Business Account to proceed.
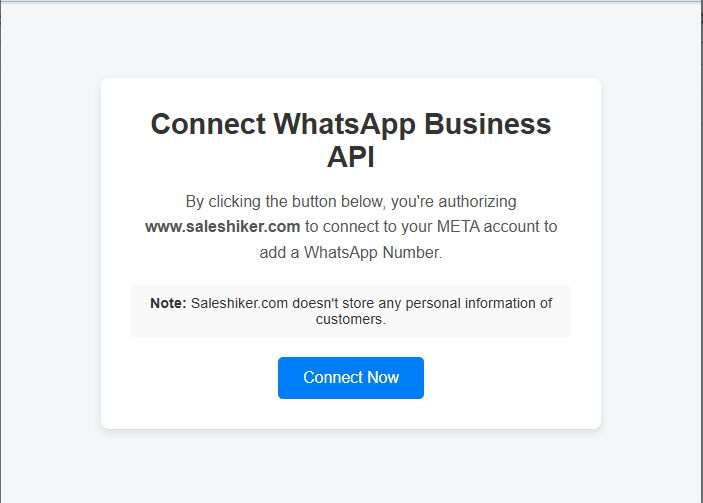
Next, you will be redirected to a page that asks you to connect your WhatsApp Business API. Simply click on the
Connect Now button to continue with the onboarding process.
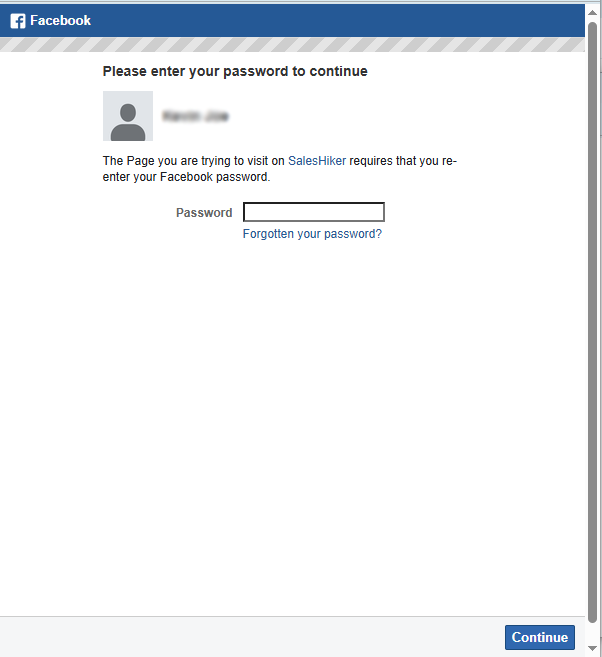
A Facebook login screen will appear, as WhatsApp Business API is managed through Facebook. Enter your Facebook
password and click Continue to authorize the connection.
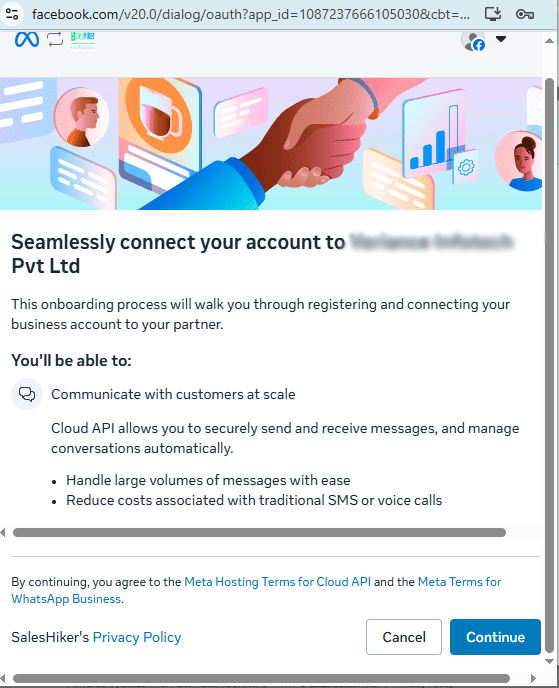
You will then see a page describing the permissions and features you will be able to access using WhatsApp Business API. Review the information and click on the Continue button to move forward.
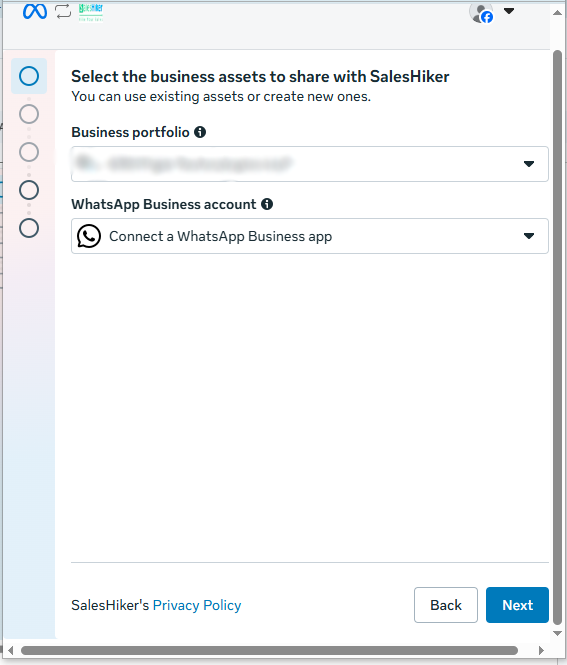
Next, a page will appear asking you to select the business assets you want to share. Here, you must choose your Business Portfolio and WhatsApp Business Account. You may either select an existing WhatsApp Business Account or create a new one directly from this screen.

After selecting the appropriate Business Account, click on the Next button to continue.
The system will then prompt you to choose your country code and enter your WhatsApp Business phone number. Make sure the number is active and associated with your WhatsApp Business App.
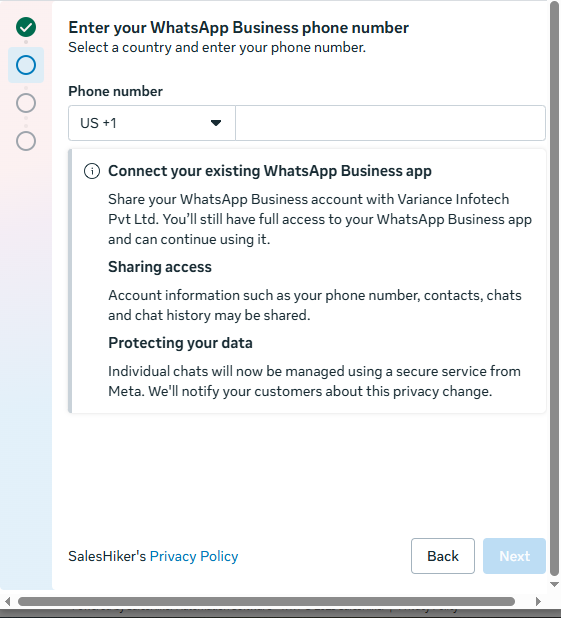
Once you have entered your phone number, click the Next button to proceed to verification.
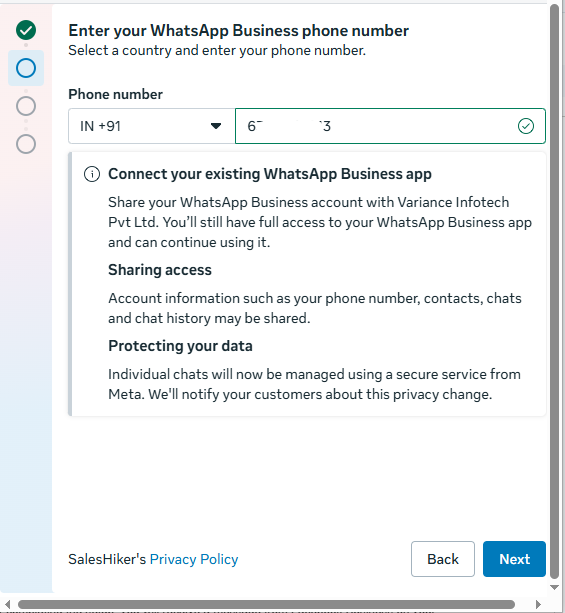
Note: Only WhatsApp Business Account numbers can be added or connected.
The system will then prompt you to choose your country code and enter your WhatsApp Business phone number. Make sure the number is active and associated with your WhatsApp Business App.
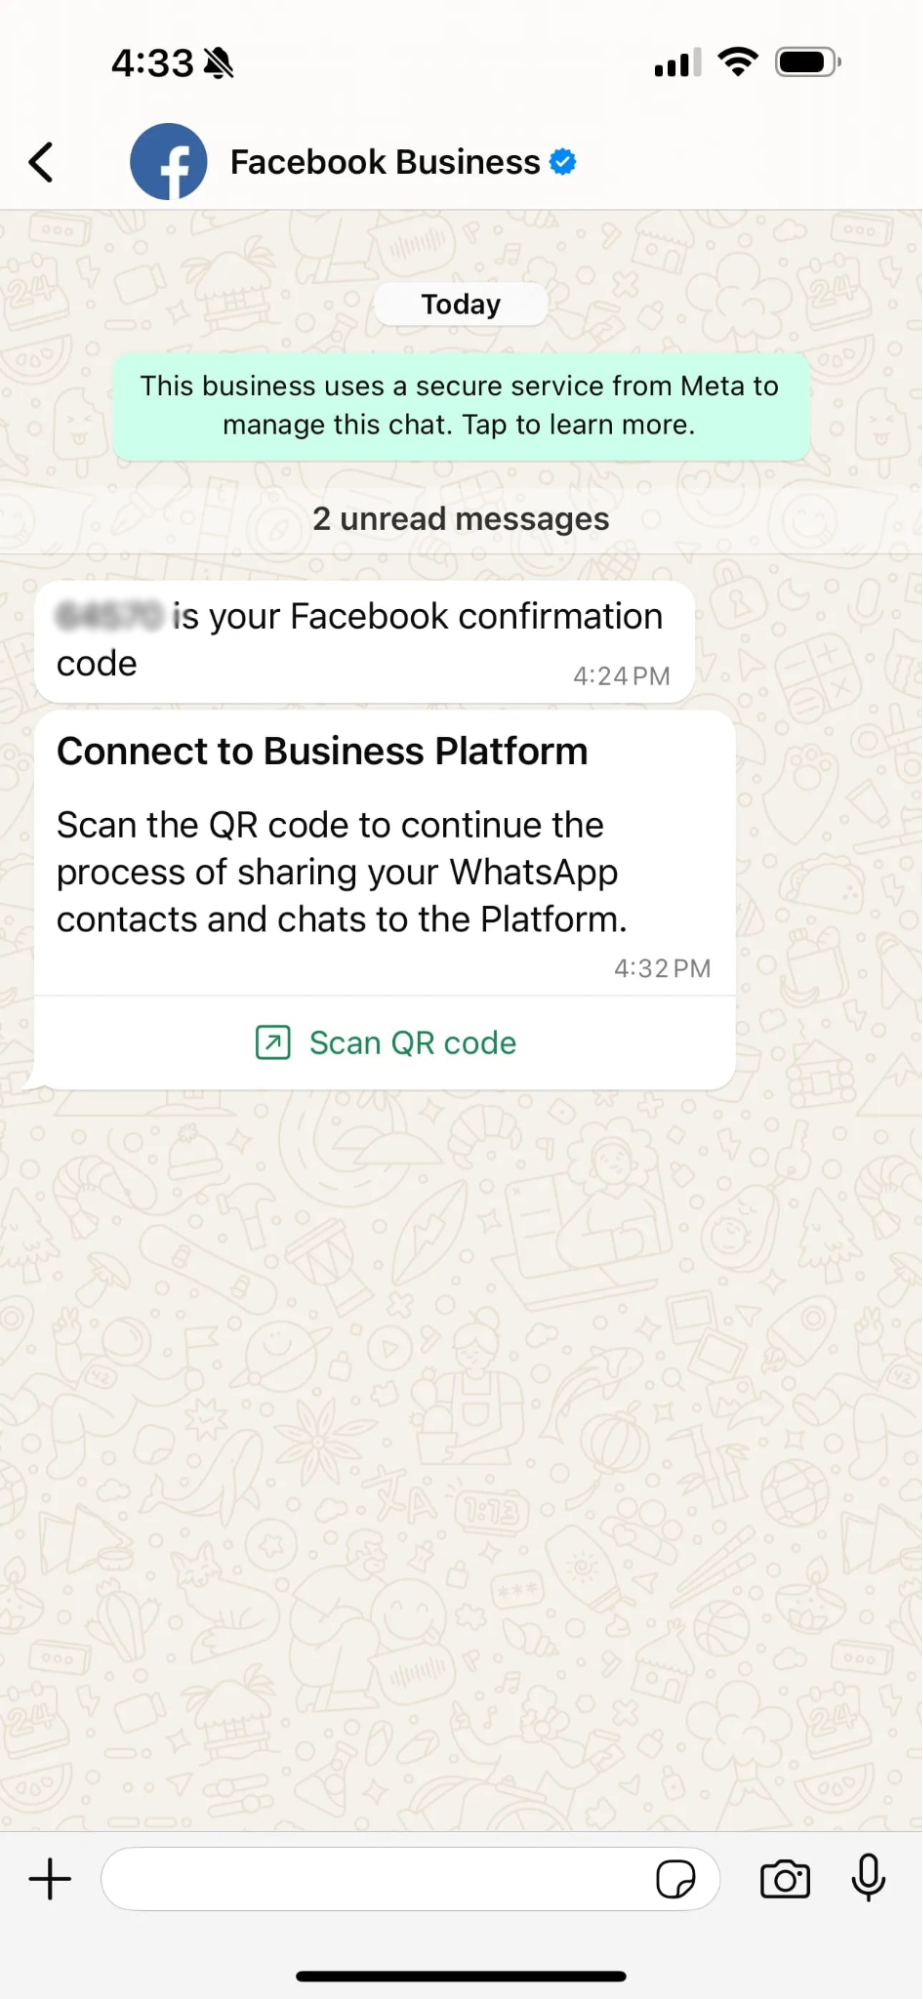
Once the connection request is initiated, your WhatsApp Business App will display a prompt asking whether you want to share your chat history. You can choose to share it or this step based on your preference.
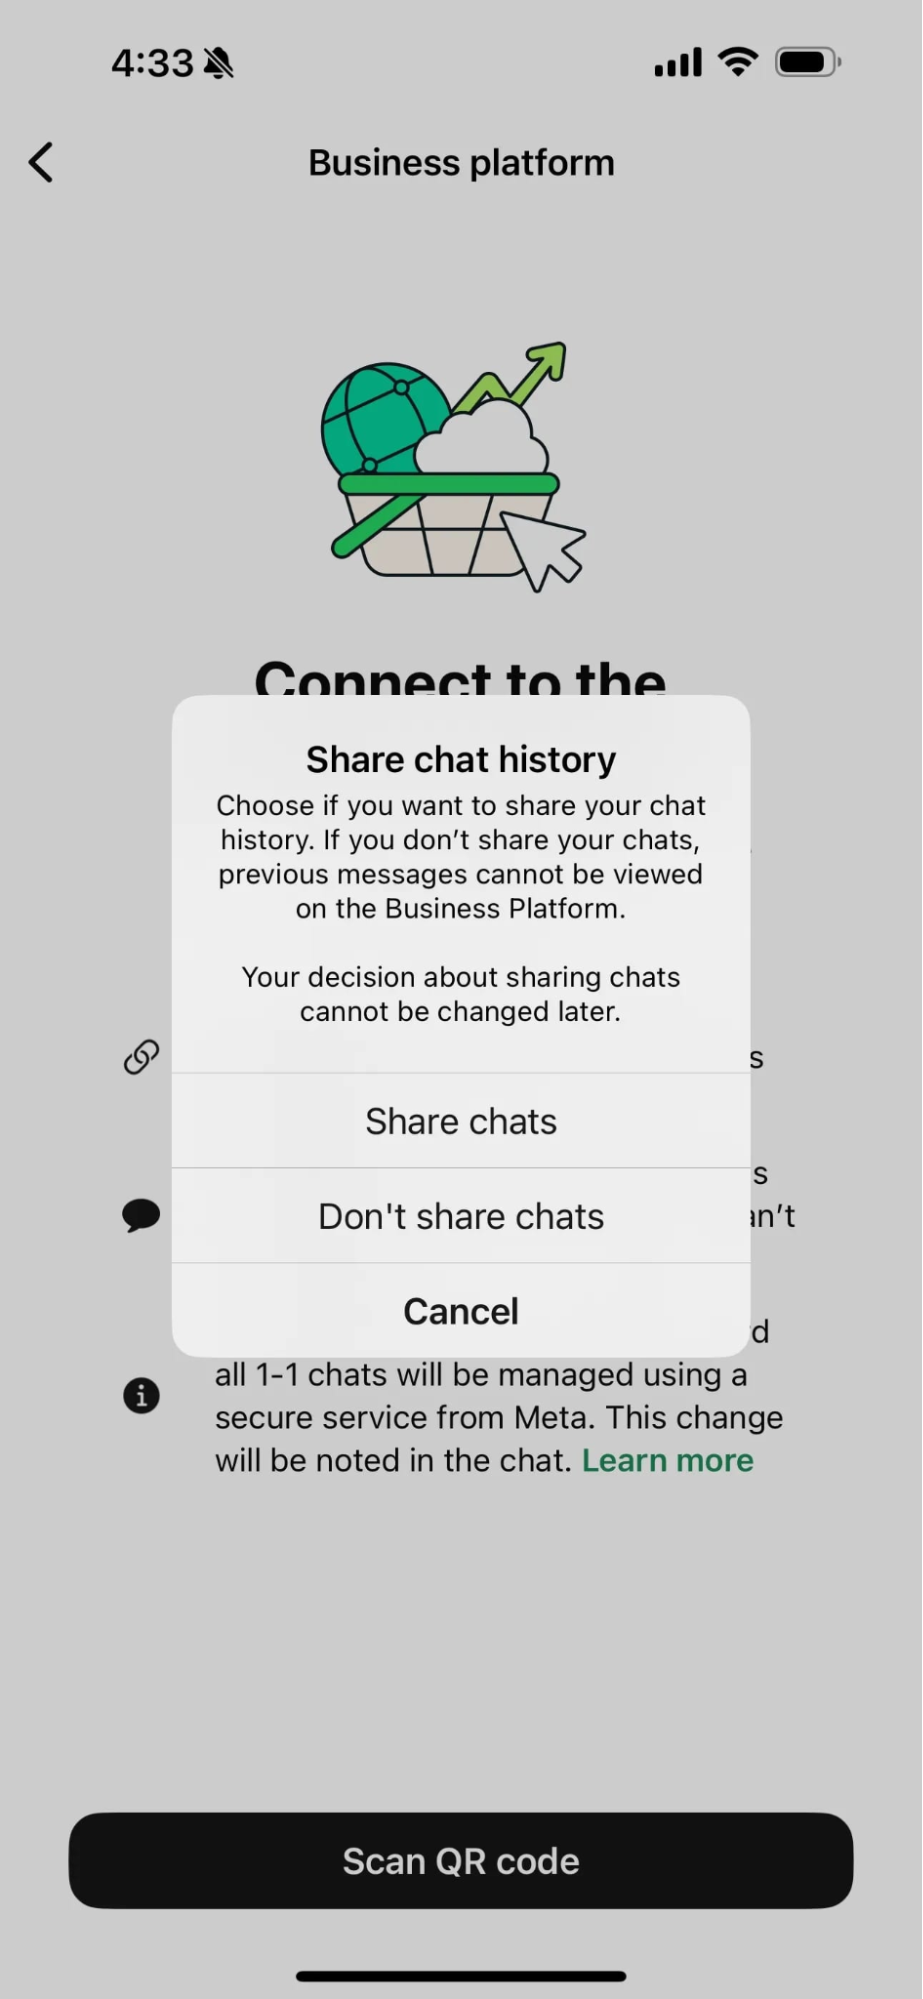
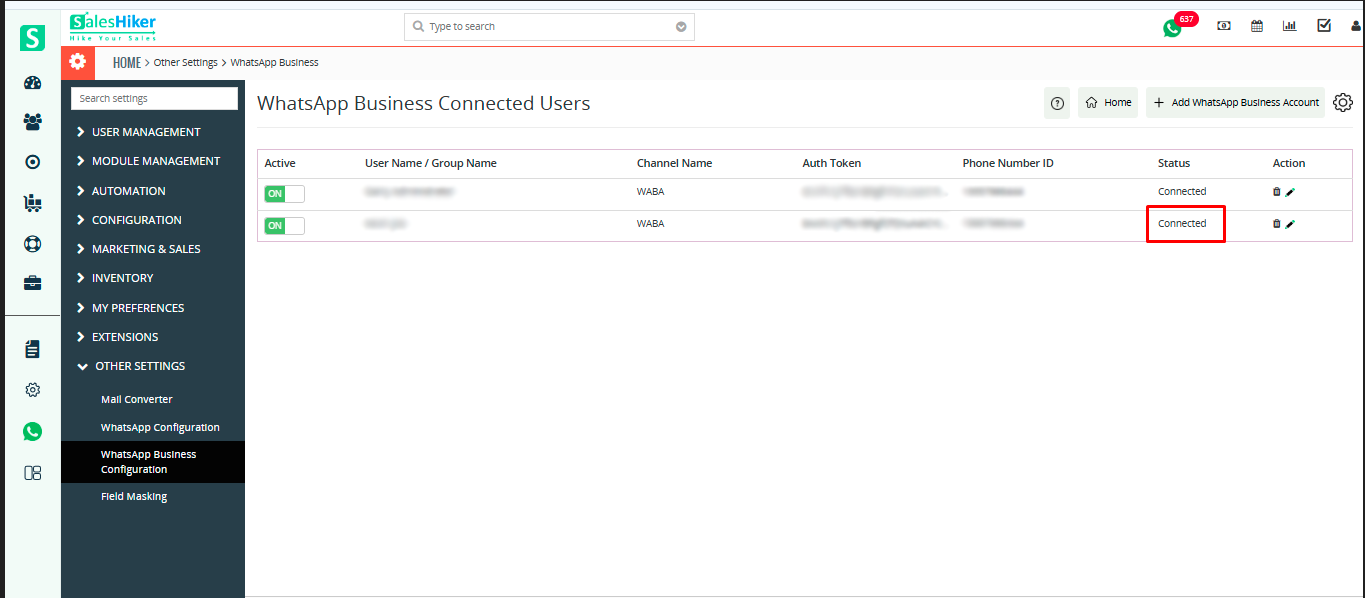
After you confirm your choice, the system will complete the verification, and your WhatsApp Business Account will
be successfully connected to SalesHiker CRM.
Key Benefits of WhatsApp Coexistence
- Zero Data Loss — Keep Your Chats
- Same WhatsApp App ExperienceKeep chatting on your mobile app like you do today.No change in your daily workflow.
- Unlock Automation + Advanced Features
With API enabled on the same number, you can now:- Send large-scale broadcasts
- Auto-reply using AI
- Route chats to multiple agents
- Connect CRMs and third-party systems
- Great for TeamsYour support team can reply via CRM/API tools You can still reply on your phone app
Both stay synced. - Cost-Friendly UpgradeNo need to buy extra SIMs or migrate numbers.
Your existing chats, contacts, and groups stay exactly where they are.No messy transfers. No risky deletions.
Limitations of WhatsApp Co-existence (Business App + Cloud API)
- Disappearing messages do not work because the API cannot handle time-based auto-deletion, so the feature is
disabled when coexistence is active. - View-once photos/videos cannot be viewed through the API, so WhatsApp disables them entirely for the number.
- Live location sharing is turned off because real-time location updates cannot sync across the API.
- Status updates do not sync; the API cannot read statuses, so they only appear on the mobile Business App.
- Group chats are not supported on the API side; the API cannot send or receive group messages, even though
groups still appear in the mobile app. - Message throughput (sending speed) is lower because coexistence operates under a shared infrastructure
designed for app traffic, not high-volume automation. - Bulk campaigns or large broadcasts may be delayed because Meta prioritizes non-coexistence API numbers for
high-volume messaging. - During setup, WhatsApp automatically unlinks some previously connected companion devices, as coexistence
restricts multi-device usage. - Only limited companion devices can be connected; laptops, tablets, or certain web devices may not mirror API
messages. - You must open the WhatsApp Business App every 10–12 days, or the coexistence connection may expire for
security reasons. - If the App becomes inactive for several days, the API connection may break, requiring re-verification or QR
linking. - Business name changes become restricted after coexistence is enabled, because Meta locks the display name to
keep API identity stable. - Some business profile fields (about, description, categories) may become locked or require Meta approval for
any changes. - Only up to 6 months of chat history can sync (provider-dependent), which means older conversations will not
migrate to the API. - Older chat media files might not sync correctly, especially large files or messages stored outside local
device memory. - Co-existence is not available for all countries or regions due to Meta’s phased rollout and local compliance
rules. - The phone number must have at least 7 days of active use in the WhatsApp Business App to be eligible for
coexistence. - Some BSPs recommend 1–2 months of usage to reduce onboarding failures or Meta verification issues.
- Co-existence cannot be activated directly by developers; it requires a Meta Business Solution Provider (BSP)
with coexistence onboarding access. - The API does not receive all message types—certain media, reactions, and system messages may not appear on
the API side. - App-based automation features (welcome messages, away messages, quick replies, catalogs) may conflict with
API automation or stop working. - After coexistence setup, some linked devices must be manually re-linked, as only allowed devices remain
connected. - If the number was previously inside a WhatsApp Business API (WABA) account, a cleanup process may be
required before enabling coexistence.
Requirements (Simple!)
You only need:
- A WhatsApp Business account
- A number that is currently using WhatsApp Business app
That’s it.
How Setup Works (Summary)
Once the coexistence feature is available on your provider/platform:
- Choose “Connect existing WhatsApp Business number”
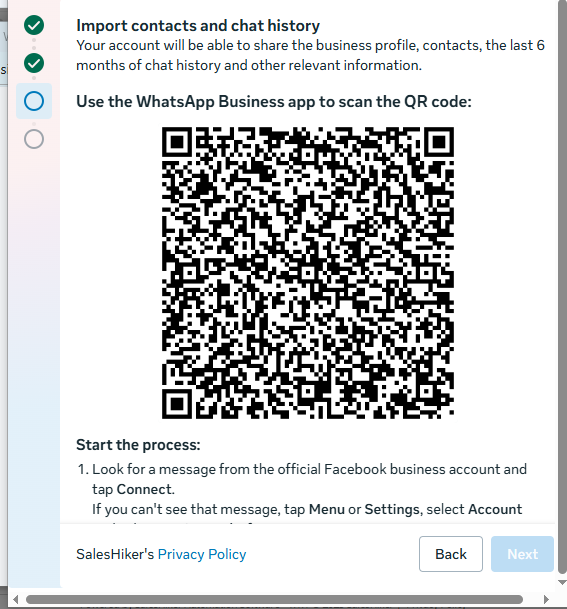
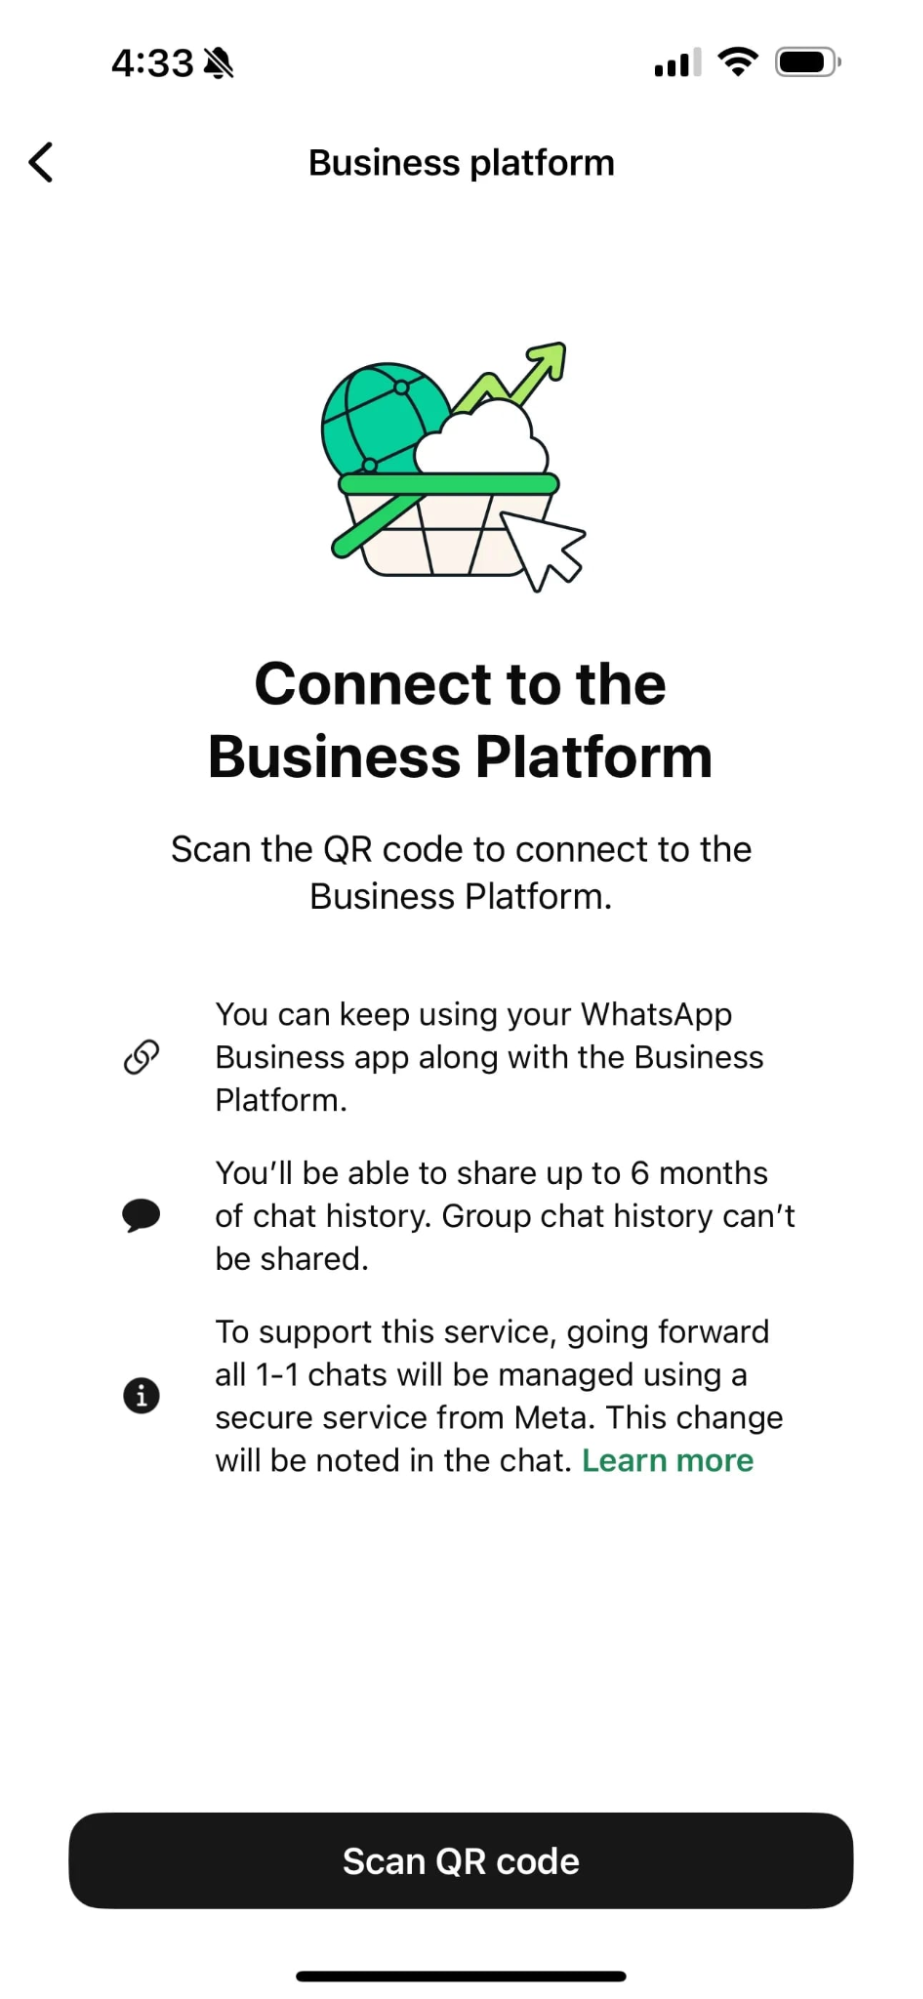
- Verify the number with a QR code from WhatsApp
- Choose whether you want to sync chat history
- Complete verification
After setup:
- The mobile app remains active
- API + automation tools start working in parallel
It usually takes just a few minutes.
Why This Update Matters for Businesses
WhatsApp is the most used communication channel for businesses today. But the automation gap held many companies
back from scaling.
With Coexistence:
- Small businesses can keep their number + upgrade
- Growing teams can scale communication without fear of losing customer records
- Enterprises can enable automation without disrupting operations
This update finally makes WhatsApp automation accessible for everyone.
FAQ’s
- Do I need to delete my existing WhatsApp account?No. Coexistence works without deleting your account.
- Will I lose my existing chats or contacts?No. All chats, groups, and contacts stay intact.
- Can I use both — WhatsApp app and API — at the same time?Yes. Both work together on the same phone number.
- Is this feature available for everyone?It is being rolled out in phases. Some businesses might see early access as it’s in beta.
Final Thoughts
WhatsApp Coexistence removes the biggest barrier businesses faced — the fear of losing their number and chat
history.
- Continue using WhatsApp the way you like
- Add automation and AI without starting over
This update marks a major shift in business communication:
WhatsApp can now scale with your business — not limit it.
WA Broadcast Message (Mass Message)
Mass Message Configuration
- This option will be managed from Setup WhatsApp > Gear
Icon>WhatsApp Configuration. Find Mass Message Configuration


To access the WhatsApp business configuration go to Setup WhatsApp Business > Gear
Icon![]() >WhatsApp Business Configuration. Find Mass Message Configuration click on
>WhatsApp Business Configuration. Find Mass Message Configuration click on
settings icon of WhatsApp business.

After clicking on it, the settings page will open to look for mass message
configuration.

- Batch size allows the user to send mass messages in a batch of
messages to avoid spamming. - Example : If you wish to send 500 messages and if you set a batch
size 15 and Time Interval to 15 minutes. Then it will send 15 messages in each batch based on the Time Interval
calculated below. - Time to send 500 messages = (500 messages / 15 Batch size) * 15
minutes = 500 minutes = 8 Hours Approximately. - Random : Random selection dynamically select any number from 1 to 25
as a batch size when sending message to customer, It means if there is 500 messages to send and Batch Size –
Random than it will send 5 messages in first Batch, 8 messages in a second Batch and so on. - Users can send Bulk/Mass messages from Record List of CRM for
those modules which are enabled from the “Allow module access” feature from WhatsApp configuration page. - In the below image WhatsApp and WhatsApp business both bulk messages
can be sent using highlighted buttons.


- From the Record List Select more than one record then Go To More
> Send WhatsApp message or send Bulk WhatsApp messages to more than one contacts. - Users can send Bulk messages now or any selected date to send
messages according to the time set from the Send now/later option. - The user can place the bulk message on hold by selecting the ‘On
Hold’ checkbox.
WhatsApp Business Configuration
WhatsApp Configuration Management
- Access Setup WhatsApp Business > Gear Icon
- Add/Remove modules for WhatsApp Business
- Add/Remove modules to be integrated with WhatsApp Business to send/receive messages against any phone
number of the module. - In below screen, click on
 to add modules to provide access to display WhatsApp icons to send/receive
WhatsApp messages.

- Select “WhatsApp Business # field” to allow which fields in selected modules to be considered WhatsApp
Business fields.
- Add/Remove modules to be integrated with WhatsApp Business to send/receive messages against any phone
WhatsApp Module/Number Access to User
- Using Single WhatsApp Business # configuration, any user who has
rights given from Setup WhatsApp Business > Gear Icon >WhatsApp Business Configuration Find “WhatsApp Business module/number Access to
user” and Select list of the users to get WhatsApp module access.

General Settings
- This option will be managed from Setup WhatsApp Business >
Gear Icon >WhatsApp Business Configuration Find General Settings.


- In the General Settings you can configure the Country code, WhatsApp
Business Window View, Access to show Unknown Message to non-admin Users, and display the status indicating
whether it is active or not.
Country Code
- This is an important setting before you start using WhatsApp
Business integration. WhatsApp Store phone number with Country Code It means if your phone number is 6308618263
and Country code is +1 then the WhatsApp store number as “16308618263”. If you’ve a record having a phone number
without a country code then follow the instructions below.
WhatsApp Business number without country code in Records
- In this scenario, if you want to apply country code as a prefix to
all “Phone numbers” of all modules where you have to add the country code in the general setting > country
code field in WhatsApp Business configuration page. So whenever a WhatsApp message is sent out from the CRM it
will add a Prefix because WhatsApp requires “Country Code” to send a message to a contact. For example : If the
connected phone number is “987654321” and the country code is “+1” than WhatsApp Business number becomes
“1987654321” - Record with country code as a prefix : If you already save a
record/phone number with country code then In this scenario keep the country code field “Blank”.
WhatsApp Business Window View
- SalesHiker’s WhatsApp Business Integration allows their users to
configure the WhatsApp Business Integration Window in Right to Left view which is mostly preferable in the
middle east countries. SalesHiker by default supports the Left to Right view.
Show Unknown Message
- If a WhatsApp Business message has been sent by a customer whose
number is not in the CRM as a Record and if you want to allow all non-admin users to see those numbers then
enable this feature. So all non-admin users can see those messages by clicking on the Global WhatsApp icon and
see it under “Message from Unknown numbers”.
Active Status
- This option allows you to show WhatsApp status.If you select the
checkbox then it will show your status as active when you are active on WhatsApp otherwise it will not show
anything.
Auto Message Responder
- This option will be managed from Setup WhatsApp Business >
Gear Icon >WhatsApp Business Configuration Find Auto Message Responder

- Auto responder will send the predefined message the first time any
unknown number sends a message. - It is helpful to give answers to messages automatically. It means
you have just written a message which will be sent automatically to the sender. - Customers received messages from auto responder message text
automatically the first time or after 14 days of no activity.
Analytics
To Access this module click on Analytics from the top menu.
Below screen is the main screen of analytics from where different filters can be applied
and get results accordingly.

Send/Receive Statistics
- To check Send/Receive Statistics Go to Analytics and click on ‘Send/Receive
Statistics’.

- Send/Receive Statistics for WhatsApp messages typically refers to data on the number
of messages sent and received over a specific period. This may include:- Total Finished Chat
- Total Pending Chat
- Total Sent Message
- Total Received Message
- Total Message

Total Finished Chat
- “Finished Chat” for last sent message from CRM, “Pending Chat” for last received
message in CRM

Total Pending Chat
- The number of chat sessions that are still open or awaiting a response.

Total Sent Message
- The total count of messages sent from the system to users.

Total Received Message
- The total number of messages received from users.

Total Message
- The combined count of all sent and received messages.

Broadcast Statistics
- To access Broadcast Statistics Go to Analytics and click on ‘Broadcast
Statistics’.

Broadcast Statistics parameters with descriptions:
- Batch Size – The number of messages sent in a single batch during a broadcast.
- Time Interval – The time gap between consecutive message batches to prevent
spam detection. - Your WhatsApp Number – The WhatsApp number used to send the broadcast messages

Chatbot Statistics
- Click on the highlighted button to see Chatbot statistics.

- This Chatbot Statistic option will show total count of “Active Chat” for initiated
chat of all customers, “Finished Chat” of chatbot with customer, “Sent Messages” from chatbot, “Received
Message” in chatbot And “Total Messages” of all sent/received message of chatbot.

WhatsApp – Meta Usage

- WhatsApp – Meta Usage provides a detailed view of all conversations, both free and
chargeable, within the CRM, along with analytics and estimated charges as shown in the below screenshot.

Quick Access

- This is a list of submenus which can be directly accessed from here.

WhatsApp Timeline View
- This menu will redirect to the main page of WhatsApp chat.

WhatsApp Messages
- This will redirect a user to the WhatsApp logs.

WhatsApp Templates
- This option will redirect users to the WhatsApp templates module.

WhatsApp Workflow
- This option will redirect a user to the workflow module where the user can create and
manage workflows.

WhatsApp Bot
- This option will redirect a user to the WhatsApp bot page.

Setup WhatsApp
- This menu will redirect a user to the ‘ WhatsApp Connected Users ‘ page where users
can Setup WhatsApp for more users.

Select From Number
- To see analytics reports of WhatsApp number or WhatsApp business number, select that
number from this dropdown and to see both numbers data select ‘All’ Option.

Duration
- This option allows users to select the duration of the analytics report according to
their requirement. - After selecting one option from the dropdown the report will give the results
according to the selected option.

WhatApp Automation (Workflow)
This module can be accessed from Settings > CRM Settings > Automation >Workflows.
Here the list view of the workflow will be visible.

Here the contact updation workflow is activated.
So if the conditions provided in the workflow met properly then workflow will work and update the contact.

- WhatsApp workflow allows sending Automated WhatsApp messages on the
trigger event of any module link with the WhatsApp module. - To add the new workflow click on ‘New Workflow’ to add the new
workflow.

- After clicking on the button below the screen will be visible.

Add basic details and select the condition on which you want to fire a workflow.

After adding conditions action should be selected .
From here users can select if they want to create a workflow for WhatsApp or WhatsApp business.

More conditions can be added from the above dropdown.
- The WhatsApp workflow can configure the WhatsApp messages to whom we
want to send individually WhatsApp templates to share files or message format, general field, add fields and
message. - In the above workflow whenever conditions will be matched and the
contact get updated the user will get a message on WhatsApp/WhatsApp business.
WhatsApp Business Template
Overview
WhatsApp Business Template helps users to create/manage WhatsApp business templates to send template messages using our
extension.
Features
- You can add a message template in a specific language when creating a template.
- You can create templates with the “Marketing” or “Utility” or Media Card Carousel category.
- You can create templates with various text, media, and interactive components, based on your business needs.
- You can also see Template Message Preview.
- When you send template create requests, Facebook immediately validates its category using Templates Guidelines.
Create WhatsApp Business Template
Users can create a WhatsApp Business Template in two ways.
- Facebook Developer page
- WhatsApp Business Create Template page
Create WhatsApp Business Template From
Facebook Developer page
Users have to go and login to the developer’s Facebook page

Once you login the page click on My App

Once you click on My App the page will look like below screenshot, Click on your SalesHiker App

Once user click on SalesHiker app it will redirect to the App Dashboard, users have to click on WhatsApp in the sidebar
> API Setup

Once user click on SalesHiker API setup it will take user to the API setup page, scroll down to step 2 – To create your
own message template click here

After clicking on the link, it will open the page displaying a list of the created templates.

Click on create template button.

Users have to select the category, name and language of the Creating template.

After selecting the category and language, and entering the template name, the ‘Continue’ button will be enabled, and
the user will have to click on the ‘Continue’ button.

After the user clicks on ‘continue,’ they will be taken to the following page where they can add a header, body, footer,
and buttons to the template.
Users can also preview how the message will be displayed. And at last By clicking the ‘submit’ button, the template will
be created

Once the template is created, it will be submitted to Facebook for approval, and users can view the status of the
created template on the list page under the ‘Status’ column.

Once the template is approved by facebook, Template will automatically sync to the CRM WhatsApp Business Template list.

Category Validation
When submitting a template creation or edit request via API, you must specify a category based on the provided
guidelines. The system will validate your selection and assign one of the following statuses:
APPROVED
Indicates that the category is correct, and the template has passed review. The template is now available for use in
messages. A message_template_status_update webhook will be triggered
with the event set to APPROVED
PENDING
Indicates that the category is correct, but the template is under review. The outcome will be communicated via a message_template_status_update webhook, which will update to either APPROVED or REJECTED.
REJECTED
Indicates that the category is incorrect A message_template_status_update webhook will be triggered with the event
set to REJECTED and the reason specified as INCORRECT_CATEGORY.
Next Steps if Rejected
- Submit a new template with the correct category.
- Update the category manually.
- Request a review.
WhatsApp Template
To Create a WhatsApp template click on WhatsAppTemplate.

After clicking on it below the pop up will be open.

Click on the WhatsApp icon ,list view of the WhatsApp template will be open.

To add a new WhatsApp template click on the button named ‘Add Record’.
After clicking on the button below the form will be open.

Create a WhatsApp Business Template

Regular Template
Regular template used to send template messages to contacts in which conversations have been established.
You can send any templates with text, media or video to promote your business / services / products to contacts to their
WhatsApp number.
WhatsApp Business Template
WhatsApp Business template used to send template messages to contacts in which conversations have not been established.
It means you’ve to first approve templates with WhatsApp and it will take 1-5 days time by WhatsApp to approve
templates.
Once the template has been approved by WhatsApp then only you can send template messages to unknown contacts.
Setup Regular WhatsApp Template
To add Regular Template click on the “Regular Template” widget as shown in the below screenshot.

Fill up all the details for the Regular template & click on the “SAVE” button as shown in the below screenshot.

Setup WhatsApp Business Templates
WhatsApp Business Template Category
- Marketing
- Utility
- Media Card Carousel
To create WhatsApp Business Template click on “+ Add WhatsApp Templates” button as shown in below screenshot.

Click on “WhatsApp Template Approved by Facebook” widget as shown in below screenshot.

Enter all details as shown in the below screenshot.
Template Name: Enter the template name with lowercase, numbers, and underscores.
Category: Select template category.
Language: Select template specific language.
Broadcast Title: Headers are optional components that appear at the top of template messages.
Broadcast Title: Select header type for template.
– If you select Header Type TEXT then Enter the Header Text & you can also add the one variable in the header.
– If you select Header Type Media then you can select Media Type like, (Image/Document/Video) & attach media.
Body: Add body text with variables. To Add Variable in body click on “+ Add Variable” button.
Footer: Enter Footer text. Footers are optional that appear immediately after the body component.
Buttons: Select buttons from button type dropdown. Buttons are optional. It’s an interactive component that
performs specific actions when tapped.
Limitations:
- You can enter template name with lowercase, numbers & underscores & template name field is limited to
512 characters. - Header Media Valid values are application/pdf, image/jpeg, image/jpg,
image/png, and video/mp4 - The body text field is limited to 1024 characters.
- The footer text field is limited to 60 characters.
- You can add a total of 10 buttons in one template.
- You can add a maximum of 2 Visit Website type buttons.
- You can add only one Copy Offer Code type button.
Marketing
The marketing category in WhatsApp Business templates is used for business-initiated interactions to promote products or
services. These templates can help businesses increase awareness, drive sales, and more
Here in the marketing category there are two category types .
- Custom
- Send promotions or announcements to increase awareness and engagement.
- This template is good forWelcome messages, promotions, offers, coupons, newsletters,
announcements - Template areas that you can customiseHeader, body, footer, button
- Flows
- Send a form to capture customer interests, appointment requests or run surveys.
- This template is good for Sign-ups, promotions, surveys, appointments
- Template areas that you can customiseForm, body, button
Custom
Create Custom Template :
During the creation of flow templates, certain fields must be completed to ensure proper configuration. These fields
include:
- Language: Select the preferred language for the template to ensure it aligns with the audience’s
linguistic needs. - Modules: Specify the relevant modules associated with the flow template to categorize or streamline its
functionality. - Broadcast Title and Details: In a separate section, provide:
- Broadcast Title: A concise and clear name for the broadcast to
identify its purpose. - Details: Additional information or description to elaborate on the
intent or context of the broadcast.
- Broadcast Title: A concise and clear name for the broadcast to
Steps to Create a New Marketing Template using custom template type.
- Template Name: Enter a unique name (no spaces or capital letters).
- Template Category: Select Marketing.
- Template Type: Choose Custom .
- Language Selection:Select the desired language.
- Select Module: Select Module for which you want to create this WhatsApp business template.
- Broadcast Title: This is optional if the user wants to Show their company’s name or anything that can be
entered here. - Media Upload: Add images for each card.
- Enter a message in the body which you want to send to any user through this template.


Message Preview will be displayed as mentioned in below screen.

To send template create requests on Facebook side click on “Save & Send” button as shown in below screenshot.

Once you click on ‘Save & Send,’ a request will be sent to meta for template approval. Until it is approved, the
status will be shown as ‘Pending.

Once it is approved by Meta, the status will be updated to ‘Approved.’

You can also edit the template from listview as shown in the screenshot below.

You can view the template if it has been rejected by Meta, as shown in the screenshot below.

Flow
Steps to Create a New Marketing Template using Flow template type.
- Template Name: Choose a unique name (no spaces or capital letters)..
- Template Category: Select Marketing.
- Template Type: Choose Flow Template .
- Language Selection:Pick the preferred language.
- Flow Structure:
- Welcome Message: Greet the user and introduce the offer or campaign.
- Media Cards: Display product images, descriptions, and pricing.
- Interactive Buttons:
- Quick Reply: (“Show More Offers,” “Book Now”).
- URL Button: (“Shop Now,” “View Website”).
- Follow-Up Message: Send a reminder or discount offer if no response.
- Media Upload: Add images, videos, or documents for a richer experience.
- Confirmation Message: Acknowledge the user’s choice and provide the next steps.
- Save & Submit: Meta will review the template for approval.
These fields are integral to structuring an effective and user-friendly flow template.

In the screenshot below, the detailed view of the flow is displayed.
This view showcases all the information entered by the user during the flow creation process. It includes key details
such as the message body, recipient fields, and any specific parameters or customization added. This summary provides a
comprehensive overview, ensuring that the flow setup aligns with the intended configuration.


The highlighted message corresponds exactly to the message content displayed in the “Body” section and the “WhatsApp
Message to Send” fields in the detailed view of the WhatsApp template. This ensures consistency between the template
details and the actual message received in the chat. The recipient can view the intended message as formatted and
structured during the template creation.

The received flow template message will appear on the recipient’s side in a clear and structured format. It will display
all the relevant information as entered by the sender, ensuring easy readability and accessibility for the recipient.
The design will maintain consistency with the sender’s message flow while adapting it for seamless viewing on the
recipient’s end.

As displayed in the screenshot above, there is a button labeled ‘View Flow’. By clicking on this button, the user
will be directed to the screen shown below.
On this screen, the user will be required to fill in their details, including Name and Email. Once the
information is entered, the user can proceed by clicking on the ‘Continue’ button to move to the next step. This
ensures the system captures essential user details for further interaction or communication.

After clicking the “Continue” button, the user will be directed to the next screen, as shown below.
In this screen, the user will be prompted to select their areas of interest by checking the boxes next to their
preferred topics. Once the user has selected their interests, they can click the “Confirm” button to submit their
response. This step ensures that the user’s preferences are captured for personalized recommendations or further
actions.

Once the user clicks on the “Confirm” button, the system will generate a response in PDF format. This PDF will contain
all the details submitted by the user in the form, organized in a clear and professional layout. The content of the PDF
will match the data displayed on the confirmation screen, ensuring accuracy and completeness. The user can then download
or view this PDF as shown in the accompanying screenshot.

The response will display the information entered by the user in the form. This includes all the fields filled out by
the user, such as name, email,and interested areas provided. The displayed details will be formatted in an organized
manner, reflecting the exact entries made during the form submission process. This ensures transparency and allows for
review or confirmation of the submitted data.

Note: Flow category type message only be displayed in mobile WhatsApp, it will not be displayed in Web WhatsApp view.
Media Card Carousel
A WhatsApp Carousel Template lets businesses showcase multiple products, offers, or services in a scrollable format.
Each card includes an image, title, description, and call-to-action (CTA) buttons (e.g., “Buy Now” or “Visit Website”),
making it easy for users to explore options and take action. It’s perfect for displaying different product angles,
variations, or collections, creating an engaging and seamless shopping experience within WhatsApp.
The goal of this setup is to create a highly interactive and engaging experience for WhatsApp users, allowing them to
click on buttons, view images, and interact with content dynamically.
Key features of this interaction include:
- Horizontal Scroll: A scrolling functionality is available within the chat.
- Navigation Between Offers: The user can click on the horizontal scroll buttons to view previous
and next offers conveniently.
This design ensures an interactive and seamless browsing experience for users to explore multiple offers within the same
chat interface.
This guide provides step-by-step instructions on how to create and submit a Carousel Template message. Once
submitted, Meta will review and approve the template within a few seconds.
Steps to Create a New Media Card Carousel Template
- Template Name: Enter a unique name (without spaces or capital letters).
- Template Category: Choose Media Card Carousel.
- Language Selection: Choose the preferred language.
- Add Cards: Include multiple cards with text, images, and buttons.
- Buttons:
- Quick Reply: Predefined responses (e.g., “Book Now”).
- URL Button: Clickable links (e.g., “Explore More”).
- Textbox: Enter template text to guide users.
- Media Upload: Add images for each card.
- Click on Save & Send.

Send Media Card Carousel Template Message Preview as shown in the screen below.

When a user receives the message, it will be displayed as shown in the screen below.


Utility
Here in the Utility category there are two category types .
Custom
- Send messages about an existing order or account.
- This template is good for Order confirmations, account update, receipts, appointment
reminders, billing - Template areas that you can customise Header, body, footer, button
The highlighted message demonstrates the Utility category with a Custom message type.
Flow
- Flow Message is a new interactive message type introduced by WhatsApp that allows
businesses to create multi-step, interactive forms inside WhatsApp chats. - Send a form to collect feedback, send reminders or manage orders.
- This template is good for Customer support, surveys
- Template areas that you can customise Form, body, button It enables:
- Seamless two-way interaction
- Multiple question forms
- Dropdown selections
- Button-based navigation
- Payment collection
To create a custom WhatsApp message template in the Utility category, follow these steps:
Steps to Create a Utility Custom Template:
- Template Name: Enter a unique name (without spaces or capital letters).
- Template Category: Select Utility.
- Template Type: Choose Custom Template.
- Language Selection: Choose the preferred language.
- Template Structure:
- Header: Add a title (optional: include an image, video, or document).
- Body: Main content of the message (e.g., transaction details,
appointment updates). - Footer: Additional information or disclaimers (optional).
- Buttons:
- Quick Reply: (“Confirm,” “Need Help,” “Cancel Request”).
- Call-to-Action (CTA) Button:
- URL Button:(“View Order,” “Track Shipment”).
- Phone Button: (“Call Support”).
- Media Upload: Attach images, receipts, or documents if required.
- Click Save & Submit: Meta will review and approve the template.


And the received message will be displayed as shown below.

To create an effective WhatsApp message template for the Utility category with a flow type, follow these steps:
Steps to Create a Utility Flow Template:
- Template Name: Enter a unique name (no spaces or capital letters).
- Template Category: Select Utility.
- Template Type: Choose Flow Template.
- Language Selection: Pick the preferred language.
- Flow Structure:
- Welcome Message: Acknowledge the user’s request (e.g., order tracking,
appointment updates). - Quick Reply Options: Allow users to select their required service.
- Media Cards (if needed): Additional information or disclaimers
(optional). - Call-to-Action (CTA) Buttons:
- Quick Reply: (“Track Order,” “Reschedule Appointment”).
- URL Button: (“View Details,” “Chat with Support”).
- Final Confirmation: Confirm completion of the process or provide
further assistance.
- Welcome Message: Acknowledge the user’s request (e.g., order tracking,
- Media Upload: Attach receipts, tickets, or relevant documents if necessary.
- Click Save & Submit: Meta will review and approve the template.

To create flow type utility template messages, users have to create flow in meta , once it is published from meta user
can use existing flow.

To Send Utility flow type message, the user has to click on template “WhatsApp Business Icon” to select template and
send.

Sent Utility flow type will be displayed as mentioned in below screen.

When a customer receives a utility flow type to share feedback, a message will be displayed as below screen.

Users can enter detail in feedback form and click on continue to next feedback for rating.

The following screen demonstrates the selection of ratings.

Selected ratings will be highlighted with green text.

Once feedback is submitted, it will be displayed as below.

When the user clicks on the “Share Feedback” button, it will show submitted feedback.

How to Use WhatsApp Chatbot?
WhatsApp chatbot for SalesHiker is Automated tools along with manual send/receive message to WhatsApp contact from
SalesHiker.
How to Setup a WhatsApp Chatbot?
To access WhatsApp bot click on WhatsApp Bot in the top navigation bar.


To Access bot for WhatsApp click on below icon.

Clicking on this WhatsApp icon from the bot pop up below screen will appear.
In this WhatsApp bot screen the list of WhatsApp bot will be visible.

Creating a New Bot

When you click on the “Add New Bot” button, you have two options to create a bot:
- Select from Existing Bot Templates
- A list of pre-designed bot templates will be displayed.
- Browse through the available templates and select one that fits your needs.
- Once selected, proceed with customization and configuration.
- Create a Bot from Scratch
- Click on the “Add New Bot” button again.
- Enter the required details, such as bot name and purpose.
- Configure the bot settings as per your requirements.
After completing the setup, your bot will be created and ready for use.
- Users can edit, duplicate and delete WhatsApp Bot by clicking on related icons.
- Users can view the chat for that flow by clicking on the Chat log according to Bot ID.
- Chats display the total numbers of the message conversations for that bot from different
numbers. - Users can see the modified date and time of the conversation for the flow which is displayed
in the Date of conversation column.

Search in WhatsApp Bot Listing
- Users can edit, duplicate and delete WhatsApp Bot by clicking on related icons.

How to Create a Chatbot Button?
- Users can design a WhatsApp Chat button to place on your website integrated with the WhatsApp
ChatBot.

- Users can create a Chatbot button for their website by clicking on the WhatsApp Bot
Settings icon > WhatsApp Chat Button > WhatsApp Bot Button Setting.
Keywords
- Keywords are used to initiate a bot.
- Multiple bot can be activated simultaneously so the user can initiate multiple bot by entering
keywords. - For example , When a customer sends a message ‘Hi Education’ – then Education bot will
initiate. - When a customer sends a message ‘Hi Real State’ – then the Education bot will initiate. so on
for other industries .


- Users have to fill in all the required details to design the Chatbot button and select the
scanned number and save it.

- After that users have to copy that script and paste it to their website where this Chatbot
button is required to display.

How to use WhatsApp Bot template?
- Users can use template from the created bot by clicking on the “Add New Bot” button, and
selecting available template. - You can use predefined templates offered by the SalesHiker team for WhatsApp. You’ve 2
options: either Create Bot from Scratch or Select template for available WhatsApp Bot.
By clicking on ‘Add New Boat’ below the screen will be open.

- Select the “Assigned To” user, and that user scans the WhatsApp number.

- “Select Number for Bot” drop list will show the scanned WhatsApp number of the user
according to the “Assigned To” user. - Select WhatsApp Number for bot from “Select Number for Bot”.
- “Select Number for Bot” drop list will show a scanned number which is accessible to the user.
- Enter Bot Name.
- Add Start Node for designing bot flow
- Create Flow by using Question/Response, CRM Action, and Variables according to your business
requirement. - Connect End Node for designing bot flow
- Save Bot By clicking on the “Save” button.

- Enable Bot for connected WhatsApp number.

Note: WhatsApp Bot will enable only for those users who have rights to scan
selected WhatsApp numbers from Setup WhatsApp > Gear Icon![]()
Keywords
Key words can be added to bot which can be used while users want to search any bot by the keyword.

How to Build/Design Flow for WhatsApp Chatbot?
- Users can set the flow according to the requirements for the Bot.

Basic:
- Start: Use this node when you start designing the Bot flow.
- End: Use this node when you end designing the Bot flow.

NOTE : Bot must start with a choice question.

Question/Response:
- With this feature, users can set various types of questions in flow to ask customers.
- Add a Condition to check it against a response from a customer in Bot.
Question/Response Action Settings:
- Quick Actions for Added Questions/Responses and CRM Actions:
- Users can edit, delete, and create duplicate questions/responses and CRM actions added
to the bot by click on the icons shown below
- Users can edit, delete, and create duplicate questions/responses and CRM actions added

- Text/Response:
- Message Type:
- Regular message – This is a regular message type format sent to
customers from the Bot. - WhatsApp Response – This message type will display responses to
customers in WhatsApp format.
- Regular message – This is a regular message type format sent to
- Copy from Variables: Select variable to add or copy to the message which
converts to actual value when sent message to customer. - Response Text/Question: Type a message as a response or ask a question to the
customer. - Format: Select any format like text, number, email and date for response.
- Note: To validate NUMBER, EMAIL, DATE format, you can use same
name variable in English as “number”, “email”, “date”
- Note: To validate NUMBER, EMAIL, DATE format, you can use same
- Response file: Send an Image as a response to the customer along with text.
- Response copy to variable: Copy the customer’s answer to the question from bot
to variable, which can be used to store in CRM or reply to a customer on various stages of Bot flow.

- Message Type:
- Choice Question
- Message Type:
- Regular message – This message type will display responses to customers in
WhatsApp Regular format. - Question/Response: Add a question for the flow according to your choice.
- Add Option: Add an option for the question according to your choice.

- Condition: User can add condition for the question if it’s true then it will fire the value which is set.
- Variable: Select a variable like number, email, date or description for the
value. - Condition: Select the condition for the question like a value equal to Apple
etc. - Enter Value: Enter value according to variable type selected.

- Variable: Select a variable like number, email, date or description for the
- Transfer condition:When the user selects the Transfer condition, the bot will transfer the chat to an
agent and switch from robotic to manual mode.
CRM
- CRM Action: With CRM Action, you can create/search and update records to or from CRM.
- CRM Action Setting:
- Select an Action: Select an Action should allow the user to select
various operations on CRM.- Create a Record – It allows you to create records in
CRM from responses from the customers. - Search a Record – It allows you to search records from
CRM from the value passed to the CRM field. - Update a Record – It allows you to update an existing
record in the CRM with the values the user has set to update in the bot.
- Create a Record – It allows you to create records in
- Modules: Select a module to search/create/update a record to or from
CRM. - Assign value to SalesHiker fields to create/search/update:
- SalesHiker field—Select SalesHiker fields to copy value
to SalesHiker fields from available variables. - Saved variables—Select available variables used to
store the customer’s input from the chatbot’s questions.
- SalesHiker field—Select SalesHiker fields to copy value
- Save variable (Response) from the SalesHiker field: On
create/search/update on CRM, it will return the selected field value to the customer to
be displayed in the WhatsApp bot.
- Copy to variable—Select variable type as name, email,
date, or description for copy variable. - Copy from SalesHiker Field—Select fields for copying
variables from the SalesHiker field.
- Copy to variable—Select variable type as name, email,
- Select an Action: Select an Action should allow the user to select
- CRM Action Setting:

- Variables: Variables used to copy answers from customers using bot like their
name,email, phone etc. This will be used to map with respected CRM fields to Add/Search To or From CRM.

Add Variable Pop-up:
- Variable Name: Enter name for Variable
- Description: Enter Description for Variable

- In the final response, the user has the option to print a response for all UI types included.

- Users can Clear all the added actions by clicking on the Clear option and also duplicate the
created Bot from the Flow Builder. - Zoom In and Zoom Out buttons are also there for the flow builder.
- Save or Cancel the Created bot by clicking on the save or cancel button

Limitations of WhatsApp Business Chatbots
- When designing a WhatsApp chatbot using a flow builder, it’s essential to be aware of
the platform’s limitations regarding interactive elements like buttons and lists:- Buttons:
- Maximum Number: You can include up to 3 reply buttons in a single message.
- Character Limit: Each button’s text is limited to 24 characters.
- Lists:
- Options Limit: A list message can contain up to 10 options.
- Selection: Users can select only one option at a time from a list message.
- Buttons:
- When you click on the radio button, the bot will disconnect. Additionally, if the scan
number is disconnected, the status will show as ‘Disconnected’.

How to Convert Chat to Manual / Robotic Mode?
- Clicking on this will stop automatic conversation from the Bot to the selected customer
number. - If Chat is initiated for any number, then only the Chatbot icon will be displayed on the Chat
timeline screen. Otherwise, the Chatbot icon will not be displayed.

- If the initiated Chatbot flow ends with the conversation for the number, then the Chatbot icon
will disappear for that number from the Chat timeline screen. And again if the user starts a conversation via
Chatbot flow then the Chatbot icon will appear again for that number.

Bot Ideal Time
- This option will work if the user selects 5 minutes as Bot Ideal Time and Conversation mode is
in Manual mode and if the user is not sending any new message within 5 minutes from last sent message then
Conversation mode will change to Robotic mode automatically. - User can set Bot ideal time from Set Up WhatsApp > Gear Icon in WhatsApp configuration go to general settings .Look for Bot ideal Time.
- Note: It will automatically enable Robotic mode if the difference b/w Send Message
from CRM and receive message is more than Bot Ideal Time.

How does WhatsApp Chatbot work?
Note: It must be activated for Multiple WhatsApp Numbers for users.
- Users can activate or in-active WhatsApp Bot by clicking the ON/OFF button accordingly.
- Users can also sort Bot Names alphabetically.

How does the WhatsApp Chatbot for the Support team work ?
- Activate “Support Bot” to connect your WhatsApp Number.

When you start messaging as “Any message”, Bot will auto-respond according to the flow.

- Select the “Support” choice as its set flow for that.

- Enter Name, Email and Phone Number, that will create contact according to the details you
entered detail as its set CRM Action in flow.

- Enter your choice “To create a new ticket” or “Status of existing ticket”.

- If you select “Create New Ticket” by entering number as 1 will ask to describe your concern.
- It will create a ticket in CRM against your concern.


- Or If you select “Status of your existing Ticket” by enter number as 2 will ask you to enter
the ticket number to show ticket status.
 by
by