Mail Manager
Mail Manager is an integrated email client that allows you to automate and perform CRM related actions on the incoming emails. It helps you create Leads, Contacts, Organizations, Tickets, and To Dos etc. from the emails that you receive in your inbox. Should sender’s email ID match with a record in SalesHiker CRM, you can perform more actions like, attaching emails, Adding To do, Comments and Ticket. Additionally, you can manage composing, replying, forwarding emails etc. In short, SalesHiker CRM Mail Manager provides an excellent feature using which you can can create new records automatically from the email and update the existing ones.
How to Configure Mailbox in SalesHiker CRM?
Go to the main menu and select Mail Manager

While accessing it for the first time, it will take you to the configuration page. From here user can configure the mailbox.

Once, user clicks on the configure mailbox, it prompts them to select an email provider to receive all emails right in your SalesHiker CRM. If the email provider is either Gmail, Yahoo, or Fastmail, then mail server name will be automatically populated. Otherwise, you will have to provide server name or IP address manually.
Follow few simple instructions to configure the email provider settings:
- Click Mail Manager tab and select either setting or configure mailbox (in case you are using it for the first time)
- Under Settings tab, Select your email provider
- Mail Server Name will be automatically populated for Gmail, Yahoo and Fast mail
- Provide your user name and password
- Provide Refresh time
- Click Save

Next step will be entering the mailbox information:
Note : If your mailbox is not configured yet, you’ll be navigated to Settings. In case if you’r mailbox is already configured, you can find Settings in the left.
If your email provider name is not listed (Eg: Aol), click on Select Organization Type drop-down and select Other

- Click Settings tab, click Select Account drop-down and select Other
- Provide Mail Server Name or IP (Eg: imap.aol.com for Aol) (for outlook the server name will be: smtp-mail.outlook.com)
- Enter the User name (the email address)
- Provide the password. In some cases, it will use the app password instead of the regular passwords
- Select protocol supported by your email provider
- Click Save
Heads up!
SalesHiker CRM only supports IMAP. POP3 is not supported yet.
Create new records from emails
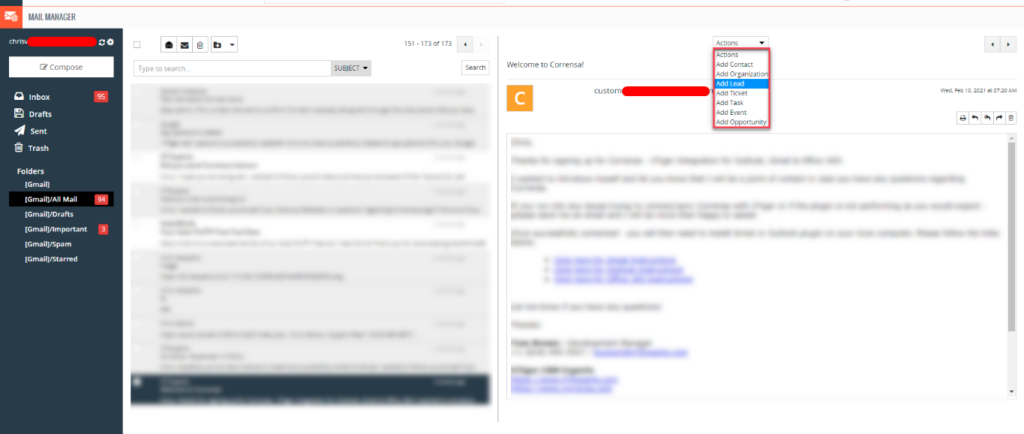
If the sender’s email doesn’t match the email field of any of the existing records in SalesHiker CRM, you can create new Contact, Lead, Organization etc. from the email.
Follow few simple instructions to create records from the received emails
- Click on your email to open
- On the right side of page, under Related Records, look up is made basing upon email id
- If email does’t match, click on Actions drop-down
- Click on either Add Leads or Add Organizations or Add Contacts or Add Tickets
- Modify values in the pop up, if necessary
- Click Save

Update existing record from Email
If email matches with the existing record in your SalesHiker CRM, you can associate a To do, Ticket, add a Comment, or attach an email to the record.
Follow few simple instructions to update record from within your email
- Click on your email to open
- On the right side of page, under Related Records, look up is made basing upon email id
- If email matches, click on Actions drop-down
- Click on either select Add To do, Add Ticket, Add Comment or Attach Email
- Modify values in the pop up, if necessary
- Click on Save button

More Actions
Apart from managing operations on incoming emails, you can perform more operations like sending out emails, replying and forwarding emails, searching, grouping all emails sent from SalesHiker under different folders, saving drafts etc. Custom filters in your personal email account will also be displayed. You can move emails in and across those folders.
Sending out emails
Follow few simple instructions to send out emails from Mail Manager
- Click Mail Manager tab
- Click Compose
- Enter recipient’s email in To Field. Click on folder next to To field to search for email ids across records in SalesHiker CRM
- You can also attach files to your email. Click Upload to attach files from your machine, click Select Documents to attach files saved in your Documents module.
- Click Save Now to save your email in Drafts. You can send out those emails later.
- Click Select Email Template to populate previously saved email templates
- You can also have rich text, images, tables etc in email body
- After composing email, click Send
Heads up!
- You will have to first configure your Outgoing Server before sending out emails from Mail Manager
- Emails will be sent from your personal email id in My Preferences.
Sent Mails
All the emails that will be transferred from SalesHiker CRM will be displayed under Send Mails. It groups emails sent to Leads, Contacts, Organizations and Users under different folders. Emails sent from the CRM can be seen under Reports > Email Reports folder.
Also, in Mail Manager Settings, you can choose which folder in your email account, do you want to copy the sent mails to.
Heads up!
The emails displayed in Sent Mails will not necessarily be sent from Mail Manager. Emails that were sent through any email sending channel in SalesHiker CRM will be displayed in Sent Mails, depending upon if this configuration was made at the beginning.
Importance
Mail Manager is an absolute vital necessity for your SalesHiker CRM, it helps you with.
- Introducing automation to your CRM.
- Reducing the manual labor.
- Run automations on the basis of the emails received.
- Saves time.
- Updates existing records and creates new.


